For too long, curly hair was treated as a problem to be solved rather than a gift to be celebrated. When it comes to updos, many curlies fall back on the same tight, slicked-back bun out of fear that their texture might look “messy” or unruly. But the truth is exactly the opposite: curls provide the natural volume, grip, and intricate detail that straight hair can only achieve with pins, backcombing, and extensions.
Whether you have loose waves, tight coils, or something in between, a curly updo is your opportunity to turn your texture into architecture. From romantic date-night styles to powerful red-carpet statements, these 11 ideas will work with your curl pattern—not against it. No frizz-shaming, no flat-ironing, and no fighting your natural texture. Let’s dive in.
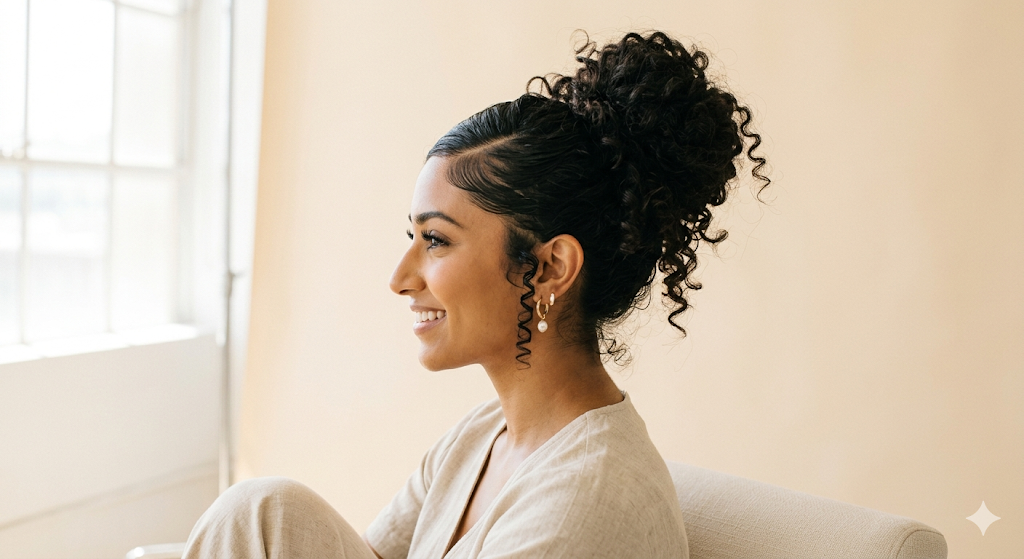
1. The Pineapple Puff (High & Loose)
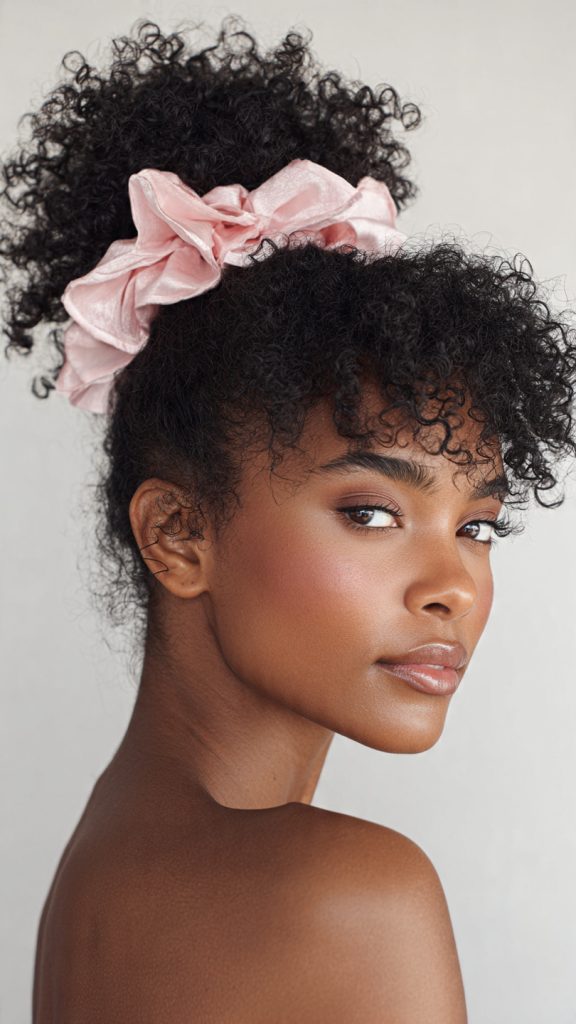
Best for: Type 3A–4C, second or third-day curls
The pineapple puff is the ultimate lazy-girl updo that somehow looks intentional. Gather all your hair to the very top of your head—right around your hairline—and secure it with a silk or satin scrunchie. The key is not pulling the ends all the way through on the last loop, leaving a fat, rounded puff that spills out like a blooming flower.
Pro tip: Leave a few face-framing curls out and define them with a drop of oil. For extra height, use two scrunchies stacked together.
2. The Curly French Twist (Fake-Out Version)
Best for: Medium to long hair, Type 2B–3C
A true French twist is tricky on curls because they refuse to lie flat. Instead, create the illusion: Sweep all your hair to one side, twist it upward vertically along the back of your head, and tuck the ends under. Secure with two long spiral pins (U-shaped pins work better than bobby pins for curly texture). The natural spring of your curls will hold the shape without needing a single bobby pin grid.
Why it works: Curls lock into each other like Velcro, so the twist stays put without hairspray cement.
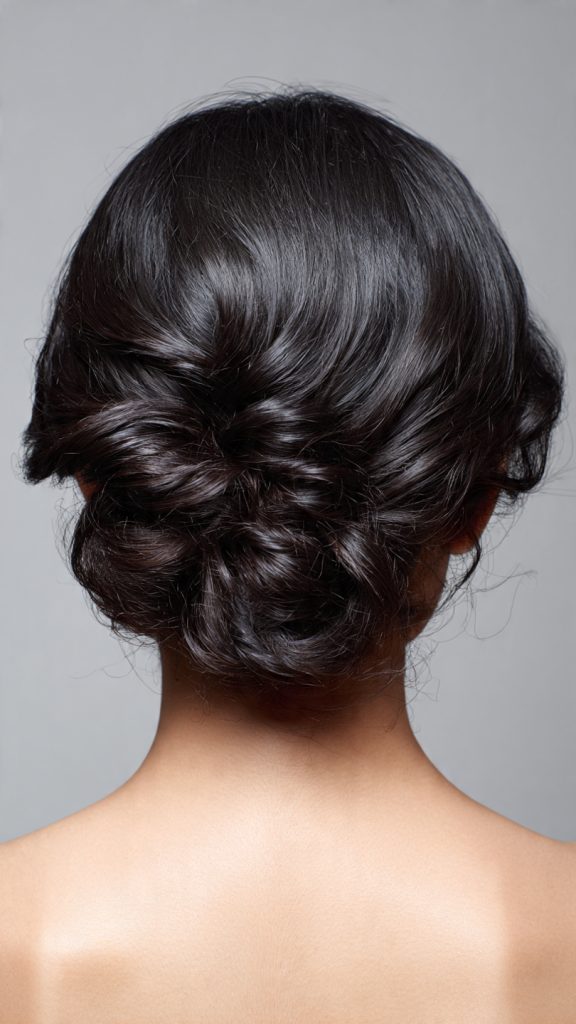
3. The Low, Knotted Chignon
Best for: Shoulder-length to long curls, formal events
This style looks complex but takes under three minutes. Pull your curls into a low ponytail at the nape of your neck. Divide the ponytail into two sections, tie them into a loose knot (like the first step of tying a shoelace), then tuck the ends over and under the knot. Pin any stray pieces flat against your head.
Variation: For a more organic look, don’t hide the ends—let a few curly tendrils poke out like ivy around the knot.
4. The Curly Space Buns (Double Buns)

Best for: Festivals, gym sessions, or any “fun” event
Part your hair down the middle. On each side, gather hair up toward your crown and twist it into a small bun. Because curls have volume, even a tiny bun will read as substantial. Leave the lower half of your hair (from ears down) loose or pin it up—both work.
Why it’s genius: Space buns hide uneven shrinkage. If one side of your head always curls tighter than the other, nobody will ever notice.
5. The Sleek Front, Voluminous Back Combo
Best for: Weddings, galas, or any updo that needs to last 8+ hours
Apply a strong-hold gel or mousse to your front edges and smooth them down with a boar-bristle brush into a side or middle part. Pin that smoothed section flat against your scalp. Then, completely ignore the back of your head—gather the remaining curls into a wild, oversized bun or pouf. The contrast between sleek discipline and curly freedom is incredibly editorial.
Pro tip: Use a satin scarf to tie your edges down for 10 minutes before pinning. That gives you glass-like sleekness without heat.
6. The Curly Crown Braid (Pull-Through Braid)

Best for: Type 2B–3C, when you want a braided look without actual braiding
Instead of a traditional three-strand braid (which often frays on curls), make a “fake” braid: Section your hair into three big clumps. Instead of crossing strands over each other, simply pull each clump up and through the middle. This creates a braided shape that showcases each curl clump individually. Once complete, wrap the whole thing around your head like a crown and pin.
Visual effect: It looks like a intricate Celtic braid but takes 60% less time.
7. The Pin-Curl Updo (Using Your Own Curls as Pins)
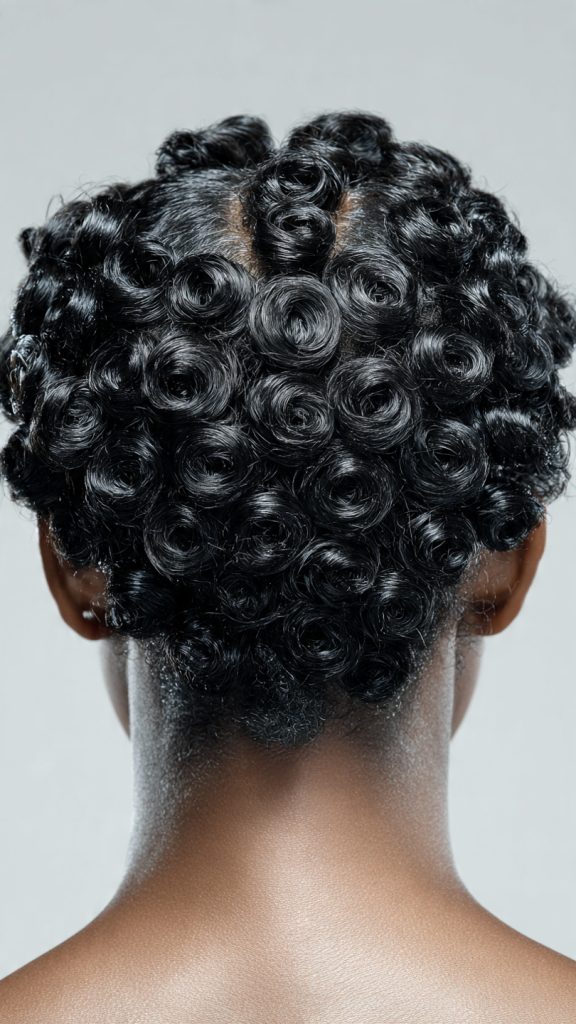
Best for: Type 3B–4C, shorter curly hair (chin to shoulder length)
This is an advanced move but a showstopper. Instead of using bobby pins, take individual curl clumps, coil them into a flat spiral against your scalp, and pin them with their own ends tucked underneath. Layer these pin curls all over your head, overlapping slightly. The result looks like a mosaic of rosettes.
Who this is for: People with naturally defined curl clumps that hold a spiral shape without product. If your curls fall out easily, skip this one.
8. The Half-Up Curly Waterfall
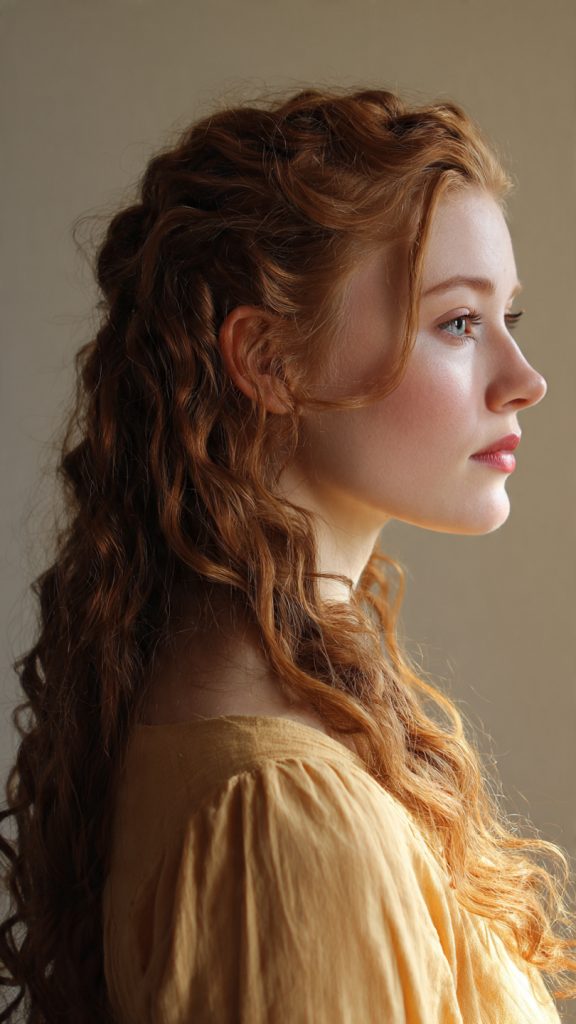
Best for: Long curls, romantic or bohemian vibes
Take the top half of your hair (from the temples up) and secure it loosely at the back of your crown with a claw clip or pins. But here’s the twist: before pinning, gently pull a few individual curls out of the gathered section so they cascade down over the secured part. The pinned section acts like a dam, and the fallen curls become the waterfall.
Styling note: This works best on wash-day curls with good slip. Day-old curls tend to grip too much and won’t fall naturally.
9. The Curly Gibson Tuck (Vintage-Inspired)
Best for: Type 2A–3A, medium length, vintage or officewear
Roll your curls inward from the bottom up, as if you were putting them into a very low ponytail but stopped halfway. Once the roll is tight against your nape, fold the whole thing upward and pin it flat against your head. The visible roll should look like a smooth, tucked pillow of curls. Edwardian vibes, zero heat.
Caution: This requires some length—at least armpit level when stretched. Shorter curlies will end up with a mini tuck, which is also adorable.
10. The Messy Bun (But Intentional)
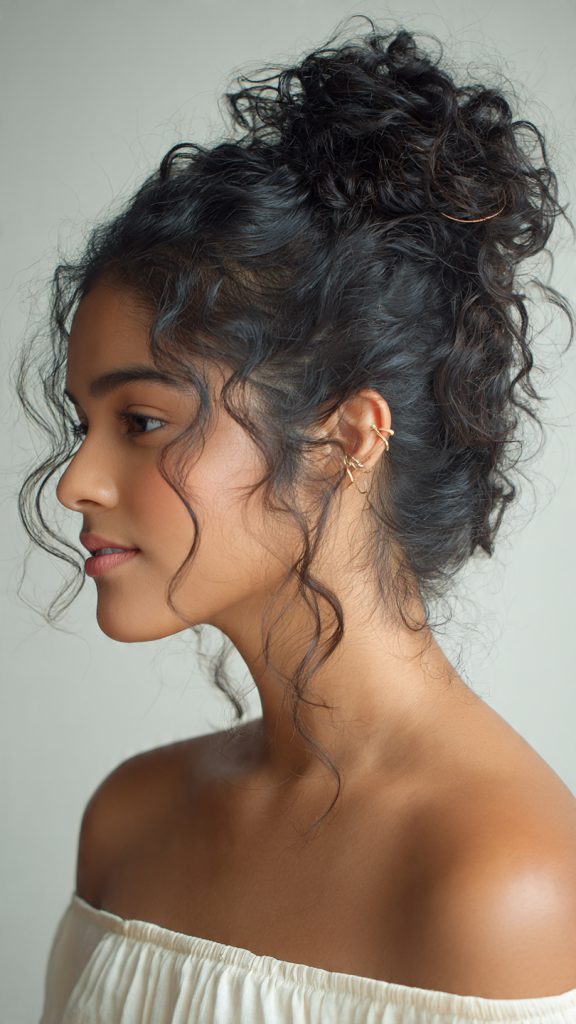
Best for: Every curl type, every day
The universal favorite, but done right: Do not brush your curls. Do not smooth them. Simply gather everything into a high ponytail, twist loosely, and coil into a bun. Now—and this is critical—pull out at least 10–15 individual curls from the bun’s perimeter so it looks exploded. Then take two bobby pins and pin nothing—just weave them into the bun as decoration.
The rule: If your messy bun looks like you tried, it’s wrong. If it looks like you gave up halfway through, it’s perfect.
11. The Tucked-In Bob (For Shorter Curls)
Best for: Type 3B–4C, chin-length or shorter, growing out a curly cut
If your curls don’t reach a ponytail yet, use the “tuck and pin” method. Apply a little gel or curl cream, then use small duckbill clips to tuck the ends of your curls under themselves all around your head. The goal is to create a rounded, faux-bob shape that sits just above your shoulders. It’s not a traditional updo, but it lifts the hair off your neck and gives a completely new silhouette.
Why you’ll love it: This is the only “updo” for short curls that doesn’t require a single elastic or scrunchie. Just clips and creativity.
Before You Start: Essential Prep for Curly Updos
Curly updos fail for one reason 90% of the time: dry hair. Unlike straight hair, which can be pulled back at any texture, curls need specific preparation to hold shape without frizzing or collapsing.
The Night Before (Highly Recommended)
- Sleep on a satin or silk pillowcase (or wear a satin bonnet). This preserves your curl clumps and reduces friction that leads to frizz.
- If your curls are flattened, refresh with a water-and-conditioner spray bottle. Do not brush dry curls—ever.
On the Day (15 Minutes Before Styling)
- Apply a lightweight mousse or curl cream to damp hair. Avoid heavy oils or butters—they make curls too slippery to pin.
- For sleek edges (as in idea #5), use a gel with medium hold. For volume-focused styles, use nothing at all or a salt spray.
- Detangle only with your fingers or a wide-tooth comb while hair is wet. Dry detangling destroys curl patterns.
The Tool Kit You Actually Need
- Satin scrunchies (no elastic bands—they snap curls)
- U-shaped hair pins (better than bobby pins for thick or curly hair)
- Duckbill clips (for sectioning and the tucked-in bob)
- A small spray bottle with water
- A soft bristle brush (only for edges, never for the whole head)
What to Avoid
- Hairspray with alcohol (dries curls out within an hour)
- Fine-tooth combs (cause frizz and breakage)
- Pulling hair too tight (curly hair is fragile; tension leads to traction alopecia)
How to Adapt Any Updo for Your Curl Type
Not all curls behave the same way. Here is a quick cheat sheet to modify any of the 11 ideas for your specific texture.
| Curl Type | Characteristics | Adaptation Strategy |
|---|---|---|
| Type 2A–2B (loose waves) | Falls flat easily, low volume | Use mousse for grip. Add a texturizing spray before pinning. Curls may slip—use more pins than you think. |
| Type 2C–3A (defined S-curls) | Medium volume, good hold | Most versatile type. Almost all 11 ideas work as written. Focus on keeping ends hydrated. |
| Type 3B–3C (tight corkscrews) | High volume, high shrinkage | Embrace shrinkage as volume. For buns, use two scrunchies. For braids, use the pull-through method only. |
| Type 4A–4B (coils and zigzags) | Very high shrinkage, dense | Pineapple and pin-curl styles work best. Avoid styles that require length (Gibson tuck is difficult). Use water generously. |
| Type 4C (tight zigzag without defined curl) | Most shrinkage, most fragile | Focus on protective styles. The pineapple puff and tucked-in bob are ideal. Always use satin accessories. |
Shrinkage note: If your curls shrink by 50% or more, stretch them gently with your fingers before pinning. Never use heat for this—just water and tension.
Products That Work (And Ones That Don’t)
Approved for Curly Updos
- Eco Styler Gel (for edges and sleek fronts)
- The Doux Mousse Def (for volume and hold without crunch)
- Pattern Beauty Curl Gel (medium hold, no flakes)
- Ouidad Advanced Climate Control (anti-humidity for outdoor events)
- SheaMoisture Coconut & Hibiscus Curl Mousse (lightweight, good for fine curls)
Avoid for Updos
- Heavy butters (Shea butter, cocoa butter) – too slippery, pins fall out
- Coconut oil alone – no hold, just shine
- Drugstore aerosol hairspray – contains drying alcohol
- Cream-based leave-ins applied same-day – weigh curls down before pinning
The One Product You Don’t Need
Hairspray. Seriously. Curly hair grips itself. If your updo won’t stay, you need more pins or better preparation, not more spray.
How to Make Your Curly Updo Last All Day (Or Night)
Curly updos have a reputation for falling apart by hour three. That reputation is earned—but avoidable.
The 4-Hour Rule
Within four hours of styling, your curls will naturally relax and expand. Plan for this by building “give” into your updo. If you pin everything too tight at hour zero, you’ll have escapees by hour four.
The Pin Placement Secret
Don’t push pins straight into the bun. Instead, weave them in parallel to your scalp, catching a few hairs from the bun and a few from your head. This creates a hinge rather than a spear.
The Emergency Refresh Kit (Keep in Your Bag)
- 3–4 extra bobby pins (U-shaped pins for thick curls)
- A mini satin scrunchie (for mid-event pineapple conversion)
- A drop of jojoba or argan oil on your fingertip (to smooth flyaways, not re-wet)
When to Give Up and Redo
If your updo starts looking more like a bird’s nest than a style after five hours, don’t fight it. Pull the pins out, finger-comb, and redo a simpler style (the pineapple puff or messy bun) in 90 seconds. No one will know.
Conclusion
Curly updos are not about forcing your hair into a shape it doesn’t want to take. They are about revealing the shape that was already there—the natural architecture of your curls, the volume that straight-haired people spend hours trying to fake, the texture that tells the world you aren’t afraid of a little spring in your step.
The 11 ideas in this article are not commandments. They are starting points. The pineapple puff might become your daily uniform. The pin-curl updo might stay pinned to your Pinterest board for years before you try it. That is fine. What matters is that you stop apologizing for your texture and start using it as the tool it was always meant to be.
Next time you have an event—a wedding, a work party, or just a Tuesday—resist the urge to straighten. Do not reach for the flat iron. Do not slick everything back into a tight, lifeless knot. Instead, flip your head over, gather those curls, and pin them with confidence. Let the frizz be frizz. Let the volume be loud. Let your hair do what it was born to do.
And if someone tells you curly updos look “unprofessional” or “messy”? That is their problem. Not yours.
Leave a Reply