Blog

  • The Butterfly Cut — Why This Layered Look Is Everywhere Right Now

    The Butterfly Cut — Why This Layered Look Is Everywhere Right Now

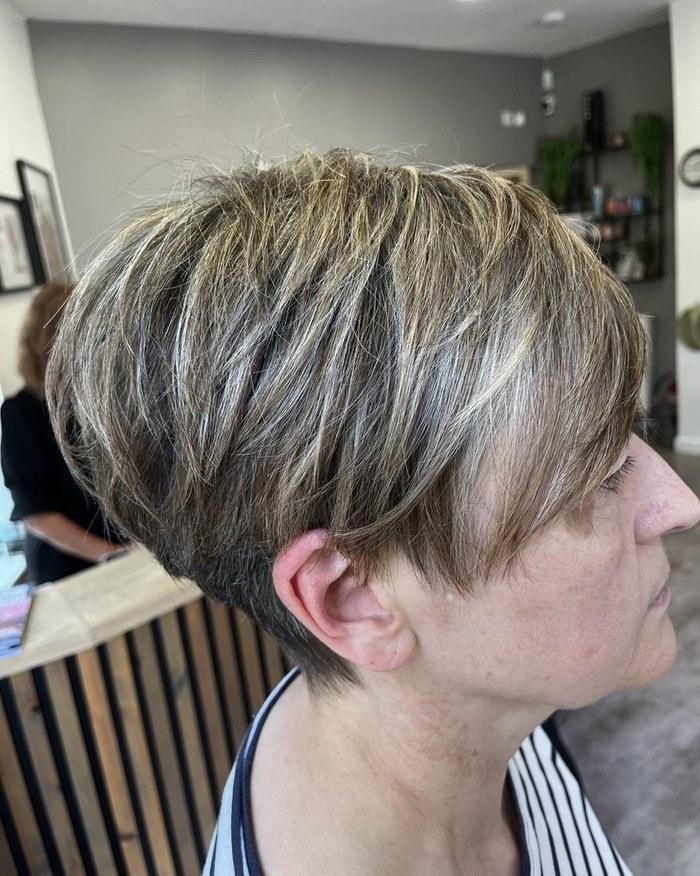
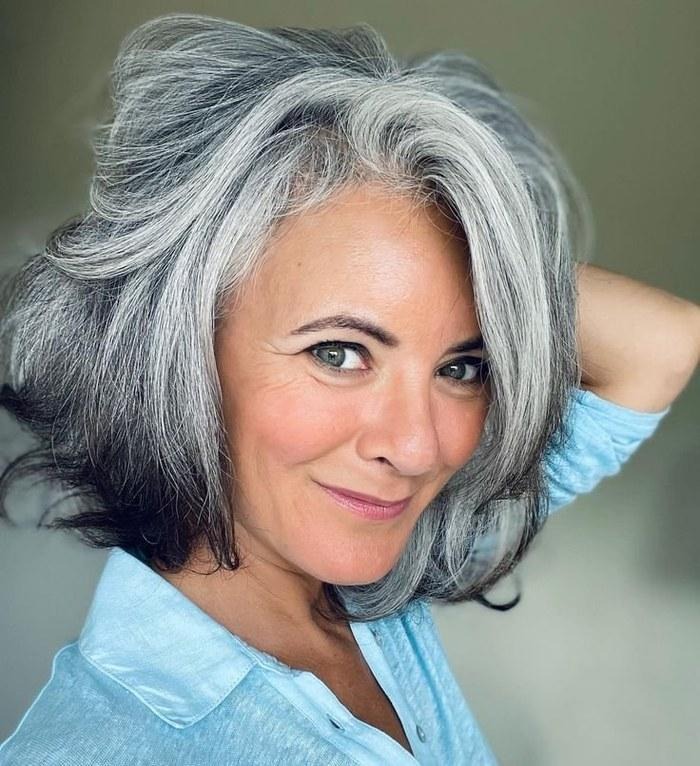
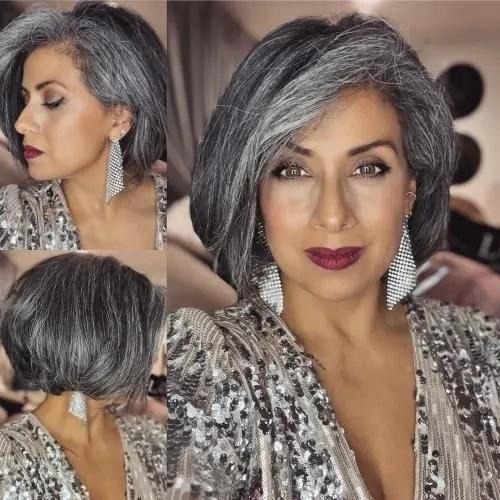
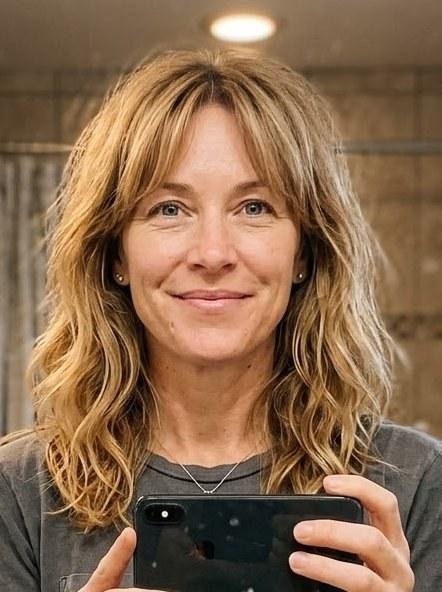
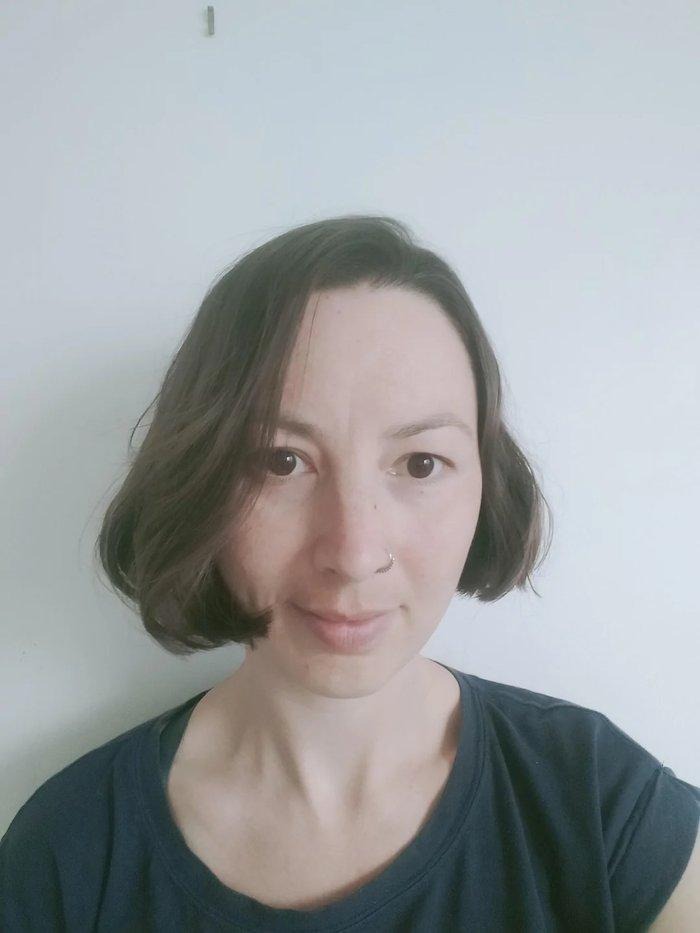
    Volume without a chop. Movement without the commitment. This is the layered cut that solves the problem women have been asking stylists to fix for years.

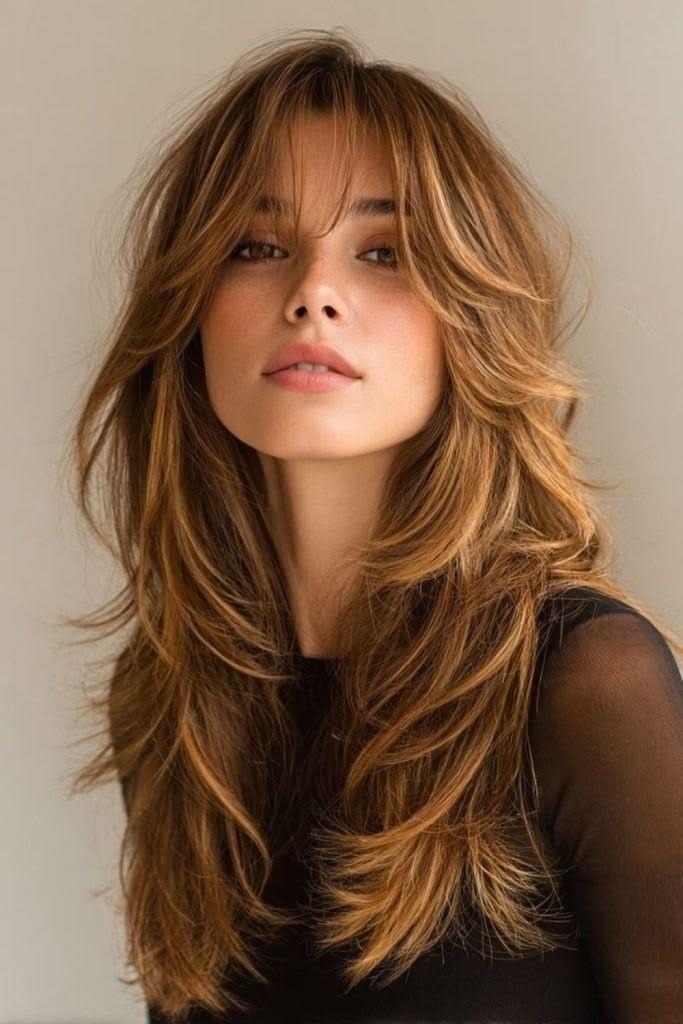
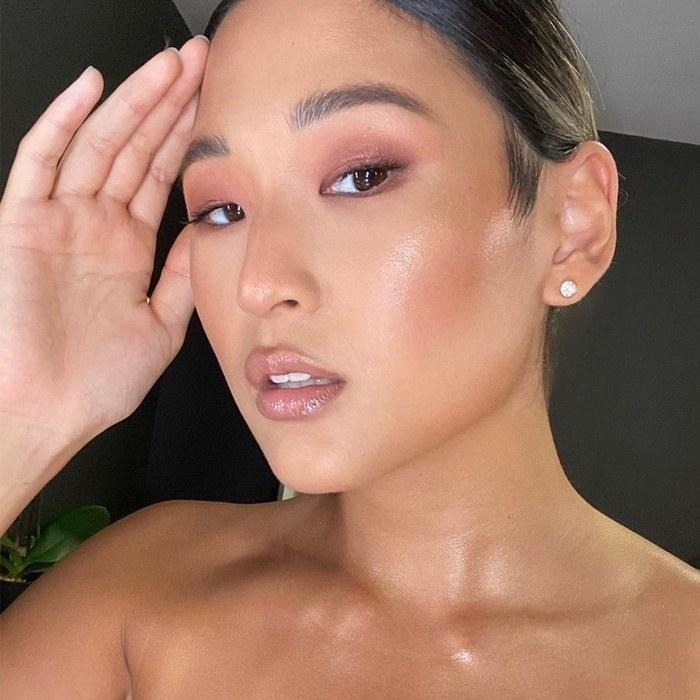
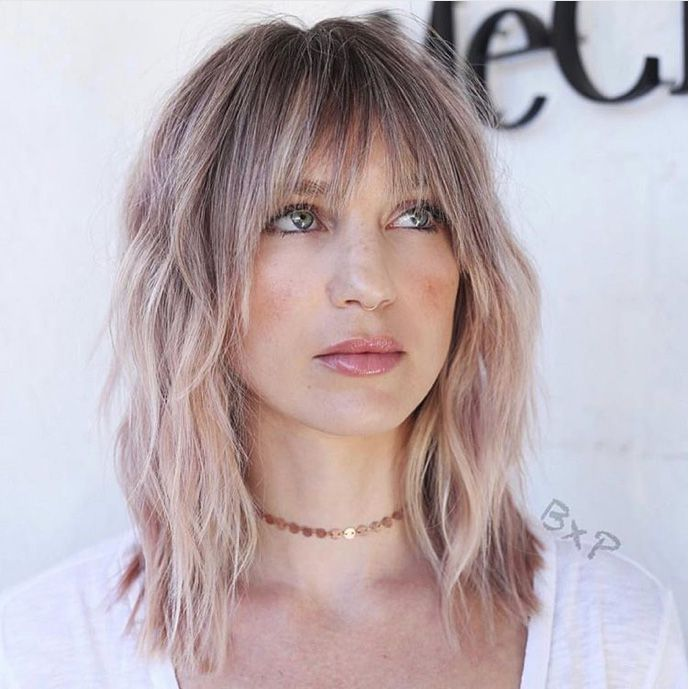
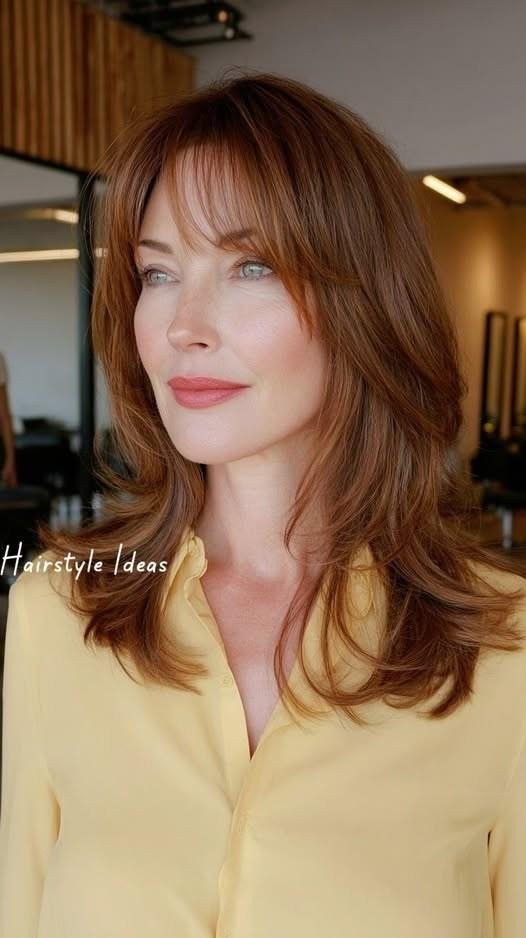
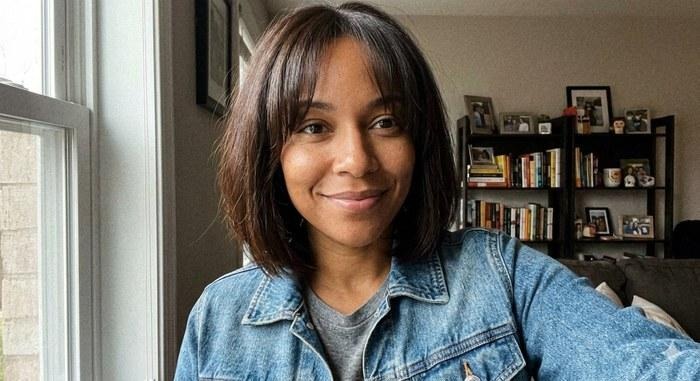
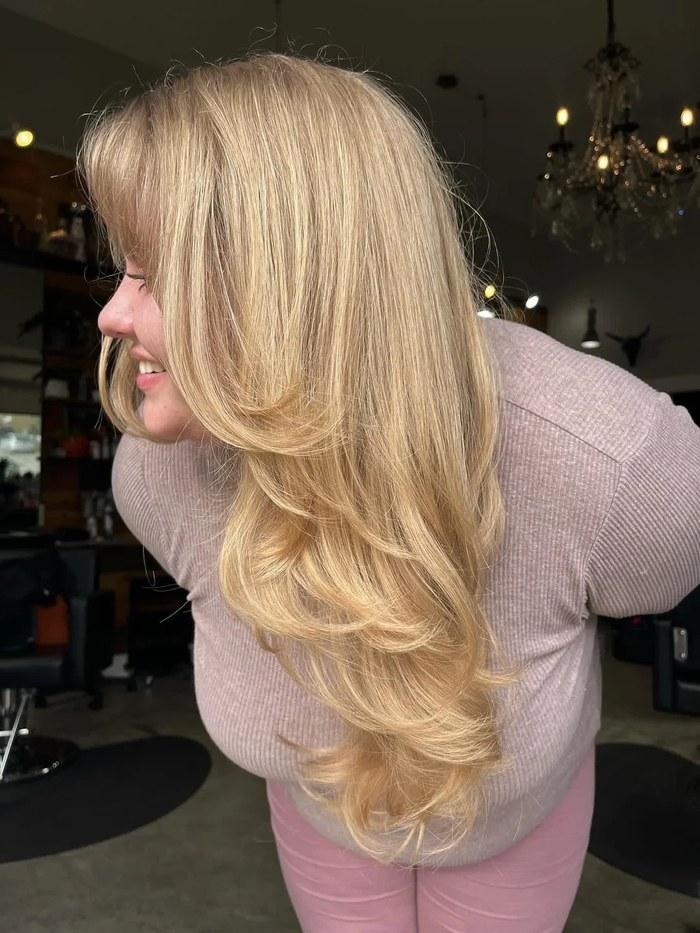
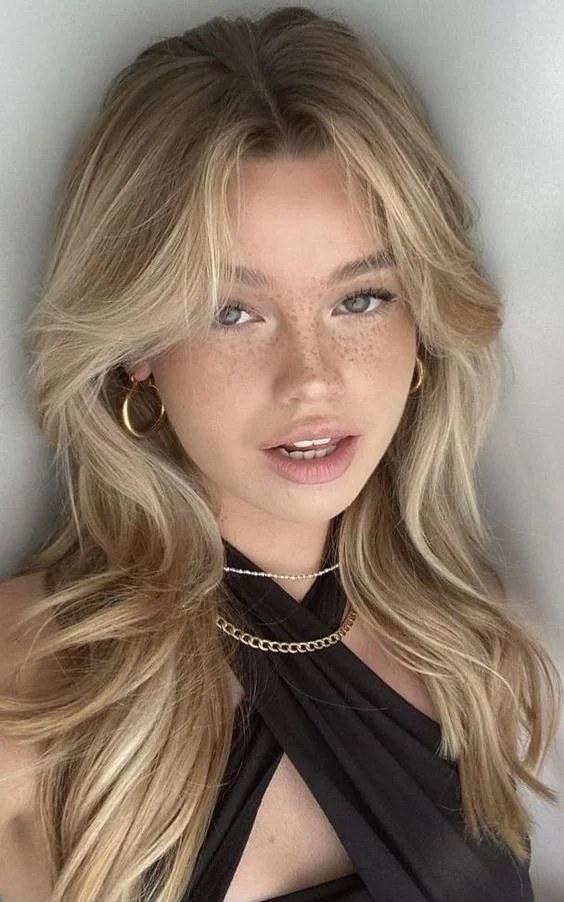
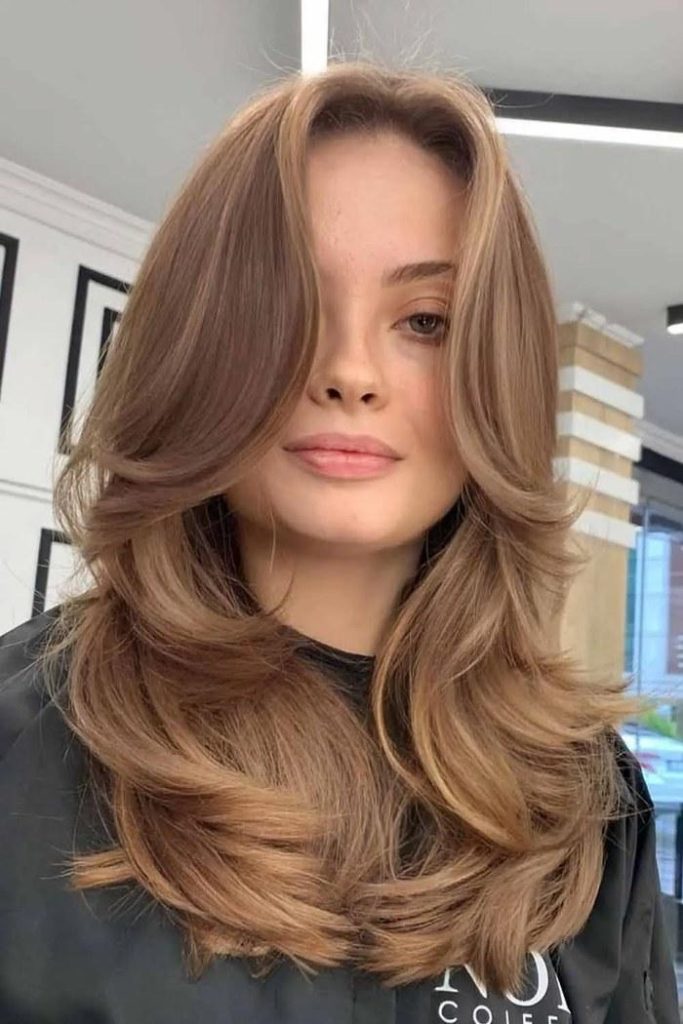
    The butterfly cut in its most flattering form — long layers, face-framing curtain bangs, and effortless movement

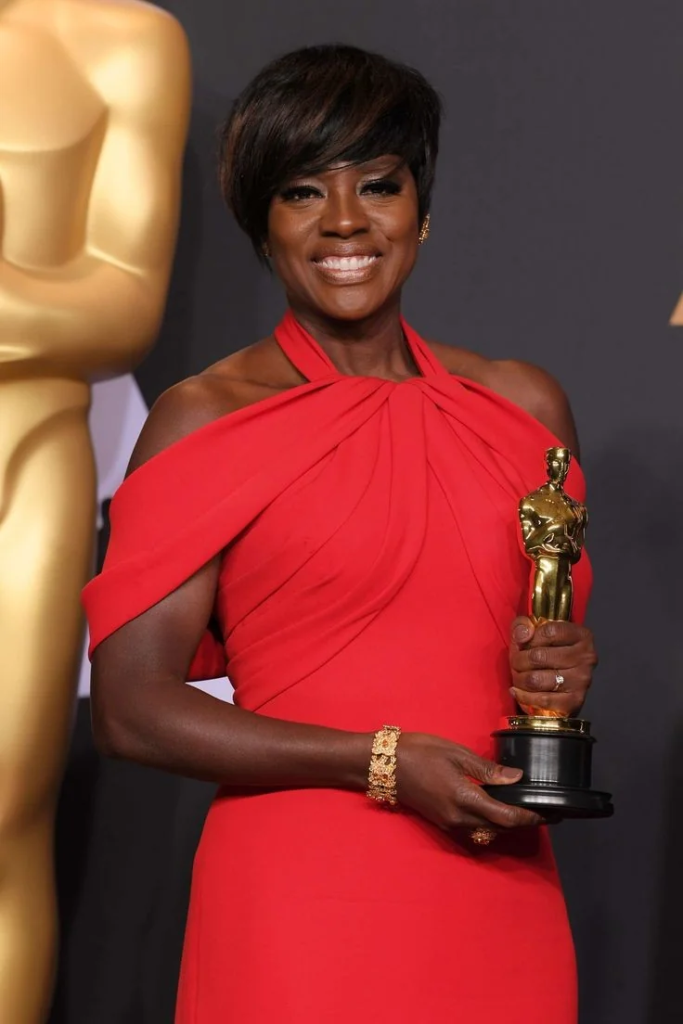
    If you’ve been scrolling hair content lately and noticing the same shape appearing again and again — lots of movement, shorter layers around the face, longer flowing length underneath, an irresistible bounce — that’s the butterfly cut. It has over 580 million views on TikTok and is consistently the most-requested layered haircut in salons through 2026.

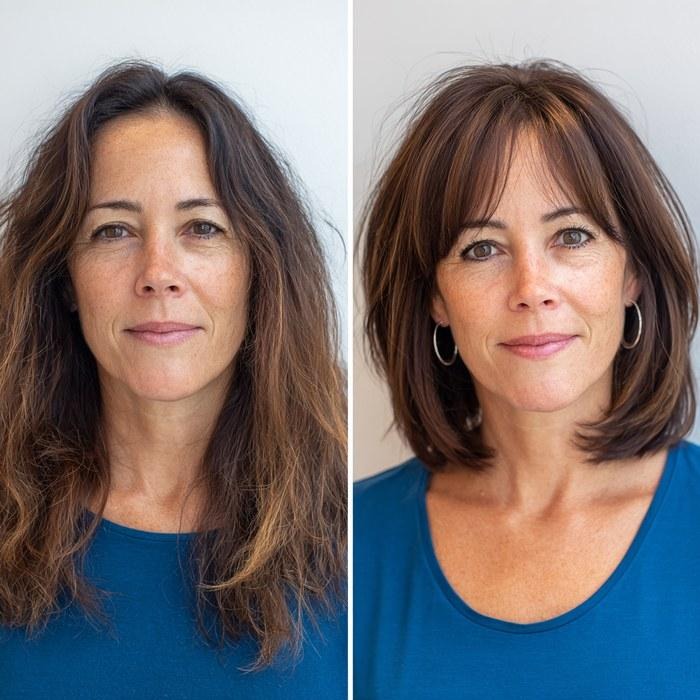
    But here’s what’s worth knowing beyond the numbers: the butterfly cut isn’t just a trend. It’s a specific layering technique that solves one of the most common hair frustrations — hair that looks flat and heavy despite being long. If you’ve been growing your hair but not loving how it looks, this might be exactly the cut you’ve been circling around.

    What Exactly Is the Butterfly Cut?

    The butterfly cut is defined by a single structural principle: high contrast between two distinct layers. Shorter, face-framing layers cut at roughly chin or cheekbone height sit above longer layers that maintain the overall length beneath. When the hair is styled and those shorter layers flip outward, they create a wing-like shape on either side of the face — hence the name.

    The key distinction:  Unlike a standard layered cut where layers are blended evenly throughout for all-over texture, the butterfly cut relies on deliberate contrast. The short top layer and the long underneath layer are intentionally distinct — it’s that separation that creates the lift and volume.

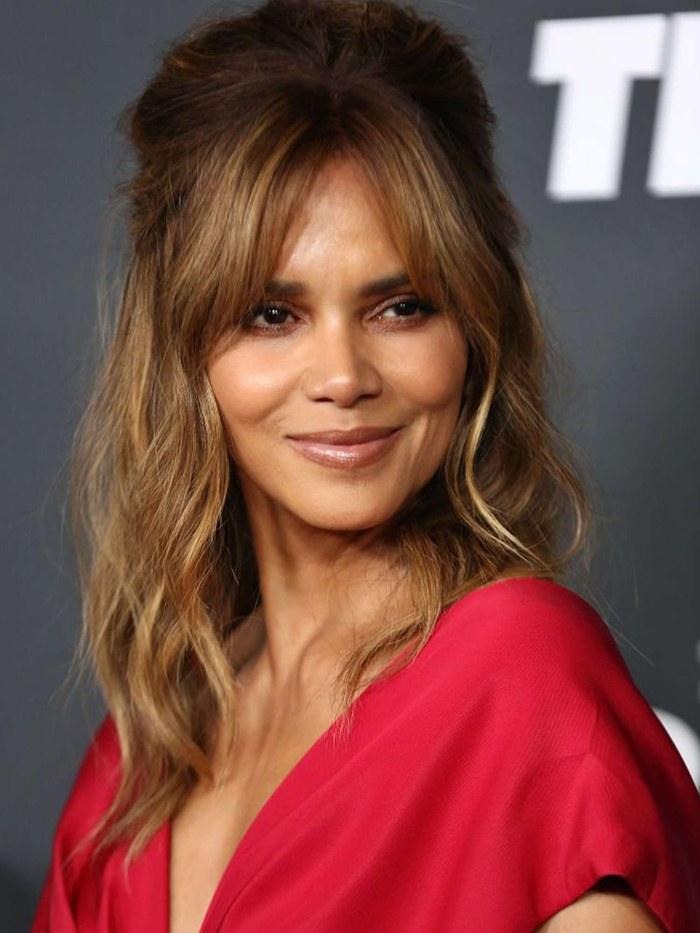
    Celebrity hairstylist Cindy Duplantis, speaking to Fashion Magazine, describes the face-framing layers as essentially a contouring effect: they’re placed to accentuate the cheekbones or jawline depending on what the individual face shape needs. It’s the secret behind Sabrina Carpenter’s signature blowout — and it’s why the result photographs so well.

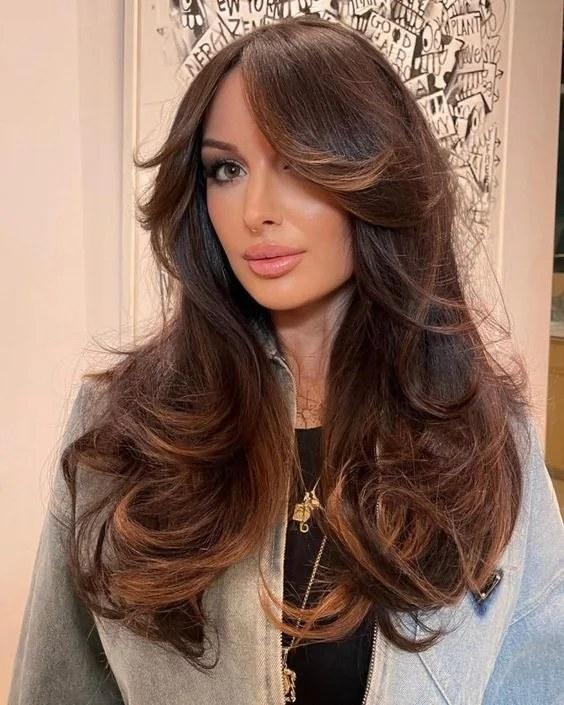
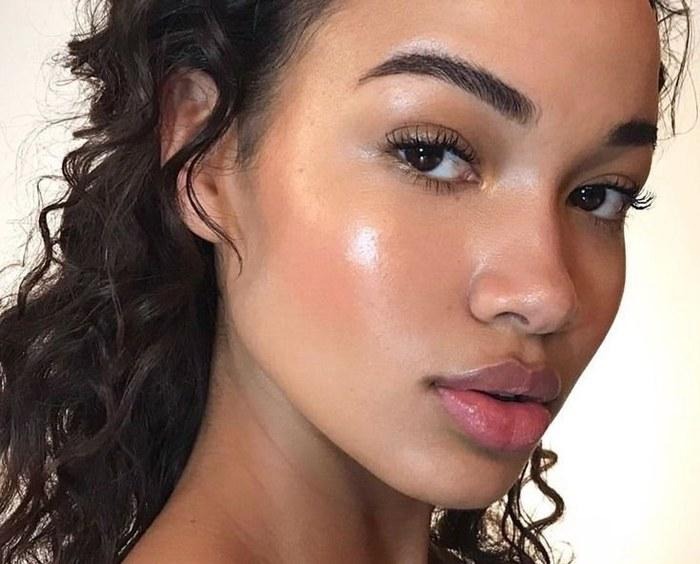
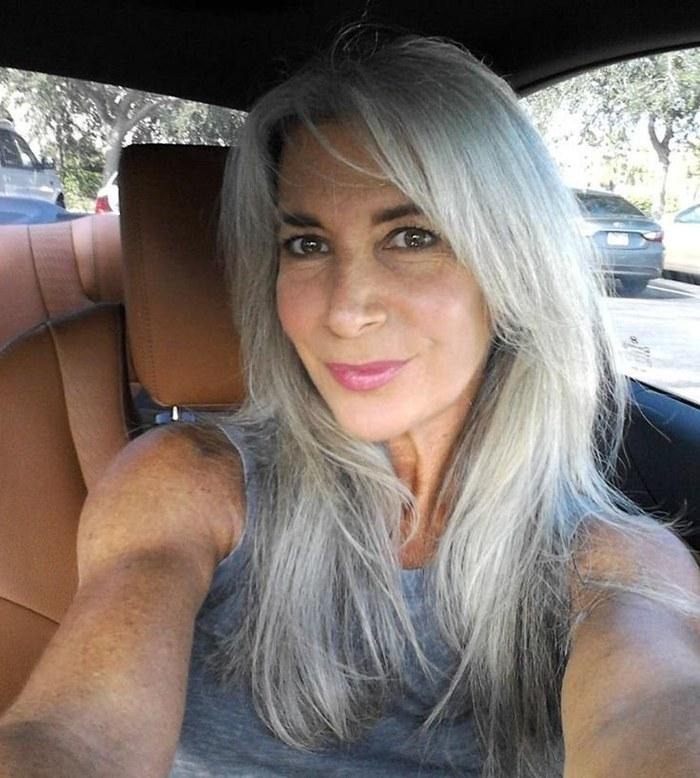
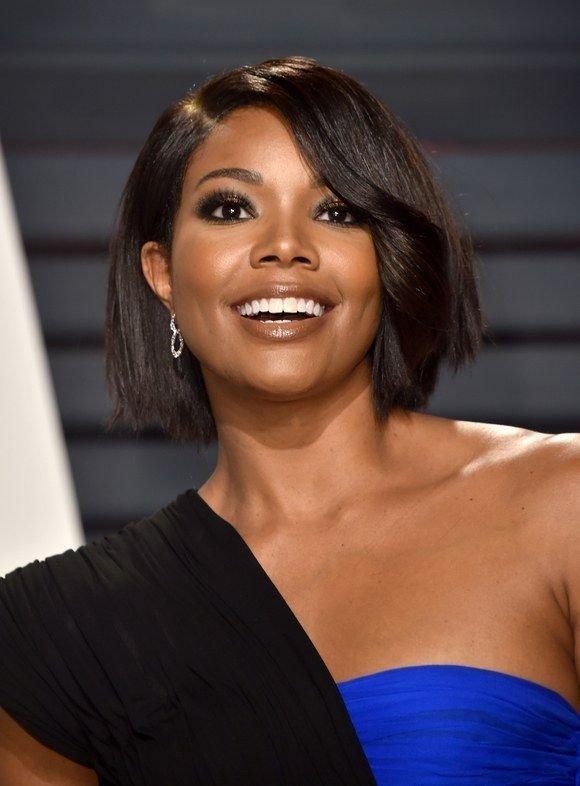
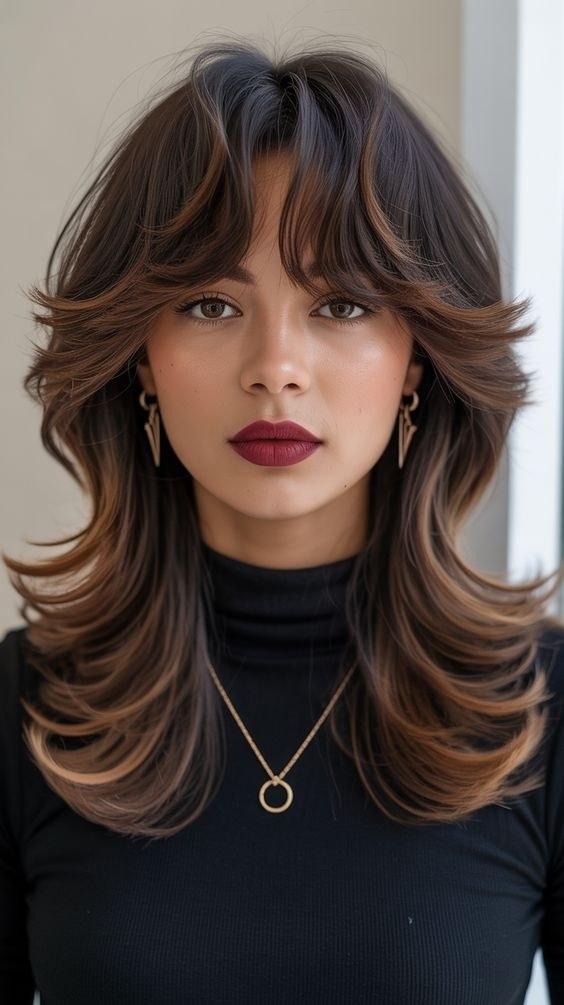
    The full butterfly effect — voluminous, face-framing, dramatically layered while keeping every inch of length

    The cut traces its roots to the 1970s shag, evolved through the feathered styles of the ’90s, and has now been refined into something that works equally well air-dried or blow-dried, with or without bangs, on straight hair and wavy hair alike. That adaptability is precisely why it has stayed at the top of salon request lists.

    How It’s Different from Other Layered Cuts

    vs. The Wolf Cut

    The wolf cut has heavier, more dramatic short layers at the crown and a shaggier, more textured overall feel. The butterfly is softer and more refined — less rock band, more French Riviera. The layers are still pronounced but they land with more polish and less intentional dishevelment.

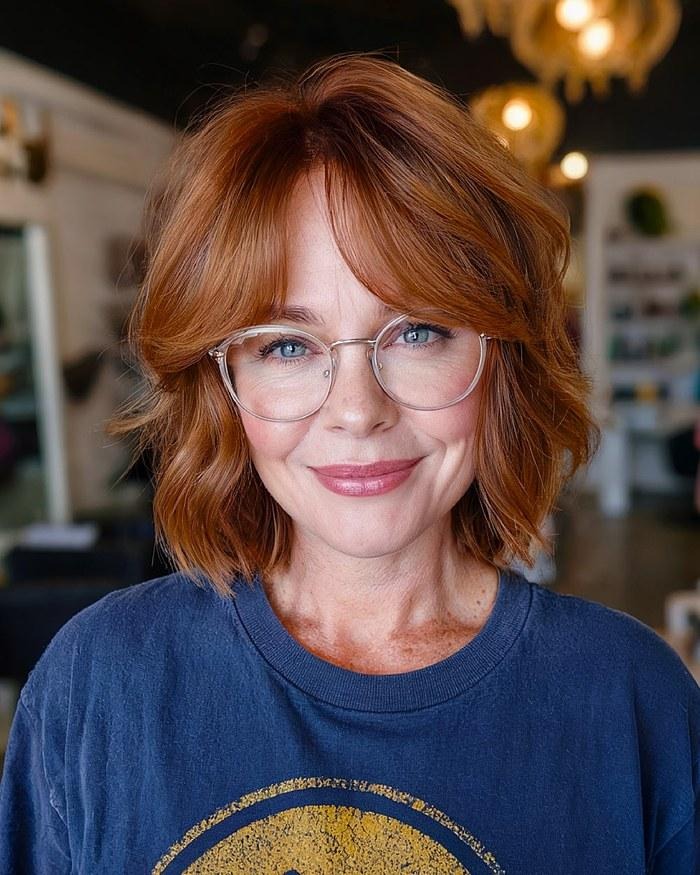
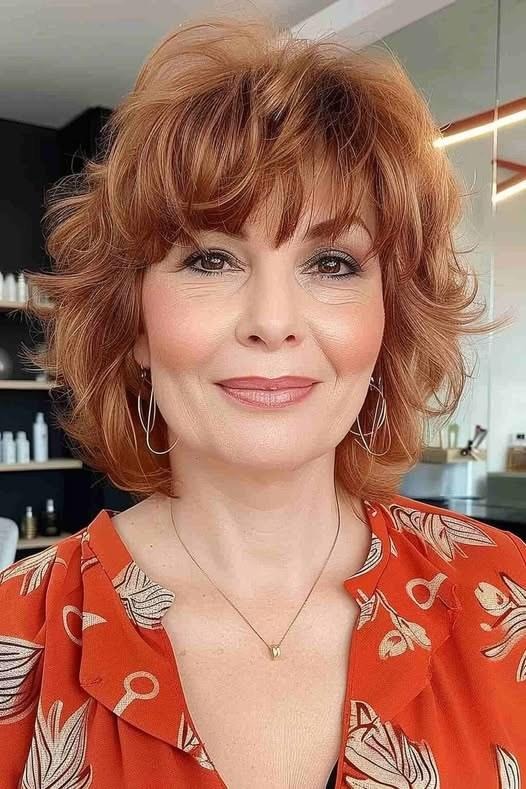
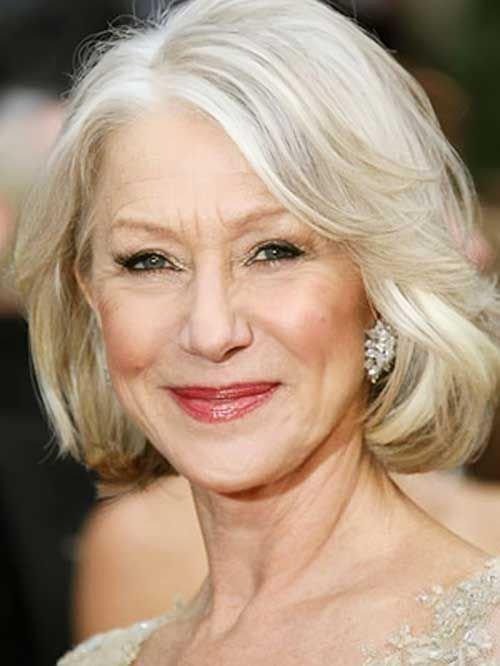
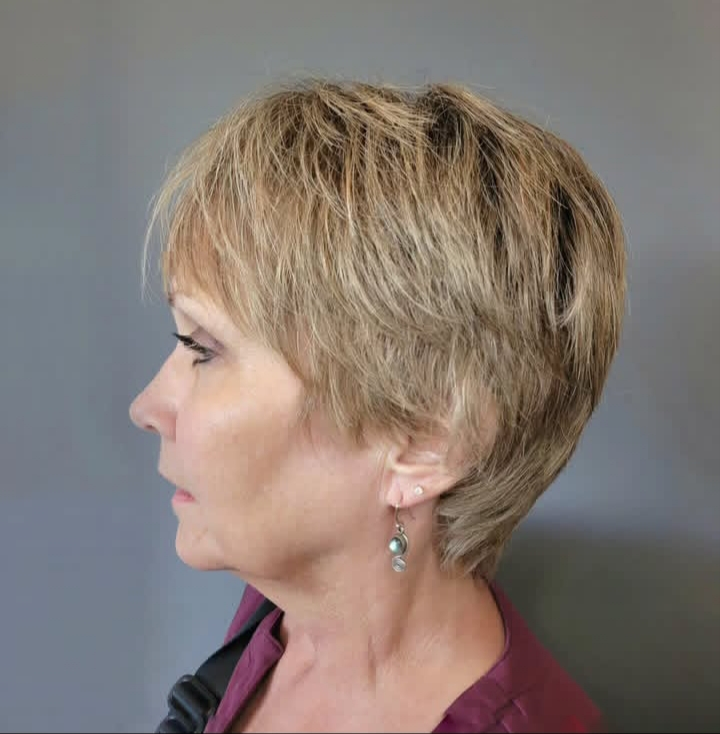
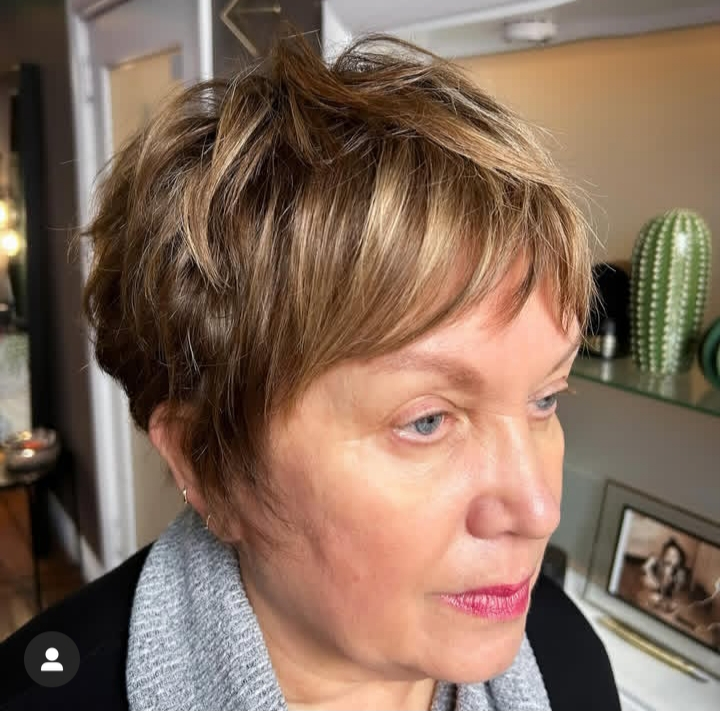
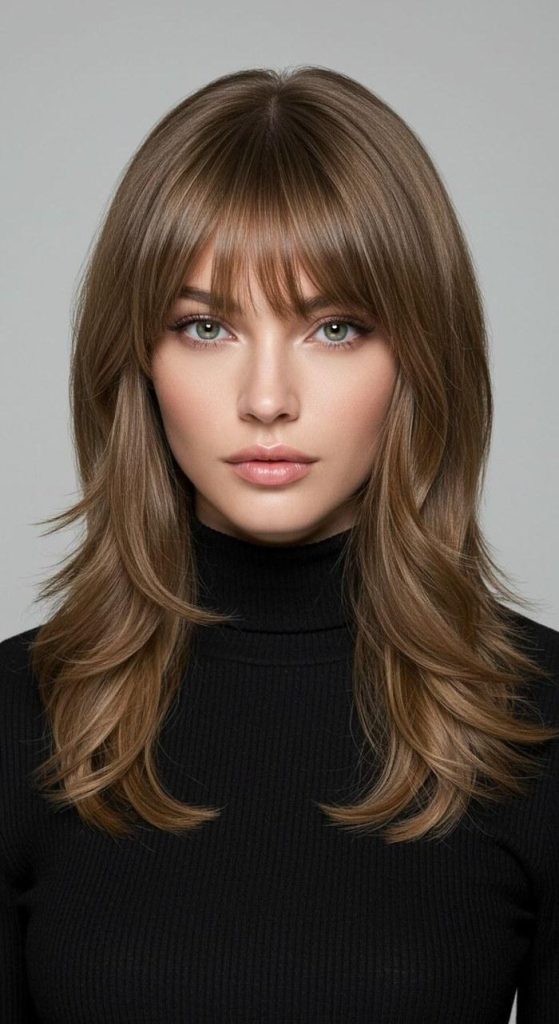
    The butterfly at medium length — textured, airy, and effortlessly soft with natural movement

    vs. Standard Layers

    Standard layers are blended gradually throughout the hair, giving an even distribution of texture from root to tip. The butterfly creates a clear visual break between the shorter face-framing section and the longer body of the hair — that contrast is what gives it its distinctive winged shape and volume at the crown.

    vs. The Shag

    The shag is choppier and more textured throughout, often with visible razored ends. The butterfly is cleaner, with a more deliberate structure. It can share the shag’s energy when styled casually, but it cleans up significantly more easily for polished occasions.

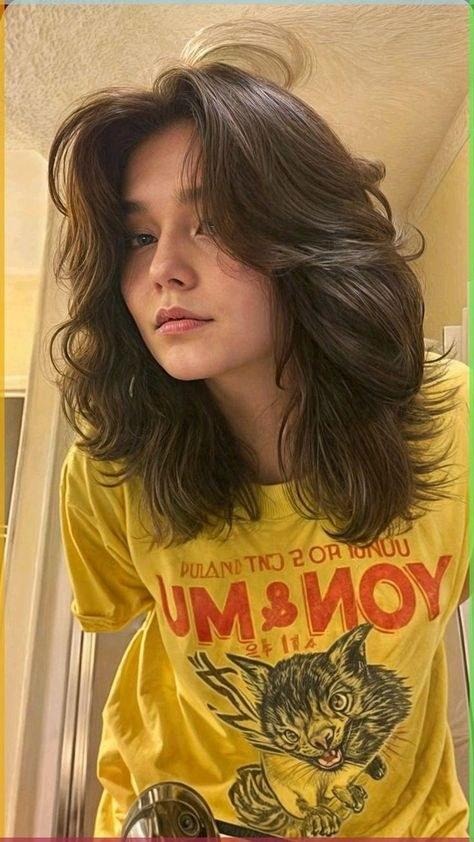
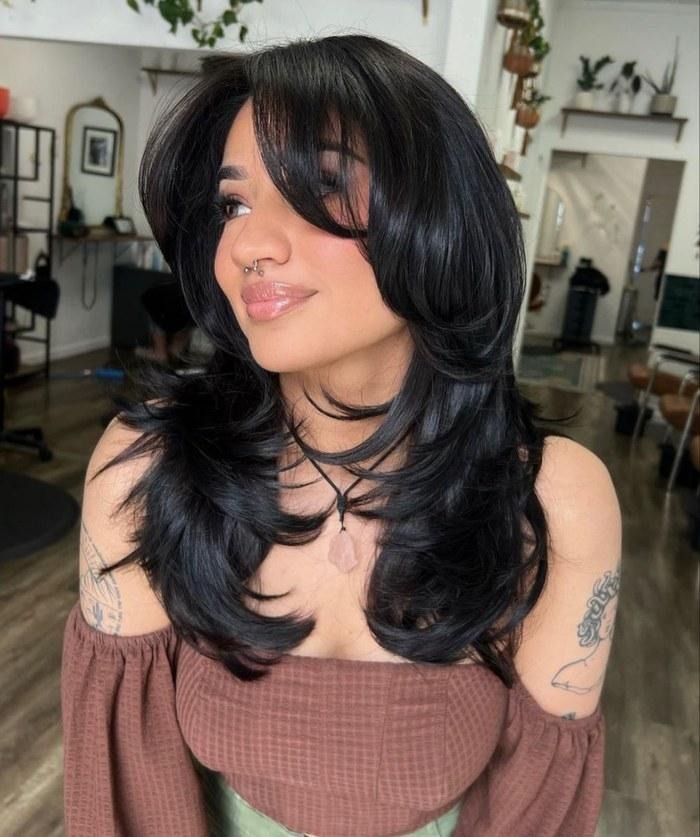
    The butterfly at a shorter medium length — casual, wavy, and air-dry friendly

    Why It Works — The Volume Problem Solved

    The most common hair complaint among women with long hair is that it looks flat, heavy, and shapeless despite the length. Long hair carries significant weight, and that weight pulls layers down, removes volume from the crown, and creates a straight, uninspiring line.

    The butterfly cut interrupts that weight. The short layers at the crown and face have no length below to pull them flat — they’re free to spring up, flip outward, and move independently. The longer layers underneath maintain the length you’ve worked to grow. You get the volume of a shorter cut and the length of a long one simultaneously.

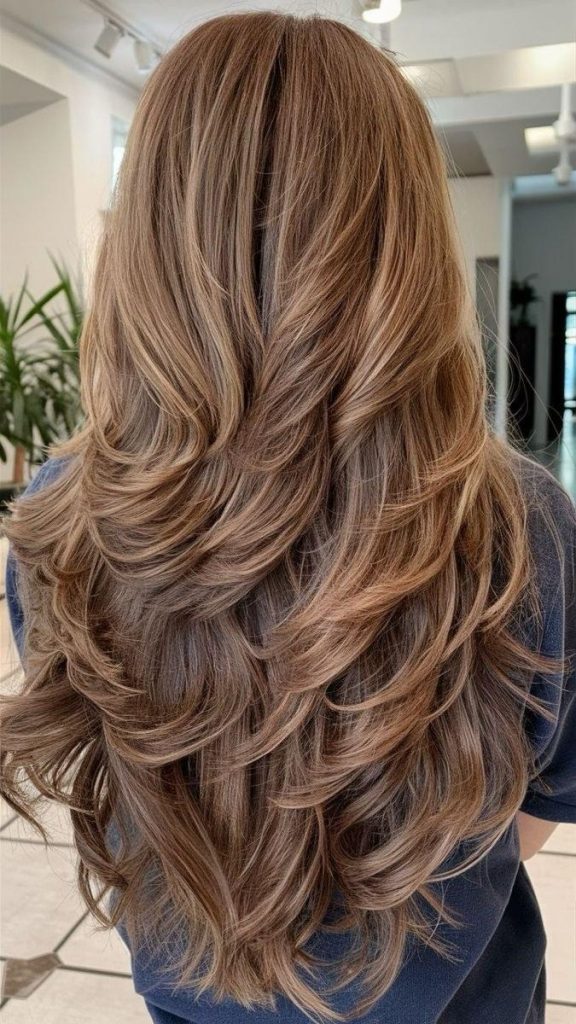
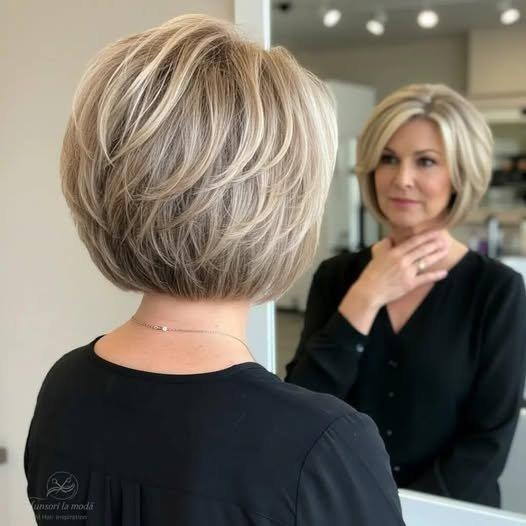
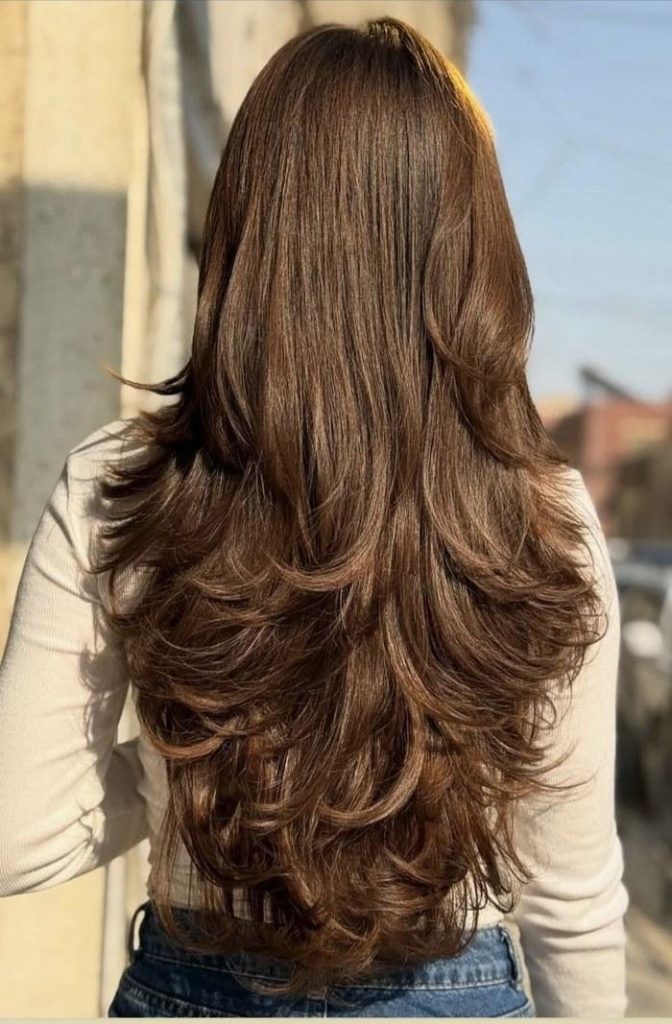
    The waterfall effect from the back — the cascading layers are what make the butterfly so visually distinctive

    Volume and curl at the ends — the layers at different lengths catch and hold movement in a way one-length hair simply can’t

    The grow-out advantage:  The butterfly cut grows out more gracefully than most layered cuts. Because the length differential is intentional rather than blended, the layers can gain length without losing their essential shape. Most clients need trims every 10–14 weeks rather than the 6–8 typically recommended for precision cuts.

    The Variations — Which Version Suits You

    Classic Butterfly — Long

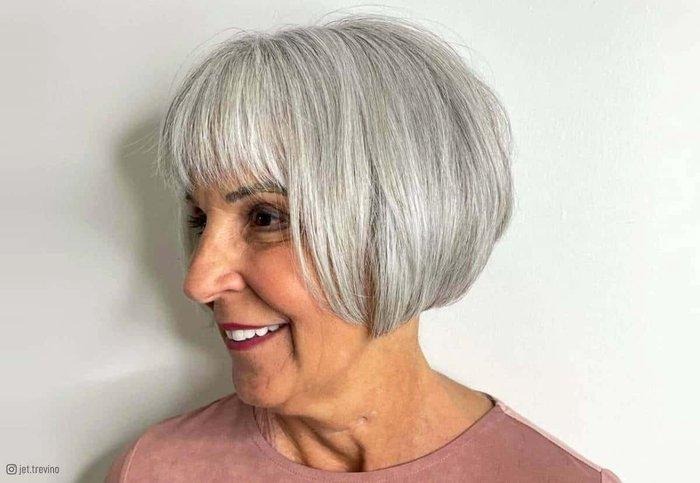
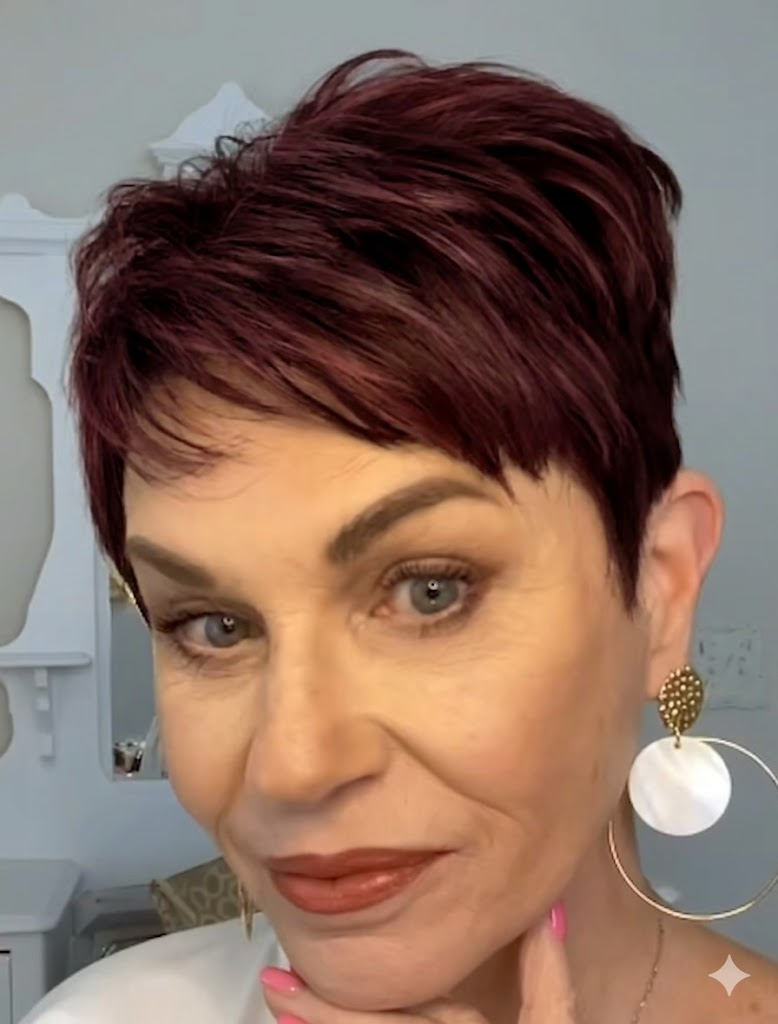
    The original version on long hair: shorter layers landing around the cheekbone or collarbone, longer layers flowing well past the shoulder. The most dramatic version of the cut, with the greatest contrast between sections. Styled with a blow-dry and round brush, the result is the full bombshell effect. Air-dried, it softens into something more relaxed and lived-in.

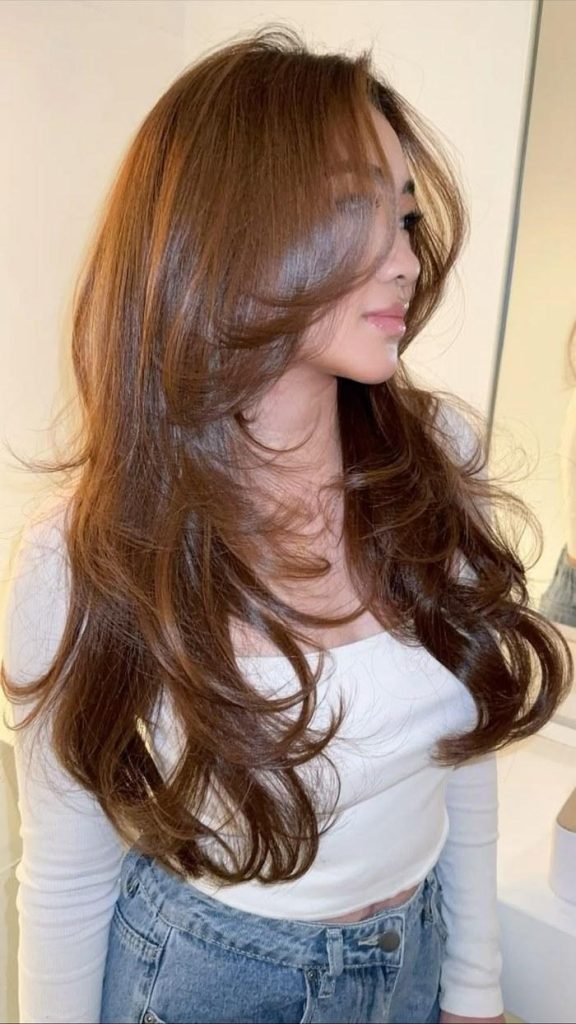
    Long butterfly on auburn hair — the side profile shows the layering architecture beautifully

    Long butterfly from the back — the distinct sections are clearly visible, especially at the ends

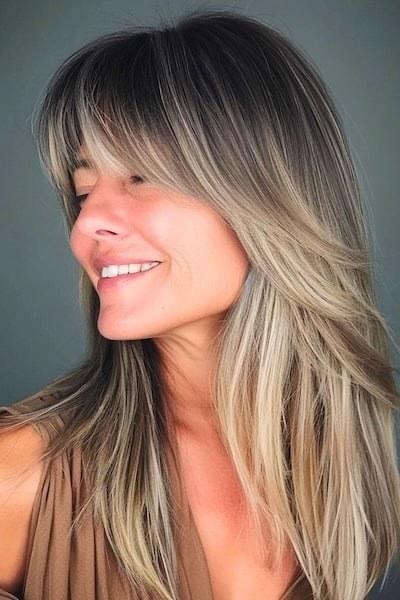
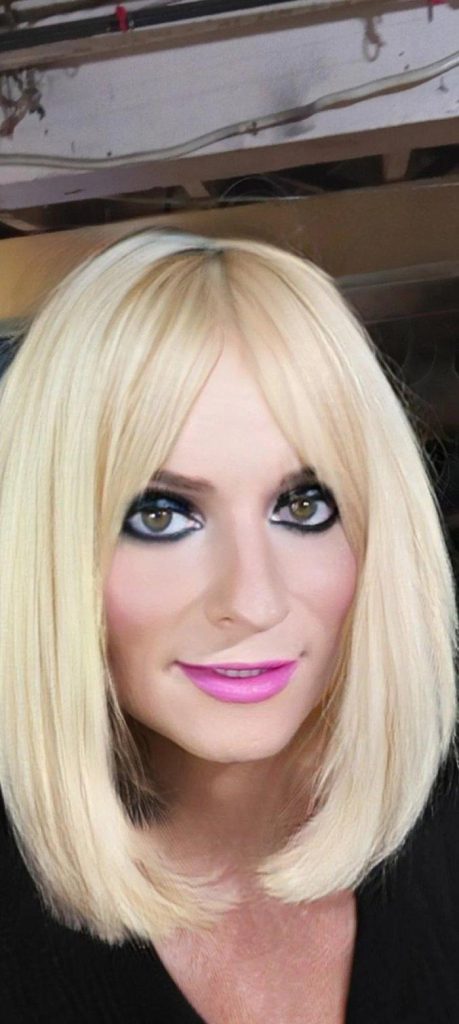
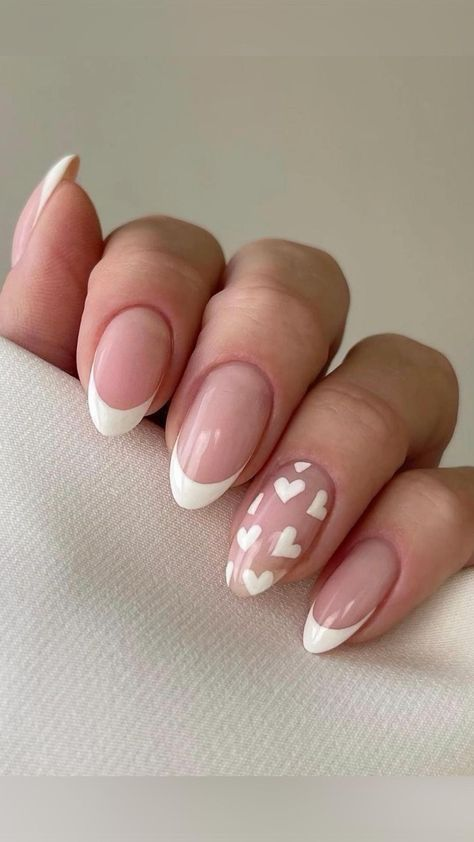
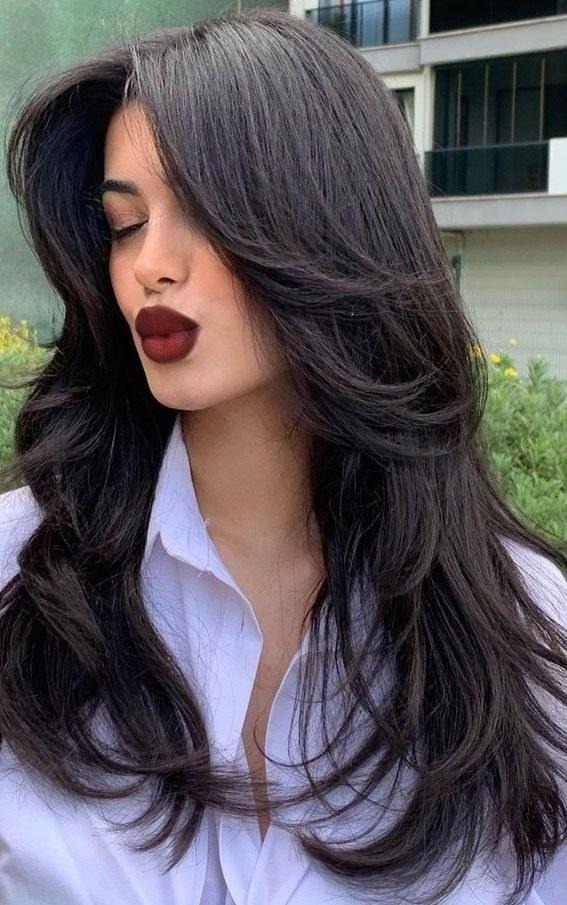
    Butterfly with Curtain Bangs

    The most-requested variation heading into 2026. Curtain bangs blend seamlessly into the shorter face-framing layers, extending the winged shape across the forehead and adding another frame around the face. The combination is particularly flattering on oval and heart-shaped faces. It softens a wide forehead and creates symmetry around the features.

    Butterfly with curtain bangs — the bangs flow naturally into the face-framing layers for a cohesive, balanced shape

    Structured butterfly with a full fringe — the more defined bang adds polish and a slightly retro edge

    Butterfly with Full Fringe

    A more committed version — a fringe that sits at brow level rather than parting to the sides. It’s a stronger statement but pairs beautifully with the softer layers below, creating a contrast between the structured bang and the flowing body of the cut. Works particularly well with medium-length hair.

    Classic butterfly with a full fringe — the straight-across bang anchors the look and emphasises the eyes
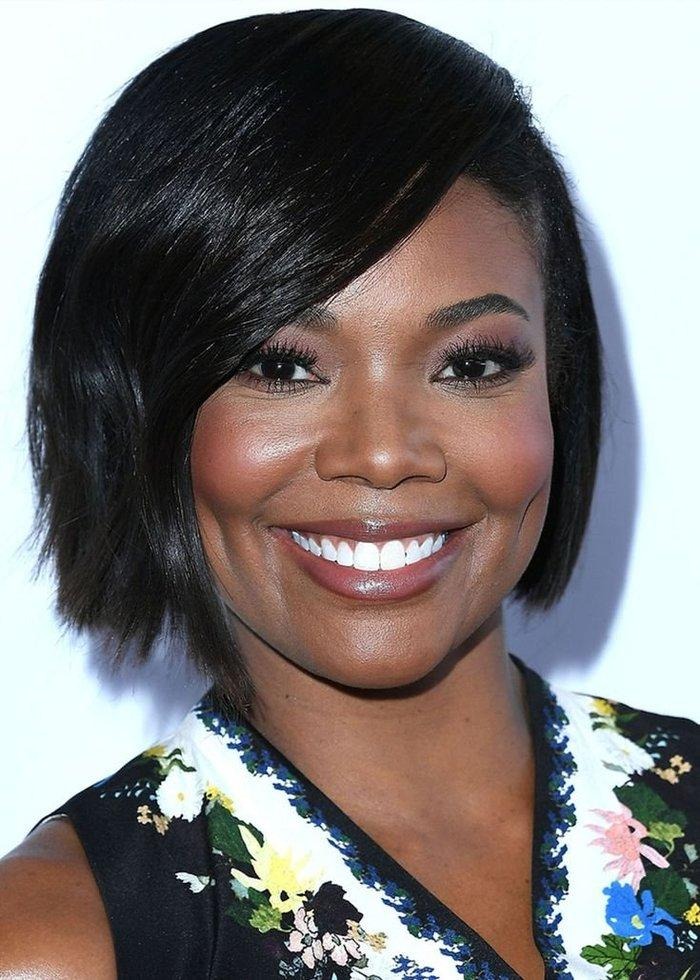
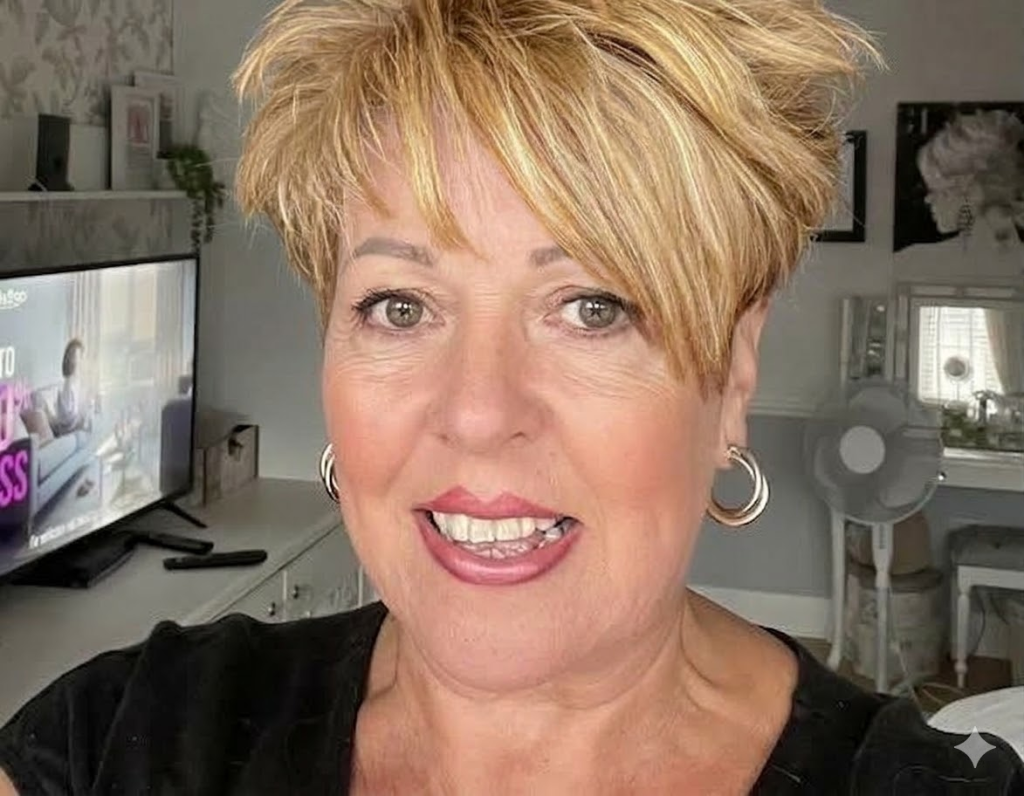
    Medium Butterfly

    The butterfly at shoulder to collarbone length. Here the contrast between sections is slightly less dramatic but still very visible — the shorter layers frame the face while the overall silhouette stays manageable and practical. This length is the most low-maintenance version of the cut and grows out the most gracefully.

    Black hair butterfly at medium length — the face-framing layers work dramatically on dark hair

    Honey-toned layers at medium-long — the partial face cover from the layers is a signature butterfly styling moment

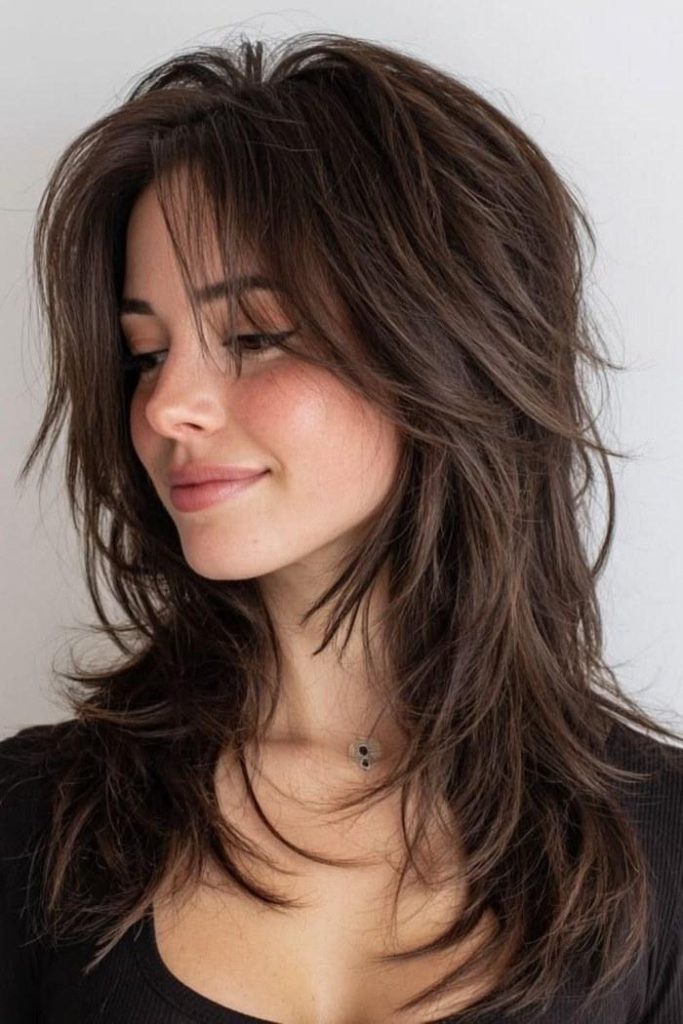
    Soft & Textured Butterfly

    A looser, less structured interpretation with more blending between the layers. Less dramatic contrast, more movement and texture throughout. This variation air-dries beautifully on wavy or slightly textured hair and requires almost no styling beyond a diffuser or simply leaving it to dry naturally.

    Dark hair, soft side-swept butterfly — the layers are less structured but the movement and volume are still unmistakably butterfly

    Which Face Shapes Does It Suit?

    The butterfly cut is genuinely one of the more universally flattering haircuts available because the face-framing layers can be positioned differently depending on face shape. Here’s the honest breakdown:

    Oval:  Works with any variation. No adjustments needed — the natural symmetry of an oval face carries the butterfly shape effortlessly.

    Round:  Opt for layers that start higher (at the cheekbone rather than the chin) and add length to elongate the face visually. Curtain bangs help add the illusion of length. Avoid very short, chin-level layers that widen the face.

    Square:  Softer layers with a slight flick at the ends soften a strong jaw. Curtain bangs and layers that frame from the cheekbone are the most flattering. Avoid blunt or very structured layers.

    Heart:  The butterfly is particularly flattering — the volume at the lower section balances a wider forehead. Curtain bangs blend beautifully and soften the forehead without hiding it.

    Long:  Keep layers from getting too long, which can elongate the face further. Aim for layers that sit at shoulder length or slightly above for maximum width and balance.

    Diamond:  Curtain bangs work extremely well. Face-framing layers at the cheekbone level soften the widest point and draw attention to the eyes.

    ✂️ Stylist tip: Book a consultation before committing, not just the appointment. A five-minute conversation about face shape, hair texture, and styling routine will get you a better butterfly than the same cut applied without that context.

    Hair Types & Textures

    Straight Hair

    The butterfly works on straight hair but requires more styling effort to maintain the lift and volume. A blow-dry with a round brush is the most effective approach. Without heat styling, straight butterfly layers can fall flat relatively quickly. If you have naturally straight, fine hair, discuss the layer depth with your stylist — very heavy layering can make fine hair look thinner rather than more voluminous.

    Wavy & Textured Hair

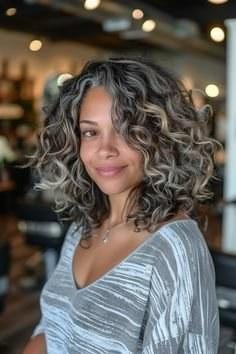
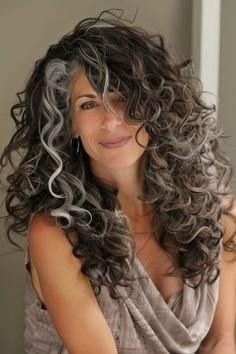
    The butterfly’s natural home. Wavy hair responds to the shorter layers by curling and springing upward at the crown, creating effortless volume with minimal effort. The textured ends flip and move in exactly the way the cut is designed for. Air-drying with a diffuser on low heat is all that’s needed to bring out the full butterfly shape.

    The butterfly on naturally textured brunette hair — the texture does all the work

    Thick Hair

    Thick hair benefits enormously from the butterfly cut — the weight removal through layering transforms heavy, dense hair into something that moves and lifts. Stylists often combine the butterfly layering with point-cutting at the ends to remove bulk without losing shape.
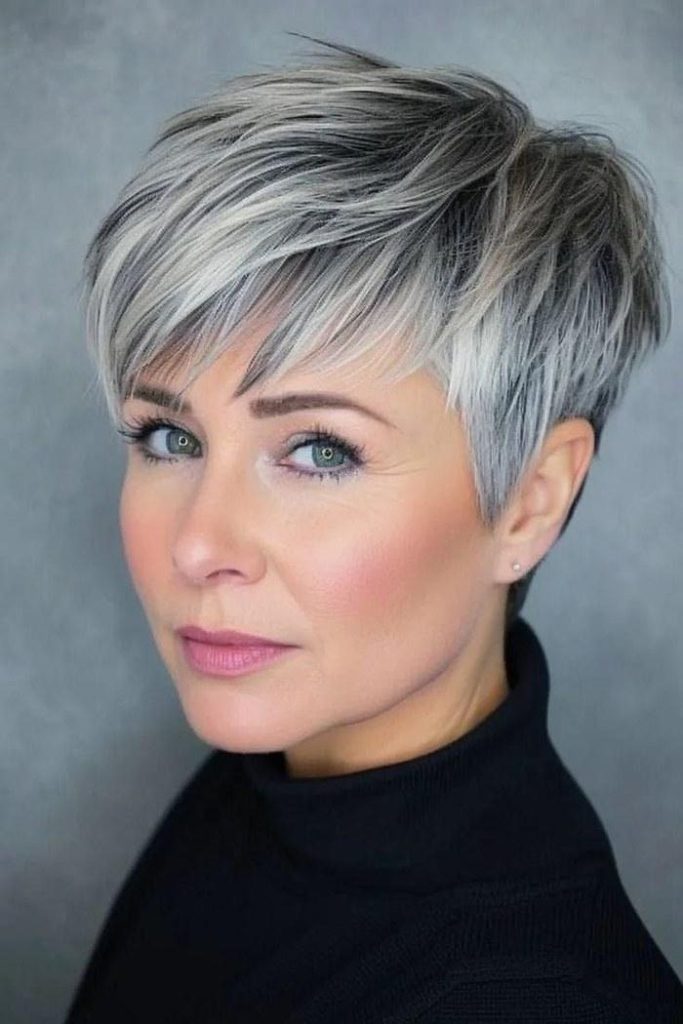
    Fine Hair

    Possible, but approached differently. Layers on fine hair need to be less dramatic — very short face-framing layers on genuinely fine hair can make it look wispy at the ends. A more subtle version with softer contrast between sections works better. The medium-length butterfly is often the most flattering for fine hair.

    Styling — How to Get the Shape at Home

    The blow-dry method (for maximum volume)

    Apply a volumising mousse or spray to damp hair. Flip the head upside down and rough-dry with a diffuser or low heat until about 70% dry. Flip upright and use a round brush to roll the shorter layers upward and outward at the crown, directing the ends away from the face. This is what creates the wing shape. Finish with a light-hold spray or a drop of serum on the ends for shine.

    The air-dry method (for texture and ease)

    Scrunch a small amount of curl cream or texturising foam through damp hair. Leave it alone. The butterfly cut is one of the most air-dry-friendly layered styles precisely because the contrast between sections creates natural movement and body without intervention. The ends flip on their own as the hair dries.

    Products worth having

    Volumising blow-dry spray for root lift. A round brush — medium to large barrel depending on hair thickness. Light-hold finishing spray that won’t weigh the layers down. A small amount of serum or oil on the ends to define them and control flyaways. For wavy or textured hair, a diffuser attachment for your hairdryer.

    ✂️ Stylist tip: The one styling mistake that collapses a butterfly cut: heavy products applied at the root. Keep serums and oils to the mid-length and ends only — anything at the root will immediately flatten the layers you’re trying to lift.

    What to Say at the Salon

    Screenshots are your best tool — bring two or three images from this article that show the variation, length, and texture closest to what you want. Beyond that, here’s the brief that gives your stylist everything they need:

    The brief:  “I’d like a butterfly cut — shorter face-framing layers around the cheekbone and longer layers kept through the back. I want volume at the crown without losing length. My hair is [texture] and I [do / don’t] blow-dry regularly — please adjust the layer depth for that.”

    That covers the technique, the length intent, the volume goal, and your maintenance reality — the four things that make the difference between a butterfly cut that works for your life and one that only looked good in the salon chair.

    Is This Cut for You?

    If you have long hair that’s been feeling heavy and shapeless, a haircut that’s growing out and losing its energy, or simply hair that you want to look more alive without dramatically changing the length — the answer is almost certainly yes. The butterfly cut is one of the rare styles where the concept is simple, the variations are genuinely wide, and the result is consistently flattering across hair types and face shapes.

    Save the images from this article, take them to your next appointment, and tell your stylist you want the wings.

    Save this — you’ll want it at your salon appointment →

  • The 5-Minute Morning Makeup Routine — Dewy, Natural & Done

    The 5-Minute Morning Makeup Routine — Dewy, Natural & Done

    The goal: skin that looks alive, rested, and completely natural — in under 5 minutes

    This isn’t about doing less. It’s about doing the right things in the right order — so your skin looks like itself, only better.

    Bobbi Brown has spent 30 years teaching women that makeup should take five to ten minutes. Not because shortcuts are good — but because when you know exactly what to do and in what sequence, you don’t need more time than that. The women who spend 45 minutes in front of the mirror are often doing too much, in the wrong order, with the wrong formulas.

    This routine is built on Bobbi Brown’s 10-step professional method, adapted for busy mornings and skin that needs hydration, not coverage. The emphasis is on a dewy finish — because heavy, matte makeup settles into lines and works against you. Every step has a reason. Nothing is filler.

    Before you start:  Wash your face, apply your moisturiser, and give it 60 seconds to absorb. Makeup applied over damp skin blends more evenly and stays fresher longer. This is the step most people rush — don’t.

    The Routine — 7 Steps, Under 5 Minutes

    Pre  Eye Cream — 20 seconds

    Apply a small amount of eye cream with your ring finger — the weakest finger, which prevents tugging on this delicate skin — by pressing gently from the inner corner outward. Don’t rub. This step is non-negotiable: without eye cream underneath, concealer will crease and cake regardless of what else you do. Give it 30 seconds to absorb while you squeeze out your foundation.

    ⏱ 0:20  Ring finger · press gently · inner corner outward

    💡 For dry or mature skin, choose a richer balm formula at night and a lighter fast-absorbing gel for mornings so it layers easily under concealer.

    Step 1  Concealer — 40 seconds

    Start here, not with foundation. Concealer on the under-eye, inner corner, and anywhere you have redness gives you a fresh, bright base before foundation goes anywhere near your face. Choose a yellow-toned concealer one to two shades lighter than your skin. Apply with a small concealer brush, then blend by gently patting with your fingers. The warmth of your fingertips melts it seamlessly into the skin. If you have significant darkness, layer a pink or peach corrector underneath first.

    ⏱ 0:40  Brush to apply · fingers to blend · pat, don’t rub

    Concealer applied with a brush to the under-eye — the shade should be yellow-toned, not ashy

    The inner corner — the single most brightening spot to apply concealer, and the most commonly missed

    💡 A tiny dot of concealer at the very inner corner of each eye — where the lash line meets the bridge of the nose — opens the eyes more dramatically than almost anything else.

    Step 2  Foundation or Tinted Moisturiser — 60 seconds

    For most mornings, a tinted moisturiser or skin tint is the better choice over full foundation — it gives coverage where you need it while letting the skin breathe and look alive. Apply with fingers starting where skin needs the most evening out — usually around the nose and mouth where redness gathers — and blend outward. You don’t need full-face coverage daily.

    ⏱ 1:00  Fingers for natural finish · sponge for more coverage

    Foundation swiped onto the cheek — blend in with fingers for a skin-like, seamless finish

    💡 For dry or mature skin, dense creams and balm moisturisers help plump the skin first, making foundation sit more smoothly and reducing the appearance of fine lines. Prep generously before any coverage product.

    Skip:  Heavy matte foundation all over      Use instead:  Tinted moisturiser or light skin tint with SPF

    Skip:  Powder all over      Use instead:  Light dusting of powder only on the T-zone

    Step 3  Powder — 20 seconds

    Powder is not about looking matte — it’s about keeping your concealer in place. Apply a pale yellow loose powder only to the under-eye area using a small fluffy brush. Press, don’t sweep. Then a light dusting across the T-zone if needed. Dry skin? Skip powder on the cheeks entirely — it emphasises texture and dries the skin further.

    ⏱ 0:20  Press under-eye first · T-zone only if needed · skip cheeks if dry

    💡 Yellow-toned powder is universally more flattering than white or translucent — it warms the skin rather than leaving it looking floury.

    Step 4  Brows — 45 seconds

    The highest-impact step per second in the whole routine. A well-defined brow lifts the eye area instantly. Using an angled brow brush and a powder shadow one shade lighter than your hair, fill in from the inner corner using light, feathery strokes. Follow the natural shape upward and over the arch. Set with clear brow gel. If brows are sparse, use a pencil first in light strokes, then layer powder on top.

    ⏱ 0:45  Powder shadow + angled brush · feathery strokes · set with clear gel

    💡 Match your hair colour, not your brow colour. If brows have faded, go one shade darker than your current brow — never as dark as your hair if your hair is dark.

    Step 5  Blush — 30 seconds

    Blush is what gives the face life — it makes you look like you’ve slept and had fresh air. Smile gently and apply a natural shade on the apples of the cheeks, sweep upward toward the hairline, then soften downward. For dry skin, a cream blush applied with the fingers before powder is more flattering than powder blush.

    ⏱ 0:30  Apples of cheeks · sweep up toward hairline · soften down

    Cream blush swatched on the cheek — the peach tone is the most universally flattering for a healthy flush

    💡 For a natural glow in seconds: skip powder blush and use a cream blush or multi-stick in a warm rose or peach tone with fingertips after foundation. It melds into the skin rather than sitting on top.

    Step 6  Mascara — 30 seconds

    Two coats of mascara on the upper lashes makes the whole face look more awake. Hold the wand parallel to the floor, start at the base of the lashes, and roll the wand as you sweep upward to separate and avoid clumps. Always curl lashes before mascara, never after. True black makes the most impact; brown gives a softer look.

    ⏱ 0:30  Curl first · base to tip · roll the wand · two coats

    Mascara wand held parallel — start at the root and roll upward to separate lashes cleanly

    💡 If your mascara is more than 6 months old, replace it. Old mascara smudges, clumps, and is a bacterial risk. It’s the shortest-lived product in your kit.

    Step 7  Lip Colour — 20 seconds

    Find your neutral — the shade closest to your natural lip colour, slightly warmer or rosier. For mornings, a tinted balm, sheer lipstick, or creamy gloss applied directly from the tube is all you need. Avoid very matte formulas for everyday — they settle into any lines around the lips and dry them out. A creamy, sheer formula with a slight gloss gives the lips a fuller, more luminous look.

    ⏱ 0:20  Applied directly from tube · no liner needed for neutrals

    Neutral lip colour options — sheer and creamy formulas give the most natural, flattering finish for everyday

    💡 Keep your everyday lip colour on your bathroom counter, not in a drawer — the more visible it is, the more likely you are to use it.

    Total Time: Under 5 Minutes

    Pre (eye cream) — 20 sec. Concealer — 40 sec. Foundation — 60 sec. Powder — 20 sec. Brows — 45 sec. Blush — 30 sec. Mascara — 30 sec. Lip colour — 20 sec. Total: approximately 4 minutes 25 seconds.

    Bobbi Brown:  “Makeup is simple. When you know how to apply it and have an organised makeup drawer, it should take only five to ten minutes. Practice is the key.”

    The result — dewy, natural, luminous. Skin that looks like skin, not like makeup

    The Formulas That Make the Difference

    Swap matte for dewy

    Matte foundations, powders, and lipsticks were designed for young, oily skin. On mature or dry skin, matte formulas settle into fine lines, emphasise texture, and flatten the face. Dewy, satin, and cream formulas do the opposite: they fill fine lines with moisture, catch light naturally, and give skin a luminous quality that reads as healthy and rested.

    Swap powder blush for cream

    Cream blush applied with fingers to freshly moisturised skin blends into the skin rather than sitting on top of it. It lasts longer, looks more natural, and doesn’t emphasise dry patches. A pot rouge or cream stick in warm rose works on lips and cheeks from one product.

    Swap full foundation for skin tint

    A tinted moisturiser, skin tint, or serum foundation gives coverage where you need it while letting natural skin texture show through. The effect looks like your skin has evened out rather than been covered over.

    The 2-Minute Version — For Rushed Mornings

    Eye cream under eyes → Concealer on dark circles and redness → Tinted moisturiser or BB cream with SPF → One coat of mascara → A sweep of tinted lip balm.

    Never skip:  Eye cream. Without it, any concealer you apply will crease within an hour. It takes 20 seconds and changes everything.

    Building Your Kit — What You Actually Need

    Eye cream · Peach or pink corrector (if needed) · Yellow-toned concealer · Tinted moisturiser or light foundation · Pale yellow loose or pressed powder · Angled brow brush · Brow powder shadow · Clear brow gel · Cream blush · Mascara · Creamy neutral lipstick or tinted balm.

    An organised makeup drawer — Bobbi Brown says this alone cuts your routine time in half

    Twelve products at most, kept in one organised drawer. That’s a five-minute routine every morning.

    One Last Thing

    The goal of this routine isn’t to look like you’re wearing makeup. It’s to look like yourself — rested, bright-eyed, and put together. The makeup should disappear into your face. What remains is just you, at your best.

    Save this — bookmark it, screenshot it, stick it to your mirror →

  • Why Your Hair Looks Thinner After 40 (And 4 Fixes That Actually Work)

    Why Your Hair Looks Thinner After 40 (And 4 Fixes That Actually Work)

    You look in the mirror and something feels different. Your ponytail doesn’t wrap around the elastic quite like it used to. Your part seems a little wider. And no matter what you try, your hair just doesn’t have that fullness you remember.

    First, let’s say something that needs to be said: you are not imagining it.

    Hair changes after 40. For many women, it starts subtly—maybe a little more hair in the shower drain, a bit less bounce at the crown. But what’s actually happening might surprise you. It’s not always about losing hair; it’s about your hair changing—in texture, density, and the way it behaves.

    The good news? You don’t need expensive treatments, drastic cuts, or a cabinet full of products to make your hair look fuller. You just need to understand what’s going on and apply a few fixes that actually work.

    Let’s break it down.


    The Real Reasons Your Hair Looks Thinner After 40

    Before we fix anything, it helps to know what’s happening under the surface. This isn’t about getting back to your 20s—it’s about working with your hair’s new rhythm.

    1. The Growth Cycle Slows

    Every hair follicle has a growth phase (anagen) and a resting phase (telogen). After 40, the anagen phase shortens, meaning hairs don’t grow as long before they shed. The result: fewer hairs at maximum length at any given time, so your hair feels less dense overall.

    2. Individual Strands Get Finer

    Hormonal shifts—especially during perimenopause—can cause each hair shaft to become thinner in diameter. So even if you have the same number of hairs, they take up less visual space. That’s why your ponytail feels smaller.

    3. Your Part Widens (But Not How You Think)

    As follicles miniaturize, the area around your part can show more scalp. This is often mistaken for dramatic hair loss, but it’s usually a gradual shift in density. It’s also why your hair may feel “thinner” on top.

    4. Texture Changes

    Many women notice their hair becomes drier, more brittle, or less responsive to styling. When hair loses its natural “grip,” it lies flatter and looks less full. The curl pattern you had in your 30s might now be looser or harder to hold.

    The takeaway: You’re not losing your hair—you’re managing a new texture and density. And with a few smart changes, you can create the look of fuller, healthier hair without spending hours or a fortune.


    Fix #1: The Haircut That Instantly Adds Volume

    The wrong haircut can make thinning hair look limp and sparse. The right one creates the illusion of density and movement—and it starts working the moment you leave the salon.

    What to Ask For

    • Blunt ends, not wispy. A blunt cut (even on longer hair) gives the appearance of thickness. Wispy, heavily layered ends can make hair look even thinner. Keep the weight line at the ends or around the jawline.
    • A long bob (lob) with subtle internal layers. This takes weight off without sacrificing fullness. Layers should start below the chin so density stays at the ends.
    • If you prefer short hair, try a textured pixie or crop. A choppy pixie with piece‑y texture creates lift at the crown and disguises sparseness beautifully.
    • Curtain bangs. Already a favorite on this site—they frame the face and add dimension at the crown, making the top of your head appear fuller.

    What to tell your stylist:
    “I want to keep the ends blunt so my hair looks thicker. Can we add just enough internal movement to give it shape without losing density?”

    Before & After Idea:


    Fix #2: The Styling Shift That Creates Lift

    You don’t need to spend 30 minutes with a blow‑dryer. A few simple technique changes can give you lasting volume with almost no extra time.

    1. Root Lifting Sprays, Not Mousses

    Many mousses weigh hair down. Instead, use a lightweight root‑lifting spray on damp roots. Blow‑dry upside down or use a round brush to lift each section away from the scalp. This gives you volume that lasts.

    2. Volumizing Powders or Dry Shampoo

    Sprinkle a tiny amount at the roots, massage in with your fingertips. Instantly, you’ll have texture, grip, and lift—without any weight. This is a 30‑second trick that works on day‑old hair or even fresh‑washed hair.

    3. Velcro Rollers (Yes, They Still Work)

    Roll the top section of your hair (from the crown forward) while you do your makeup or get dressed. Let them cool, then release. You’ll get a soft, natural lift that lasts all day. It’s a 5‑minute investment that pays off.

    Pro Tip: Avoid heavy serums or oils near the roots. They flatten hair instantly. Keep them for mid‑lengths and ends only.


    Fix #3: The Color Trick That Creates Depth

    Believe it or not, color is one of the most powerful tools for making hair look thicker. Uniform, all‑over color can make thinning hair appear flat. Strategic color adds contrast and the illusion of more strands.

    Techniques to Ask For

    • Root smudge / shadow root. A slightly darker shade at the roots creates depth and makes regrowth less obvious. It also visually thickens the scalp area.
    • Balayage or babylights. Soft, face‑framing highlights add dimension and mimic natural light reflection. This contrast tricks the eye into seeing more density.
    • Avoid all‑over solid color. It can look one‑dimensional and emphasize sparseness. Instead, aim for 2–3 shades woven throughout.

    What to tell your colorist:
    “I want dimension that adds visual density—think a soft root and face‑framing brightness. I’m not looking for a big color change, just more depth.”

    Bonus for gray hair:
    If you’re blending gray, ask for “mushroom blonde” or “ash bronde” tones. Cool shades harmonize with silver and create a multi‑tonal effect that looks naturally full.


    Fix #4: The Product Swap That Actually Matters

    You don’t need an expensive “hair loss” line. You just need the right formulas for finer, more delicate strands.

    What to Use

    • Sulfate‑free shampoo. Gentle cleansing preserves your hair’s natural moisture and doesn’t strip finer strands.
    • Lightweight conditioner. Apply only from mid‑lengths down to avoid weighing down roots. A “volumizing” conditioner is often a good choice.
    • Thickening sprays with polymers. These coat the hair shaft, temporarily increasing its diameter. Look for words like “thickening,” “volumizing,” or “body builder.”
    • Weekly protein treatment. Fine, thinning hair often lacks structure. A protein mask once a week can strengthen and add temporary body. (Don’t overdo it—protein overload can make hair stiff.)

    What to Skip

    • Heavy oils and butters (coconut oil, shea butter) near the roots.
    • “Repair” masks marketed for damaged hair—they’re often too rich for thinning hair.
    • Silicone‑heavy serums that coat the hair and flatten it.

    When to See a Professional (And What to Ask)

    If you notice sudden, patchy, or excessive shedding—or if your part seems to be widening rapidly—it’s worth a visit to a dermatologist or trichologist. Underlying issues like thyroid imbalance, iron deficiency, or hormonal shifts can accelerate thinning. A blood test can rule those out.

    At the salon, use this script:
    “I want a cut that adds volume without requiring daily heat styling. Can we keep the ends blunt and add some internal movement? Also, I’d love to talk about color dimension—maybe a root smudge and a few babylights.”


    The Takeaway

    Your hair after 40 isn’t a problem to be solved—it’s just a new canvas to work with. By choosing the right cut, adjusting your styling routine, using color strategically, and swapping a few products, you can create the look of fuller, healthier hair without spending hours or a fortune.

    Save this guide to show your stylist at your next appointment. And if you’re ready for a change, start with the haircut—it’s the foundation everything else builds on.


    Comments

    Have you noticed changes in your hair after 40? What’s worked for you? Share your experience below—we’d love to hear your tips.

  • 25 Spring Nail Ideas for women over 40 — Elegant, Trending & Not Trying Too Hard

    25 Spring Nail Ideas for women over 40 — Elegant, Trending & Not Trying Too Hard

    The most sophisticated spring nails aren’t the loudest ones. They’re the ones that make people notice your hands — and then your confidence.

    Spring 2026 is a brilliant season to be a dedicated nail lover. The biggest trends this year — milky neutrals, minimalist art, soft pearl finishes, modern French tips, and earthy sage greens — all happen to be exactly what flatters mature hands most. No clashing neons, no coffin stilettos, no maximalist chaos. Just intentional, elegant, effortlessly wearable nails.

    We’ve curated 25 ideas organised by vibe and occasion, each with a quick tip on shape, finish, and whether you can DIY it at home. Whether you’re a short-nail devotee or love a medium almond, there’s a spring look here that was made for you.

    The shape rule:  Oval, soft squoval, and almond shapes are the most flattering for women over 40. They elongate fingers, soften the appearance of veins, and work beautifully at short to medium lengths. Avoid very sharp square or stiletto shapes — they can make hands look more severe rather than more youthful.

    Milky Neutrals & Cloud Dancer Whites

    Pantone’s 2026 Color of the Year is Cloud Dancer — a serene, airy off-white. On nails, this translates to soft milky whites, sheer creams, and barely-there pearl tones that are universally flattering, work with every outfit, and photograph beautifully. This is the most-saved nail category on Pinterest for spring 2026 — and for good reason.

    1. Milky White — The Effortless Everyday

    A soft, milky opaque white with a creamy finish is the single most versatile spring nail you can wear. It reads as clean, modern, and incredibly polished without looking stark or clinical. On shorter oval nails it looks chic and intentional; on medium-length squovals it looks editorial. This is the one shade that genuinely works on every skin tone.

    💅 Tip: The key word is milky — avoid bright, stark whites which can make hands look washed out. Look for shades described as ‘sheer white,’ ‘cream white,’ or ‘milk’ rather than ‘optical white’ or ‘brilliant white’.

    ✔ Best for: All skin tones · all nail lengths · any occasion

    🏠 DIY-friendly: Yes — one of the easiest DIY shades. Two coats, a glossy topcoat, done.

    2. Soap Nails — The Barely-There Glow

    Soap nails are the nail equivalent of your-skin-but-better foundation: a sheer wash of translucent, slightly iridescent colour that makes the nail bed look clean, healthy, and luminous. The finish isn’t glossy or matte — it has a soft, satin quality that catches light delicately. This is the quietest luxury nail trend of 2026 and it’s particularly flattering on mature hands because it doesn’t draw attention to imperfections.

    💅 Tip: Apply a sheer nail tint or a milky pink jelly polish over a nude base. Top with a satin (not high-gloss) topcoat. The effect should look like your nails have just been deeply conditioned.

    ✔ Best for: All skin tones · short to medium nails · women who prefer low-key nails

    🏠 DIY-friendly: Yes — any sheer, jelly-formula polish works.

    3. Sheer Pearl — The Upgrade

    One step up from soap nails: a sheer base with a soft pearl or iridescent finish that shifts between white and blush in different lights. Pearl nails are having a significant moment in spring 2026 — they’re referenced on fashion runways and Pinterest boards alike. The shimmer is subtle enough to wear anywhere but catches light in a way that makes your hands look polished even without obvious nail art.

    💅 Tip: Look for a nail polish described as ‘pearl,’ ‘opalescent,’ or ‘shimmer white.’ Apply over a milky white base for more opacity, or alone over bare nails for a more natural effect.

    ✔ Best for: All skin tones · especially beautiful on short oval nails · daytime and evening

    🏠 DIY-friendly: Yes — one of the most beautiful and easiest DIY spring looks.

    4. Cream Nude — Your Skin But Better

    A well-chosen nude — matched to your undertone, not just your skin tone — is the most universally flattering nail colour a woman over 40 can wear. Warm undertones: reach for peachy nudes, caramel, or warm beige. Cool undertones: reach for pink-beige, dusty rose, or lavender-nude. The right nude elongates the nail bed, makes fingers look slender, and reads as effortlessly sophisticated.

    💅 Tip: The biggest nude mistake is going too light — a nude that’s paler than your skin actually emphasises veins and dark spots. Match the nude as closely as possible to the warmest point of your palm.

    ✔ Best for: All skin tones when matched correctly · all nail lengths

    🏠 DIY-friendly: Yes — test two or three shades at home to find your perfect match.

    5. Glazed Donut — The Glossy Chrome Nude

    The glazed donut trend shows no signs of slowing in spring 2026. A sheer nude or pink base with a chrome or holographic powder finish applied on top creates a mirror-like, high-shine effect that looks like the nail is lit from within. It’s playful but polished, modern without being experimental. Hailey Bieber made it famous but it looks if anything better on women over 40 who have the confidence to wear something this unapologetically glamorous.

    💅 Tip: Ask your nail tech for ‘chrome powder over a sheer nude base’ or look for glazed donut gel kits online. The chrome effect requires gel — it won’t work properly with regular polish.

    ✔ Best for: All skin tones · oval and almond nail shapes · evening and special occasions

    🏠 DIY-friendly: Possible at home with gel lamp and chrome powder kit — moderate skill required.

    The Spring 2026 Colour Palette

    These are the specific spring shades that both trend and flatter this season — chosen because they work beautifully on mature skin tones without the harsh contrast or visual noise of neons and saturated brights.

    6. Soft Coral — The Warmth Bringer

    Coral sits at the perfect intersection of pink and orange, and it’s one of the most universally flattering shades for women over 40. It brings warmth to the complexion, makes skin look more vibrant and healthy, and photographs beautifully. In spring 2026 the trending version of coral is soft and slightly muted — more peach-coral than neon — which makes it wearable from brunch to the office.

    ● Shades to try  —  Peach Fuzz, soft persimmon, muted apricot, sherbet coral

    💅 Tip: Coral is especially flattering on medium to deeper skin tones. On fair skin, opt for the peachy-pink end of the coral spectrum rather than the orange end.

    ✔ Best for: Medium to deep skin tones especially · short to medium nails

    🏠 DIY-friendly: Yes — any creamy coral formula works beautifully.

    7. Milky Lavender — Soft, Dreamy, Unexpected

    Lavender is having a genuinely significant spring 2026 moment — but the version that works for women over 40 is specifically the milky, muted lavender rather than the bright, saturated purple. A soft lavender-grey or lilac cream is subtle enough to be wearable daily but interesting enough to feel seasonal and modern. It pairs beautifully with gold jewellery and brightens fair to medium complexions.

    ● Shades to try  —  Dusty lilac, misty lavender, grey-mauve, pale violet

    💅 Tip: Milky lavender can look flat without a glossy topcoat. Make sure to finish with a high-shine topcoat to give it the luminous quality that makes it look expensive.

    ✔ Best for: Fair to medium skin tones · oval and squoval shapes

    🏠 DIY-friendly: Yes — very easy at home.

    8. Sage & Earthy Green — The Nature Moment

    Earthy greens — sage, olive, matcha, muted teal — are one of spring 2026’s most confident colour stories, and they’re far more flattering on mature hands than you might expect. The key is the earthy, muted quality: these aren’t forest greens or lime greens, they’re the tones you’d find in a herb garden or a botanical illustration. They pair beautifully with gold and silver jewellery and look particularly striking against warm to medium skin tones.

    ● Shades to try  —  Soft sage, matcha latte, olive grey, dusty teal, pistachio

    💅 Tip: Green nails can look unexpectedly polished — the trick is keeping the finish creamy or satin rather than glossy, which gives the shade a more sophisticated, intentional quality.

    ✔ Best for: Warm to medium skin tones · women who want a colour that feels unique

    🏠 DIY-friendly: Yes — earthy green polishes are readily available.

    9. Soft Sky Blue — Fresh and Modern

    Light blue nails are a spring classic, but 2026’s version is denim blue, powder blue, or sky blue rather than baby blue. This cooler, slightly more grown-up shade of blue is one of the most unexpected yet flattering choices for mature hands — it creates contrast that makes skin look more luminous and the nails themselves look clean and precisely painted. It works especially well on short squoval or oval nails.

    ● Shades to try  —  Powder blue, light denim, icy cornflower, washed chambray

    💅 Tip: Blue nails can make cool-toned hands look slightly more veiny — if this is a concern, opt for a warmer, greyer blue rather than a clear, bright sky blue.

    ✔ Best for: Fair to medium skin tones · short nails · spring and summer events

    🏠 DIY-friendly: Yes — blue polishes are widely available and apply easily.

    10. Mauve & Rosewood — The Elegant Middle Ground

    Mauve — that beautiful pink-brown meeting point — is one of the most sophisticated and universally flattering shades in the nail world. It’s warm enough to feel spring-appropriate, has enough depth to look deliberate, and complements virtually every skin tone. In 2026, the trending version is slightly richer: rosewood, dusty rose, and warm berry-mauve are all very current. These are the nails that get complimented at every dinner table.

    ● Shades to try  —  Dusty rose, rosewood, warm mauve, muted berry, plum-rose

    💅 Tip: Mauve is one of the longest-wearing colours on nails — it shows chips less obviously than lighter or brighter shades. Perfect if you want a colour that holds up through a busy week.

    ✔ Best for: All skin tones · all nail lengths · most versatile spring shade

    🏠 DIY-friendly: Yes — one of the most foolproof at-home colours.

    11. Classic Red — Forever Spring

    Spring is actually one of the best seasons to wear red nails, and for women over 40 it’s genuinely one of the most flattering choices available. A classic medium red — not too orange, not too dark — is timeless, powerful, and creates the kind of instant contrast that makes hands look more vibrant and alive. In 2026, the trending red is slightly warm-toned: think tomato red or rose red rather than blue-toned cherry.

    💅 Tip: The best red for mature hands is a creamy, opaque formula in a medium shade. Very dark reds (bordering on burgundy) can emphasise age spots; very orange reds can look harsh on fair skin. Stick to the warm-medium range for the most universally flattering result.

    ✔ Best for: All skin tones · all occasions · women who want a confidence boost

    🏠 DIY-friendly: Yes — but requires two careful coats and precise clean-up around cuticles.

    Minimalist Nail Art That Doesn’t Try Too Hard

    The spring 2026 nail art movement is specifically anti-maximalist — no crowded, overly detailed designs, no bright 3D charms, no competing elements. The most-saved nail art on Pinterest right now is quiet, precise, and feels like something a Parisian would wear. Here are the 8 designs that hit that brief perfectly for women over 40.

    12. The Modern French Tip — Elevated Classic

    The French manicure is having its biggest revival in years, but the 2026 version is nothing like the stark white tips of the early 2000s. This season’s French is softer: a sheer or milky base with ultra-thin tips in soft white, nude, or pastel. The tip line is finer and the curve is more natural. The modern French is arguably the best nail art of the season — it’s classic, it’s flattering, and it photographs beautifully at every age.

    💅 Tip: Ask for a ‘micro French’ or ‘baby French’ tip — the thinner the tip line, the more modern and expensive it looks. Avoid the thick, obvious white tips of the early 2000s.

    ✔ Best for: All skin tones · all nail lengths · any occasion

    🏠 DIY-friendly: Moderate — use a nail art brush or striping tape to achieve a clean line.

    13. Coloured French Tip — The Seasonal Update

    Take the modern French and add a seasonal twist: instead of white or nude tips, use a single spring colour — soft sage, muted coral, dusty lavender, or powder blue. The coloured French is one of the most Pinterest-saved nail looks of spring 2026. It has all the elegance of the classic French but with a quiet, modern personality. On short oval nails it looks incredibly refined.

    💅 Tip: Keep the base sheer or nude and the tip colour muted rather than bright. The subtler the contrast, the more sophisticated the result.

    ✔ Best for: All skin tones · short to medium nails

    🏠 DIY-friendly: Yes with nail art brush or tape — one of the more achievable home art looks.

    14. Single Gold Line — The Micro Detail

    One ultra-thin gold line drawn horizontally across each nail — either at the base, the tip, or the midpoint — is one of the most minimal and quietly stunning spring nail looks of 2026. The gold catches light exactly like a delicate piece of jewellery, and the restraint of the design is what makes it feel expensive rather than fussy. It works over any base colour: nude, milky white, coral, even red.

    💅 Tip: A gold nail art pen gives the most consistent, precise line without the mess of polish. Run it across the nail in one steady stroke and clean up any wobbles with a fine brush dipped in acetone.

    ✔ Best for: All skin tones · medium-length nails especially · adds elegance to any base colour

    🏠 DIY-friendly: Yes — one of the most achievable home nail art looks. Nail art pens cost under £5.

    15. Negative Space Design — Modern & Sculptural

    Negative space nail art uses the bare nail itself as part of the design — leaving sections of the nail unpainted and working with the contrast between polish and bare nail to create geometric shapes, moon shapes, or abstract lines. It’s one of the most editorial-looking nail designs of 2026 and, paradoxically, one of the easier ones to achieve at home because it requires less precise brushwork and more precise masking.

    💅 Tip: Use striping tape or gel tape to mask off areas before painting. Remove the tape while the polish is still slightly wet for the cleanest edge.

    ✔ Best for: Oval and almond nails · women who want something unique without bright colour

    🏠 DIY-friendly: Moderate — requires striping tape but very achievable at home.

    16. Tiny Dot Accent — Polka Dots, Grown Up

    Polka dot searches on Pinterest are up 2,100% year-on-year for spring 2026 — the trend is enormous. But the version that works for women over 40 isn’t the full-coverage graphic polka dot: it’s a single accent nail with three or four micro dots in a complementary colour, or a scattered dot pattern on a sheer base. The scale and restraint are what make it feel sophisticated rather than juvenile.

    💅 Tip: A dotting tool gives perfect, consistent dots. Start with a dot that’s about 2mm in diameter — smaller than you think you need. Allow to dry completely before applying topcoat to prevent smearing.

    ✔ Best for: Short squoval or oval nails · women who want nail art without committing to a full design

    🏠 DIY-friendly: Yes — a dotting tool costs under £3 and gives immediately professional results.

    17. Abstract Watercolour — The Artistic Statement

    Soft, painterly washes of two or three pastel shades blended together on a white or sheer base create a watercolour effect that’s organic, artistic, and genuinely beautiful. It’s one of the more ambitious DIY nail looks — but also one of the most forgiving, because the intentionally blended, imperfect quality is the whole point. Use spring shades: lilac and coral, sage and cream, blush and blue.

    💅 Tip: Use a sponge or a dry brush to blend two polishes together while both are still slightly tacky. Don’t overwork it — three or four strokes maximum. The less you do, the better it looks.

    ✔ Best for: Women who love an artistic look · medium-length nails especially

    🏠 DIY-friendly: Yes — one of the most creatively satisfying home nail art looks.

    18. Pearl Accent Nail — The One Statement Finger

    Rather than committing to a full pearl manicure, try the one-finger accent approach: four fingers in a muted nude or milky white, and the ring finger in a pearl or holographic chrome finish. This is a classic editorial technique — a single statement nail rather than a full statement look. It draws attention to your hands in a quiet, intriguing way without any of the visual noise of a full art set.

    💅 Tip: The ring finger is the traditional accent nail, but try the index finger for something slightly less expected. The single chrome accent against matte nude nails is one of the most striking and simple looks of spring 2026.

    ✔ Best for: All skin tones · all nail lengths · the best option for women unsure about bold nail art

    🏠 DIY-friendly: Yes for the nude base; the chrome accent requires gel and a powder kit.

    19. Taffeta / Satin Finish — The Fabric Manicure

    Fabric-inspired nail finishes are directly from the NYFW runway for spring 2026: specifically the taffeta manicure — a neutral shade with a fine, light-catching shimmer that gives the impression of woven silk. It’s not glittery, not chrome, not pearlescent in the traditional sense. It’s something subtler: a finish that looks like fabric under directional light. Incredibly elegant, completely unique, and flattering on any nail length.

    💅 Tip: Look for a nail polish described as ‘shimmer,’ ‘satin,’ or ‘micro-shimmer’ rather than glitter or chrome. Brands like OPI and Essie have options across their ranges that hit this finish perfectly.

    ✔ Best for: All skin tones · all nail lengths · women who love texture and finish over colour

    🏠 DIY-friendly: Yes — readily available in regular polish formula.

    The Best Shapes & Lengths

    Shape matters as much as colour. The right shape can make fingers look longer and more slender; the wrong one can make hands look harsh. Here’s what the experts recommend for spring 2026.

    20. Soft Squoval — The Everyday Perfect

    The squoval (square-oval hybrid) is the dominant nail shape of 2026 and one of the most flattering for mature hands. It has the structure of a square but with softened, rounded corners that prevent the harshness of a hard square edge. It’s practical — no snagging, no breakage — and works at very short lengths. This is the shape to request if you’re not sure what suits you: it’s the little black dress of nail shapes.

    💅 Tip: Ask your nail tech for ‘soft square’ or ‘squoval’ — a file angled at 45 degrees at the corners to round them gently. Keep the length at or just past the fingertip for maximum elegance.

    ✔ Best for: All hand types · practical lifestyle · the most universally flattering shape

    21. Short Oval — The Elongating Classic

    The oval shape is specifically recommended by nail experts for mature hands because it mirrors the natural curve of the cuticle and creates an elongating effect. Even at very short lengths, an oval shape gives the impression of slender fingers. It’s slightly harder to maintain than squoval but more dramatic in its elongating effect — worth the extra attention if you want your hands to look their most elegant.

    💅 Tip: Oval nails are filed on the sides toward a rounded point. The key is symmetry — file both sides equally. An uneven oval can make nails look shorter, not longer.

    ✔ Best for: All skin tones · women who type or use their hands actively at short lengths

    22. Short Almond — The Feminine Statement

    The almond shape — tapered with a slightly pointed oval tip — is the most elongating nail shape available. It makes fingers look dramatically longer and more slender. In 2026 the trend is specifically the short almond: the shape at a length that’s manageable day-to-day, rather than the dramatic extension lengths of previous years. On short to medium lengths, a soft almond looks incredibly refined.

    💅 Tip: If you’re new to almond, try it first on just one or two nails to see how you feel about the shape before committing to a full set.

    ✔ Best for: Women with shorter fingers especially · medium nail lengths · oval or almond fans

    Finish Guide & At-Home Tips

    The Finish That Ages Hands Most — And What to Use Instead

    Matte finishes are one of the most popular nail choices — but they’re also one of the least flattering on mature hands. A matte finish emphasises dryness and texture in the skin around the nail, and makes fine lines more visible. The most flattering finishes for women over 40 are creamy opaque, satin, soft gloss, and sheer — all of which smooth the appearance of the skin rather than highlighting it.

    💅 Tip: If you love the matte look, apply it only to the nail itself and keep your cuticles and surrounding skin intensively moisturised. A matte topcoat over a hydrating base formula is less drying than a matte polish alone.

    The One Product That Transforms Any Manicure

    A high-quality glossy topcoat is the single most transformative product in nail care for women over 40. It extends the life of any manicure by three to five days, deepens and enriches any colour, and — most importantly — adds a luminous finish that makes the skin around the nail look healthier and more youthful. Reapplying topcoat every two days is the easiest way to maintain a salon-fresh manicure at home.

    💅 Tip: The three topcoats recommended most consistently by nail technicians for longevity are Seche Vite, OPI RapiDry, and Deborah Lippmann All About That Base. Each of these adds significant wear time compared to budget topcoats.

    Hand Care — The Step Everyone Skips

    The most flattering nail art in the world is undermined by dry, neglected hands. For women over 40, hand care is genuinely as important as the manicure itself: the skin thins, loses moisture faster, and takes longer to recover. A hand cream applied immediately after washing, a cuticle oil at night, and SPF on the backs of the hands daily (sun damage is the number one cause of age spots) will make your nails look more polished than any nail art trend.

    💅 Tip: Apply cuticle oil every night — it takes ten seconds and makes a visible difference within two weeks. Pushed-back, hydrated cuticles make any nail colour look cleaner and more professionally applied.

    ✔ Best for: Everyone — this step makes the biggest single difference to how nails look

    🏠 DIY-friendly: Yes — entirely at-home and takes under two minutes a day.

    Take This to Your Next Appointment

    Screenshot the two or three designs that caught your eye and bring them to your appointment. The more specific your reference, the better the result — ‘something like this’ with a photo is worth a thousand words of description.

    The one-sentence brief:  “I want something elegant but modern — nothing too bold or fussy. I’m thinking [milky white / soft sage / modern French / pearl finish] in a short oval or squoval shape. Clean, polished, spring-appropriate.”

    That single sentence covers colour, shape, and vibe — everything your nail tech needs to give you exactly what you’re imagining.

    Save this for your next salon visit — spring nail season doesn’t last long! →

  • Gray-Blended Hair Color for Women Over 40 — Going Silver Beautifully in 2026

    Gray-Blended Hair Color for Women Over 40 — Going Silver Beautifully in 2026

    Forget covering your gray. The most confident, low-maintenance thing you can do with your hair in 2026 is to blend it beautifully — and let it work for you.

    Something shifted. For decades the conversation around gray hair was simple: cover it, fight it, hide it. In 2026 that’s over. Women over 40 are showing up with intentional silver, dimensional salt-and-pepper, and gorgeously blended gray-to-blonde transitions — and they look incredible doing it.

    Gray blending isn’t giving up. It’s a strategic, often gorgeous colour choice that can actually reduce your salon visits, lower your maintenance costs, and give your hair a dimension that box dye simply can’t replicate. This article covers everything: the techniques, the looks by hair type and length, the 2026 color trends worth knowing, and how to care for silver hair at home.

    What is gray blending?  Gray blending is a technique where a colorist works with your natural gray strands rather than against them — using highlights, balayage, glosses, or toning to create a seamless, multi-dimensional result that grows out beautifully with no harsh regrowth line.

    Section 1 — The 6 Gray Blending Techniques Explained

    The technique your stylist uses makes all the difference between a result that feels intentional and one that just looks grown-out. Here’s exactly what each one involves and who it’s best for.

    1. Herringbone Highlights — The Best for Seamless Blending

    Herringbone highlights are applied in a diagonal, overlapping pattern — like the bones of a fish — rather than the traditional vertical sections. This placement means highlighted pieces fall over unlightened sections, creating a far more seamless, natural blend. It’s particularly brilliant for gray blending because the overlapping technique integrates silver strands into the overall color so completely that regrowth becomes almost invisible.

    Herringbone highlights on a short pixie — the diagonal placement creates seamless silver-to-brunette dimension

    💡 Stylist tip: Ask for ‘ash blonde’ or ‘light cool-toned’ highlights alongside your natural gray — warm tones can clash with silver. Cool or neutral tones blend in perfectly.

    Maintenance level: Low. Touch-ups every 12–16 weeks. Best for: All hair lengths, brunette to light brown base.

    2. Babylights — The Most Natural-Looking Gray Blend

    Babylights are ultra-fine, closely-packed highlights — much thinner than traditional foils. They mimic the natural way sunlight hits hair, creating a soft, dimensional result without an obvious highlight pattern. For women with lighter bases (light brown, dark blonde), babylights are often the best route into gray blending because the effect is so subtle that the transition to silver feels completely organic.

    Gray-blended lob — the dimensional color is achieved through fine highlights that integrate naturally with silver

    💡 Stylist tip: If your base is light brown or dark blonde, babylights can be blended with your growing silver to create the illusion of full natural highlighting. No harsh lines, ever.

    Maintenance level: Very low. Grows out beautifully. Best for: Light brown to blonde bases, women just starting to go gray.

    3. Silver Balayage — The Statement Blend

    Balayage involves painting lightener freehand onto sections of hair, concentrating it toward the ends and face-framing pieces. A silver balayage uses cool-toned, ashy tones to bring the overall color toward silver — either enhancing natural gray or creating the silver look from scratch. The result is a gradient from darker roots to luminous silver ends that photographs beautifully and grows out with almost no awkward phase.

    Full silver embraced — long flowing layers where natural silver has been enhanced to a luminous, multi-dimensional finish

    💡 Stylist tip: Ask for a gloss treatment at the end of your balayage appointment. It seals the cuticle, adds incredible shine, and tones any unwanted brassy or yellow undertones.

    Maintenance level: Low-medium. Gloss refresh every 6–8 weeks keeps it vibrant. Best for: Medium to long hair, women wanting a dramatic silver effect.

    4. Root Smudge / Shadow Root — The Grow-Out Lifesaver

    A root smudge (or shadow root) is a technique where your colorist applies a slightly darker color just at the root — blending it gently into your highlights or silver below. Instead of a harsh line where your roots begin, you get a soft, diffused gradient. It’s the single most effective technique for women who are growing out their color or going gray gradually, because it makes regrowth completely invisible for months.

    Long silver layers grown out naturally — the seamless root-to-end transition is the result of strategic root blending

    💡 Stylist tip: A root smudge only adds 15–20 minutes to your appointment and dramatically extends the life of your colour. It’s one of the best value additions you can request.

    Maintenance level: Very low. Lasts 10–14 weeks easily. Best for: Any hair length, women transitioning slowly to silver.

    5. Air Touch Balayage — The Softest Blend Available

    Air touch balayage replaces the traditional backcombing step with a blow-dryer — the air lifts the shorter inner layers away, leaving only the longer outer strands to be painted. The result is an incredibly soft, diffused blend with almost no contrast between highlighted and unhighlighted sections. It’s the most seamless technique available and is particularly popular in 2026 for women who want a gray-blended result that looks truly natural.

    Full silver lob — this level of seamless blending is achieved through soft, diffused highlighting techniques

    💡 Stylist tip: Air touch balayage is a more specialist technique — not every salon offers it. Ask specifically when you book and check the colorist’s portfolio for gray blending work.

    Maintenance level: Very low. Can go 16+ weeks between appointments. Best for: Medium to long hair, women wanting the most natural possible result.

    6. Gray Gloss Treatment — The Maintenance Must-Have

    A gloss is a semi-permanent treatment that adds shine, neutralises unwanted tones, and refreshes color — without lightening or dramatically changing anything. For silver and gray hair, a purple or blue-toned gloss is transformative: it eliminates the yellowish or brassy tinge that gray hair picks up over time, and restores that crisp, luminous silver quality. Many women book a gloss every 6–8 weeks between full colour appointments.

    Gray-blended bob — the dimensional, high-shine finish is maintained with regular toning and gloss treatments

    💡 Stylist tip: You don’t need a full appointment for a gloss. Many salons offer a standalone gloss service in under 30 minutes. It’s the most cost-effective way to keep gray hair looking intentional.

    Maintenance level: Very low. Best used as an add-on every 6–8 weeks. Best for: All gray hair, especially prone to yellowing or brassiness.

    Section 2 — Gray Blending by Your Base Color

    The technique that works best for you depends entirely on where your hair starts. Here’s the honest breakdown.

    Dark Hair — Black to Dark Brown

    Gray blending on dark hair requires the most strategy because the contrast between dark pigment and silver can be stark. The goal is to soften that contrast without going so light that you end up with an obvious stripe. The best approaches are lowlights to add depth alongside the silver, herringbone highlights to create gradual dimension, or embracing a bold salt-and-pepper look — which is one of the most striking and sought-after styles in 2026.

    Dark base with bold silver money pieces — the contrast is intentional and stunning, especially on long layered hair

    💡 Stylist tip: Avoid going too light too fast on a dark base. The transition takes time and rushing it can damage hair significantly. A colorist specialising in gray blending will map out a multi-appointment plan.

    Brunette — Medium to Light Brown

    Medium brunettes have the most flexibility when it comes to gray blending. The contrast between brown and silver isn’t as dramatic as black, which means babylights, balayage, and herringbone highlights all work beautifully. The mushroom blonde shade — a cool, muted brown with ashy undertones — is particularly effective as a bridge color that makes gray strands look like intentional highlights rather than regrowth.

    Brunette base with salt-and-pepper curls — the gray threads read as beautiful natural highlights throughout the curl

    💡 Stylist tip: Ask for ‘mushroom blonde’ or ‘ash bronde’ tones alongside your natural gray. The cool undertones harmonise with silver rather than clashing against it.

    Blonde — From Honey to Platinum

    Blonde is the most straightforward base to transition to gray from, because lighter hair and silver share similar tonal properties. The most popular approach in 2026 is the ‘cloud dancer’ look — a soft, airy platinum-blonde that blends with silver so seamlessly that the two are almost indistinguishable. Women with existing highlights can also simply allow their roots to grow in and request a root smudge to create a polished, intentional gradient.

    Silver-to-blonde graduated pixie — demonstrates how beautifully cool blonde and silver integrate at shorter lengths

    💡 Stylist tip: If you’ve been blonde for years, transitioning to silver is often the path of least resistance. Ask your colorist about ‘progressive lightening’ — gradually cooling your blonde toward silver over 2–3 appointments.

    Section 3 — Going Silver with Natural & Protective Styles

    Gray blending isn’t only for straight or wavy hair. Natural hair textures and protective styles look absolutely extraordinary in silver, salt-and-pepper, and fully embraced gray. This section is for you.

    Natural Silver Afro & Curls

    Natural curly and coily hair carries silver and gray in a way that is genuinely unlike anything else. The curl pattern catches light differently at every angle, creating a depth and dimension that straight hair simply cannot replicate. Whether you’re fully silver, salt-and-pepper, or embracing a blended gray afro, the effect is bold, confident, and magnetic.

    Silver-blended natural afro — the gray threads through the curl create extraordinary dimension and volume

    Fully embraced silver curls — the most joyful, confident energy in the room

    Natural silver crop — minimal and powerful

    💡 Stylist tip: Gray and silver natural hair tends to be drier than pigmented hair. A weekly deep conditioning treatment and a satin bonnet at night make a significant difference to moisture retention and curl definition.

    Silver Curly Lob

    A curly lob with salt-and-pepper or silver blending is one of the most wearable and flattering looks for women over 40. The curl creates volume and movement, the silver adds dimension, and the lob length is universally flattering. It’s the sweet spot for women who love their natural texture but want a polished, intentional look.

    Dark curly hair with silver highlights threaded through — the salt-and-pepper effect is completely natural here

    💡 Stylist tip: For curly gray blending, ask your colorist for silver-toned babylights specifically placed on the curls that naturally catch light — crown and face-framing sections. This mimics the most beautiful natural gray pattern.

    Silver & Gray Protective Styles — Braids, Twists & More

    One of the most visually striking developments in the going-gray conversation is how women with natural hair are embracing silver in protective styles. Gray and silver braiding hair — whether in box braids, cornrows, twists, or locs — creates a look that is simultaneously modern, intentional, and deeply beautiful. These styles also protect your natural gray from manipulation and breakage while you grow it out.

    Silver twist updo — protective, glamorous, and completely on-trend for 2026

    Short gray box braid bob — structured, chic, and completely effortless to maintain

    Long silver braids — the length creates stunning movement and the silver tones look intentional and elegant

    💡 Stylist tip: When choosing silver or gray braiding hair, look for multiple tones rather than a single flat gray — the variation creates a much more realistic, dimensional result that mirrors natural gray blending.

    Section 4 — Gray Blending by Hair Length

    Short Hair — Pixies, Crops & Short Bobs

    Short hair is one of the boldest and most effective canvases for going silver. Because the length is minimal, the gray blending reads as intentional colour — not neglect. A gray-blended pixie or crop is also the most maintenance-free option: you’re not fighting regrowth on a long canvas, and the shape stays sharp with regular trims every 6–8 weeks.

    Short pixie with herringbone highlights blending natural gray throughout — requires almost no colour maintenance

    💡 Stylist tip: If you’re transitioning to gray and have short hair, the most efficient route is often simply to cut regularly and let the gray grow in — with a root smudge to keep it polished during the transition.

    Medium Length — Lobs & Shoulder-Length

    Medium-length hair offers the most styling versatility for gray blending. A lob or shoulder-length cut can show off the full gradient of a silver balayage, carry babylights beautifully, and still be tied back on busy days. The medium length also means the grow-out process is much faster than long hair — you can see significant progress in 3–4 months.

    Silver-blended lob with incredible volume and movement — medium length is the sweet spot for gray blending

    Gray-blended bob — front, side and back views show how dimensional the color reads at all angles

    Long Hair — Layers & Beyond

    Long gray hair is one of 2026’s most powerful beauty statements. It signals confidence, self-assurance, and a complete lack of interest in hiding who you are. The key at longer lengths is keeping the hair healthy — gray hair tends to be coarser and drier, so regular deep conditioning and trimming are non-negotiable. The silver balayage and root smudge techniques work particularly well on long hair because the grow-out is so graceful.

    Long flowing silver — this is the ‘cloud dancer’ moment: luminous, dimensional, and absolutely commanding

    Long silver layers — the selfie that proves going fully silver at length is one of the boldest and most beautiful choices

    💡 Stylist tip: Long gray hair needs a monthly deep conditioning mask as a minimum. Look for products containing keratin, argan oil, or shea butter — these combat the coarseness that gray hair develops over time.

    Section 5 — The 2026 Gray Color Trends Worth Knowing

    Cloud Dancer — The Pantone-Inspired White-Blonde

    Inspired by Pantone’s 2026 Color of the Year, Cloud Dancer is a soft, luminous white-blonde with a cool, milky quality — the most sophisticated end of the silver spectrum. It’s defined by a translucent, high-lift blonde with a soft-focus finish that blends seamlessly with silver and white hair. For women over 40 who are already predominantly gray or silver, Cloud Dancer toning gives the hair a polished, intentional quality that feels genuinely editorial.

    ● Cloud Dancer — Cool white-blonde, almost platinum but softer. Zero warmth, maximum luminosity.

    Dimensional Silver — The Anti-Flat Gray

    The worst version of going gray is flat, one-dimensional, uniform silver — it can look washed out and add years. The 2026 approach is the opposite: mixing silver, slate, white, and dark strands for a multi-tonal, light-catching result that looks expensive and youthful. Dimensional silver is what you get when a skilled colorist adds depth lowlights alongside the brightening highlights — the result has movement even when the hair is standing still.

    Dimensional silver-blended wavy lob — the mix of tones is what creates the youthful, expensive quality

    ● Dimensional Silver — Multi-tonal mix of slate, silver, white and dark threads. Never uniform. Always moving.

    Salt and Pepper — The Most Flattering Natural Look

    Salt and pepper — the natural blend of dark pigment and silver strands — is having its biggest cultural moment in decades in 2026. Rather than being seen as something to fix, it’s now recognised as one of the most sophisticated, flattering, and individual hair colors a woman can wear. The key to beautiful salt-and-pepper hair is the ratio: ideally 40–60% silver to dark, distributed so neither dominates. A colorist can add strategic lowlights to achieve the ideal balance if your natural ratio isn’t there yet.

    Natural salt-and-pepper curls — the ratio of dark to silver here is close to perfect

    ● Salt and Pepper — Dark base with 40–60% silver woven throughout. The goal is balance, not uniformity.

    Mushroom Blonde Gray Blend — The Most Wearable 2026 Look

    Mushroom blonde is a muted, cool-toned brown with ashy undertones — and it’s the perfect bridge color for women blending their brunette base into gray. The shade sits right between brown and silver tonally, which means it harmonises with natural gray strands rather than creating contrast. It’s the most low-maintenance color option for brunettes going gray: it grows out so seamlessly that many women find they only need a salon visit every 4–5 months.

    ● Mushroom Blonde — Cool, muted brown-ash. No warmth, no brassiness. The ideal gray transition color for brunettes.

    Section 6 — Keeping Gray & Silver Hair Beautiful at Home

    Gray hair requires slightly different care than pigmented hair. Here’s what actually makes a difference — and what you can stop spending money on.

    The 4 Non-Negotiables

    Purple shampoo —  Use once or twice a week to neutralise the yellow or brassy tone that gray hair picks up from water minerals, UV light, and pollution. Leave it on for 3–5 minutes rather than rinsing immediately. The longer it sits, the more effective the toning.

    Deep conditioning mask —  Gray hair is naturally drier and more porous than pigmented hair because it lacks melanin, which also has moisturising properties. A weekly deep conditioning mask — look for ingredients like shea butter, argan oil, or hyaluronic acid — is non-negotiable. Apply to damp hair, leave for 10 minutes, rinse in cool water.

    UV protection —  Sun exposure oxidises gray hair and is one of the primary causes of that unwanted yellow tinge. A leave-in product with UV filters, or simply a hat on sunny days, makes a significant difference to how long your color stays crisp.

    Sulfate-free shampoo —  Sulfates strip color and moisture from hair. For gray and silver hair — especially if you’ve had any highlights or toning — a sulfate-free formula is the simplest switch you can make to extend the life and vibrancy of your color.

    When to book a gloss:  If your silver hair has started looking yellow, dull, or flat between appointments — book a standalone toning gloss. It takes 20–30 minutes, costs a fraction of a full color service, and transforms the hair instantly.

    What to Tell Your Stylist

    Bring this to your next appointment and say exactly this:

    The script:  “I want to blend my gray rather than cover it. I’m looking for a low-maintenance result that grows out without a harsh line. Can we talk about herringbone highlights / babylights / a root smudge? I’d like to keep some dimension — not a flat silver.”

    That single sentence tells your colorist everything they need to know — your goal, your maintenance preference, and your aesthetic. The more specific you are, the better the result.

    Save this article — you’ll want it at your next salon visit →

    Related: 20 Bob Haircuts for Women Over 40 (2026)  |  Curtain Bangs for Women Over 40 — The Anti-Aging Cut

  • Curtain Bangs for Women Over 40 — The Anti-Aging Cut Nobody’s Talking About

    Curtain Bangs for Women Over 40 — The Anti-Aging Cut Nobody’s Talking About

    They frame your face, soften fine lines, and take five minutes to style. Curtain bangs are the quiet upgrade your hair has been waiting for.

    If you haven’t seriously considered curtain bangs yet, you’re not alone — most bang content online targets women in their 20s. But here’s what the hair world isn’t saying loudly enough: curtain bangs may be the single most flattering, low-maintenance addition a woman over 40 can make to her hair.

    They frame the cheekbones. They soften the forehead. They work with every hair length from a short bob to long layers. And unlike blunt or heavy fringe, curtain bangs grow out gracefully — so there’s none of that awkward in-between stage. This guide covers 20 of the best curtain bang styles for women over 40 in 2026, with a styling tip and face shape guide for every single one.

    What are curtain bangs?  Curtain bangs are wispy, face-framing fringe that part in the middle (or slightly off-centre) and sweep gently to either side — like curtains opening on a stage. Unlike heavy blunt bangs, they blend seamlessly into the rest of your hair.

    Curtain Bangs with Short Hair & Bobs

    1. Curtain Bangs with a Wavy Bob — The Effortless Everyday Look

    The curtain bang and bob combination is magic. The wispy fringe draws attention to your eyes and cheekbones while the wavy bob keeps everything feeling relaxed and undone. This is the ‘I woke up like this’ look that actually takes five minutes. Honey blonde or bronde tones brighten the complexion beautifully alongside this style.

    Honey blonde wavy bob with soft curtain bangs — the most wearable combo of 2026

    💡 Styling tip: Blow-dry your bangs last, using a round brush to guide them gently to each side. A tiny amount of texturising cream keeps the wave without crunch.

    ✔ Best for: Oval, heart and square face shapes · fine to medium hair

    2. Curtain Bangs with a Copper Bob & Glasses

    Curtain bangs are a game-changer for women who wear glasses — they sit above the frame and draw the eye upward, making glasses feel like a style choice rather than an afterthought. The warm copper colour adds warmth to the complexion and pairs beautifully with the wispy fringe texture.

    Copper wavy bob with curtain bangs and glasses — proves bangs and specs work beautifully together

    💡 Styling tip: Keep bangs slightly longer if you wear glasses so they don’t rest on the frames. Ask your stylist for ‘eyebrow-skimming’ length.

    ✔ Best for: All face shapes · especially flattering for glasses wearers · medium to thick hair

    3. Curtain Bangs with a Brunette Bob — Before & After

    One of the most striking things about curtain bangs is how dramatically they transform a face — without touching the length. This before-and-after shows exactly what a set of soft face-framing bangs does: the forehead is softened, the cheekbones are highlighted, and the whole look feels more intentional and modern.

    Before and after — brunette bob, same length, same colour. Curtain bangs make all the difference

    💡 Styling tip: Don’t be afraid to ask your stylist to cut them dry rather than wet — dry cutting gives a softer, more natural curtain bang shape.

    ✔ Best for: Round, oval and heart face shapes · straight to wavy hair

    Curtain Bangs with Medium Length Hair

    4. Soft Curtain Bangs on a Gray-Blended Lob — The Bedroom Mirror Selfie

    This is the style that’s exploding on Pinterest right now: a silver-and-brunette blended lob with soft curtain bangs that are just grown-out enough to feel effortless. The lived-in, not-trying-too-hard energy is exactly what makes it so appealing. It looks like real life — because it is.

    Gray-blended lob with soft curtain bangs — cosy, confident, completely real

    💡 Styling tip: If your bangs feel heavy as they grow out, a single trim every 6–8 weeks keeps the curtain shape without losing the grown-out ease.

    ✔ Best for: Oval and oblong face shapes · women transitioning to gray · all hair textures

    5. Curtain Bangs with Ash Blonde Long Layers — The Side Profile Winner

    Curtain bangs on long blonde layers create one of the most naturally flattering silhouettes possible. The fringe draws a beautiful frame around the face, while the layers give body and movement through the length. This side profile view shows how elegantly the bangs blend into the rest of the hair — no obvious ‘bang line’ at all.

    Ash blonde long layers with soft curtain fringe — the side profile shows how seamlessly they blend

    💡 Styling tip: Ask for your curtain bangs to be feathered into the front layers so there’s no hard transition. This is what keeps them looking grown-in rather than cut.

    ✔ Best for: All face shapes · medium to fine hair · women with highlights or balayage

    6. Auburn Curtain Bangs — Medium Layers, Salon Fresh

    Rich auburn is having a huge moment in 2026 — and curtain bangs are its perfect companion. The warm reddish tones around the face create a natural-looking glow effect that brightens the complexion instantly. This medium layered cut with face-framing fringe is achievable in one salon visit and requires minimal daily styling.

    Auburn medium layers with soft curtain bangs — warm, radiant, and completely wearable

    💡 Styling tip: Auburn fades quickly — use a colour-protecting shampoo and rinse with cool water to keep the warmth between salon visits.

    ✔ Best for: Fair to medium skin tones · oval, heart and square face shapes · medium to thick hair

    7. Copper Curtain Bangs — Short Wavy Shag

    For women who love a little drama in their haircut, this short wavy shag with copper curtain bangs delivers. The combination of the wispy fringe and the voluminous shaggy layers creates a bold, textured look that still feels feminine and age-appropriate. The warm copper tone adds incredible dimension without needing heavy highlighting.

    Copper curtain bangs on a short wavy shag — bold, textured and full of personality

    💡 Styling tip: Diffuse on low heat while scrunching upward to build that voluminous shag shape. Finish with a light-hold curl cream through the ends.

    ✔ Best for: Round and oval face shapes · naturally wavy or curly hair · women who want maximum volume

    Curtain Bangs with Long Hair

    8. Curtain Bangs on Long Copper Layers — The Café Selfie

    Long copper layers with curtain bangs is a look that simply glows in real life. The fringe adds a face-framing element to what would otherwise be a straightforward long hairstyle — and the difference is enormous. This is the style for women over 40 who love their length but want their hair to feel more purposeful and modern in 2026.

    Copper long layers with curtain bangs — warm, glowing and full of movement

    💡 Styling tip: Copper tones look incredible when the hair has natural wave. Enhance it with a sea-salt spray while damp and let it air dry three-quarters of the way before diffusing.

    ✔ Best for: All face shapes · medium to thick hair · women who want to keep their length

    9. Silver Curtain Bangs — Long Hair, Garden Selfie

    If you’re going gray or already there — curtain bangs are your best friend. The fringe softens the hairline transition and gives structure to silver hair, which can sometimes look flat or formless. This long silver lob with soft swept bangs is proof that embracing your natural color and looking absolutely radiant are not mutually exclusive.

    Silver long hair with curtain bangs — confident, glowing and completely natural

    💡 Styling tip: Silver hair benefits enormously from regular gloss treatments to add shine. A purple toning shampoo once a week keeps it bright and prevents yellowing.

    ✔ Best for: All face shapes · women embracing natural gray · medium to fine hair

    10. Blonde Long Layers with Curtain Bangs — The Classic

    There’s a reason this combination is everywhere in 2026: it works on almost everyone. Warm honey blonde long layers with softly swept curtain bangs is simultaneously youthful and sophisticated. The face-framing bangs highlight the best features while the movement through the layers adds that effortless, lived-in quality that’s so sought-after right now.

    Honey blonde long layers with curtain bangs — the most universally flattering combination

    💡 Styling tip: Blow-dry the bangs over a round brush in the very last step of your routine. Two minutes of attention here makes the whole look polished.

    ✔ Best for: Oval, heart and round face shapes · fine to medium hair · all ages over 40

    11. Paris Street Style — Dark Curtain Bangs, Long & Undone

    French women have been wearing this look for decades and it never gets old: long dark brunette hair with heavy-but-wispy curtain bangs that are just a touch overgrown. The undone, slightly dishevelled quality is the whole point — it’s confident and unbothered in the most stylish way possible. This works best on women with strong cheekbones.

    Paris street style curtain bangs — dark, undone, effortlessly chic

    💡 Styling tip: Let this style air dry naturally. The more you try to perfect it, the less Parisian it looks. A tiny bit of dry shampoo at the roots is all you need.

    ✔ Best for: Oval and oblong face shapes · straight to lightly wavy hair · dark to medium brunette

    Curtain Bangs Before & After — The Transformations

    12. Before & After — Bronde-to-Copper Curtain Bang Transformation

    Sometimes curtain bangs aren’t enough on their own — a colour shift alongside them amplifies the transformation dramatically. This before-and-after shows the same face, same general length, but with a colour refresh and curtain fringe added. The result looks like a completely different (and younger) person. The symmetry and warmth the bangs bring to the face is striking.

    Before: warm bronde, no bangs. After: richer copper tone with curtain fringe — remarkable difference

    💡 Styling tip: If you’re adding curtain bangs at the same time as a colour change, always do the colour first and cut the bangs last — that way the colourist can see how the fringe will sit.

    ✔ Best for: Women making a bold change · oval and oblong faces · any hair length

    13. Before & After — Brunette Curtain Bangs on a Shorter Bob

    This transformation is the most relatable one in the article: long, slightly overwhelming brunette hair with no real shape — versus a beautifully framed shorter bob with curtain bangs. The bangs alone lift the whole face. The shorter length removes the weight. Together, they take years off without touching a single anti-aging product.

    Brunette bob with curtain bangs — natural daylight selfie, completely real

    💡 Styling tip: If you’re nervous about going shorter at the same time as adding bangs, do the bangs first in a single appointment and see how you feel before committing to the length change.

    ✔ Best for: Women considering a big change · round and heart face shapes · medium to thick hair

    How to Style Curtain Bangs in 5 Minutes

    The most common fear about curtain bangs is the styling time. Here’s the truth: once you know the technique, it takes under five minutes and you don’t need any special tools.

    The 3-step method

    Step 1 — Dry first. Blow-dry the rest of your hair before you touch the bangs. Curtain bangs respond best when they’re the last thing you style.

    Step 2 — Round brush & low heat. Section out just the bang area. Using a small round brush, roll it under the bang section and guide each side gently outward and downward — not under, outward. Two passes per side is enough.

    Step 3 — Set & go. A light-hold spray or a tiny drop of serum through the fingers, then leave them alone. The more you touch curtain bangs after styling, the flatter they get.

    Air-dry option:  On days when you don’t want to style at all, part them in the middle while wet and let them dry naturally. They’ll form a soft, undone curtain shape on their own.

    Which Curtain Bang Style Is Right for Your Face Shape?

    Round face: Go for longer curtain bangs that skim the cheekbones — they elongate the face. Avoid short, wide-set bangs.

    Oval face: You can pull off any curtain bang style. Lucky you — even short, wide curtain bangs work beautifully.

    Heart face: Longer curtain bangs that sweep below the cheekbones balance a wider forehead and narrower chin perfectly.

    Square face: Soft, slightly wispy curtain bangs are ideal — they break the strong jawline without covering too much forehead.

    Oblong / long face: Curtain bangs are genuinely one of the most flattering cuts for a longer face. They visually shorten the forehead and add horizontal width across the face.

    Ready to Book?

    Screenshot the style closest to what you want and bring it to your next appointment. Curtain bangs are one of the easiest things to explain to a stylist — just show them a photo and say ‘longer on the sides, parted in the middle, keep them soft.’ That’s genuinely all you need.

    The best part? If you’re not sure yet, curtain bangs grow out in 6–8 weeks into a gentle face-frame — there’s no awkward phase, and no commitment. It’s the lowest-risk hairstyle change you can make this year.

    Save this article before your next salon visit! →

  • 20 Bob Haircuts for Women Over 40 That Are Absolutely Trending in 2026

    20 Bob Haircuts for Women Over 40 That Are Absolutely Trending in 2026

    If you’ve been thinking about making the chop — or just refreshing your current bob — this is your sign. These 20 styles are flattering, modern, and designed to work with your hair, not against it.

    The bob has never been more exciting. In 2026, stylists are leaning into cuts that feel personalized, effortless, and quietly confident — exactly the energy that suits women over 40. Whether your hair is fine, thick, curly, or color-treated, there’s a bob on this list that was made for you.

    We’ve rounded up the 20 most flattering, on-trend bob styles for women over 40 in 2026 — each with a quick styling tip so you can walk into the salon (and out the door every morning) knowing exactly what you’re doing.

    1. The Soft Layered Bob

    This is the go-to bob of 2026 for women over 40. Internal layers are cut throughout the length to create movement and remove that dreaded heaviness — while keeping the silhouette clean from the outside. It sits between the jawline and chin and works on straight, wavy, or fine hair. The softness of the layers prevents it from ever looking too severe.

    Platinum lob — sleek, bold, effortlessly modern

    💡 Styling Tip: Blow-dry with a round brush rolling outward at the ends for a polished, bouncy finish. A few drops of argan oil add shine without weight.

    ⏱ Best for: Fine or thinning hair, oval and heart face shapes

    2. The Flippy Bob (Bell-Bottom Bob)

    This playful style flicks the ends outward using a flat iron, adding instant energy and youthfulness to any look. It’s one of the biggest trends for 2026 and works incredibly well as the hair grows out — meaning fewer salon visits. Cut it a couple of inches below the chin to give yourself enough length to work with.

    Wavy short bob — tousled, light and full of movement

    💡 Styling Tip: Use a 1-inch flat iron and flip sections outward in the last inch of each section. Finish with a light-hold spray.

    ⏱ Best for: All hair textures, especially those with medium density

    3. The Box Bob (Italian Box Bob)

    Structured, clean-lined, and completely modern — the box bob features a blunt perimeter with even weight across both sides and the back. The squared shape creates the illusion of thickness and lends itself beautifully to sleek styling. Think of it as the ‘little black dress’ of haircuts: minimal, architectural, and intentional.

    Blonde box bob with fringe — structured and striking

    💡 Styling Tip: Keep ends razor-smooth with a flat iron and finish with a gloss serum for a fashion-forward polish.

    ⏱ Best for: Straight or slightly wavy hair, square and oval face shapes

    4. The Lob (Long Bob)

    Collarbone-length and completely timeless, the lob is perfect for women over 40 who aren’t quite ready to go short but want a fresh, lighter feel. It frames the shoulders beautifully, allows natural movement, and is easy to tie back on busy days. The 2026 version pairs beautifully with a beige blonde melt or soft bronde color for a low-maintenance, modern look.

    Brown lob — effortless everyday styling

    💡 Styling Tip: Air-dry and scrunch with a curl cream to enhance natural texture, or blow-dry smooth for an effortlessly polished look.

    ⏱ Best for: All face shapes; especially great for women transitioning from long hair

    5. The Graduated (Stacked) Bob

    Shorter at the back with length building toward the front — this classic shape adds instant volume and lift at the crown where mature hair often goes flat. The stacking at the back creates a beautiful sculpted silhouette, while the longer front pieces soften the face. It’s a smart choice if your hair has lost density.

    Layered stacked bob — salon-fresh volume, front and back

    💡 Styling Tip: A round brush blowout emphasizes the stacked shape. Ask your stylist for subtle stacking, not too dramatic, to keep it wearable.

    ⏱ Best for: Fine and flat hair, round and square face shapes

    6. The Blunt Chin-Length Bob

    Clean, confident, and jaw-droppingly chic — the blunt chin-length bob highlights your cheekbones and gives a youthful, structured edge. Straight tresses also help soften fine lines around the face. It’s classic enough to feel timeless but sharp enough to turn heads in 2026.

    Blunt chin bob — clean lines, dark brunette depth

    💡 Styling Tip: Always use a heat protectant before straightening. Try a keratin-infused product to keep it glossy and frizz-free.

    ⏱ Best for: Straight or easily straightened hair, oval and square face shapes

    7. The Wavy Lob with Long Layers

    For women with a natural wave or bend in their hair, this style is a dream. Long layers enhance the natural movement, reduce heaviness, and give you that beachy-but-refined look that’s everywhere in 2026. Paired with a sandy bronde dimension color, it requires minimal styling to look effortlessly put-together.

    Soft dark wavy chin bob — natural, unfussy and chic

    💡 Styling Tip: Scrunch in a sea salt spray while hair is damp and let it air-dry for effortless waves. Avoid over-touching as it dries.

    ⏱ Best for: Naturally wavy or wavy-with-help hair, all face shapes

    8. The Angled A-Line Bob

    Longer in the front, shorter in the back — the A-line bob creates a sleek, elongating effect that’s universally flattering. The forward fall of the front pieces draws the eye downward, which is especially flattering for rounder face shapes. Pair with an icy beige blonde or soft brunette for a bright, wearable look.

    Side-swept dark bob — glamorous, face-framing flow

    💡 Styling Tip: A deep side part amplifies the A-line angle beautifully. Straighten the front pieces for a sleek, editorial effect.

    ⏱ Best for: Round, square, and heart face shapes; all hair textures

    9. The Curly Bob

    Embracing natural curl is one of the most freeing decisions a woman over 40 can make — and the curly bob delivers. Shaped to encourage bounce and avoid the dreaded triangle silhouette, this cut defines and lifts your curls beautifully. Deep chocolate or rich chestnut tones add shine and dimension that makes curls look their most vibrant.

    Wavy brown bob — bouncy, warm and full of personality

    💡 Styling Tip: Use the LOC method (Leave-in, Oil, Cream) on wet hair to define curl pattern. Diffuse on low heat to avoid frizz.

    ⏱ Best for: Naturally curly or coily hair, oval and long face shapes

    10. The Undone Shag Bob

    Not a typical shag and not a typical bob — this hybrid brings together piecey, choppy layers with a bob length for a look that’s playful, edgy, and completely wearable. The 2026 version is softer than its rock-and-roll predecessor, with wispy layers around the face to keep it feminine.

    Shaggy textured bob — tousled, edgy and effortlessly cool

    💡 Styling Tip: Texturizing spray is your best friend here. Work it through damp hair and scrunch — the messier, the better.

    ⏱ Best for: Medium to thick hair, women who want a low-maintenance style with edge

    11. The Cloud Bob

    Soft volume, airy texture, effortless movement — the cloud bob is all about that full, fluffy silhouette that looks touchable and modern without stiffness. Light layering and rounded shaping create the signature look. It’s especially popular for women over 40 because it gives hair body without requiring excessive styling or heat.

    Silver cloud bob with fringe — full, soft, beautifully shaped

    💡 Styling Tip: Use a large round brush when blow-drying, lifting at the roots for that signature cloud-like volume. Finish with a light volumizing mousse.

    ⏱ Best for: Fine to medium hair that needs volume and body

    12. The Side-Swept Bob

    A deep side part changes everything. The side-swept bob creates instant lift at the roots and camouflages flatness at the crown — a common concern for women over 40. The longer side sweeps elegantly over the eye, adding a touch of old-Hollywood glamour that never goes out of style.

    Side-parted black bob — bright, open and beautifully balanced

    💡 Styling Tip: Blow-dry in the direction of your part using a paddle brush, then set with a spritz of medium-hold hairspray.

    ⏱ Best for: Flat or fine hair, oval and heart face shapes

    13. The Feathered Bob

    Subtle, face-framing layers that feather outward give this bob its signature swing and softness. Enhanced with golden or silver tones to brighten the complexion, it’s a natural, unfussy style that looks like it took effort but didn’t. The refined, grown-up version of classic 70s layers.

    Silver-white lob — soft waves, graceful and sophisticated

    💡 Styling Tip: A large-barrel curling iron set on low heat creates gentle, feathery movement. Brush through lightly to soften the waves.

    ⏱ Best for: Women wanting a softer, face-framing look, straight to slightly wavy hair

    14. The Choppy Textured Bob

    Piece-y, undone, and full of character — the choppy textured bob uses razored or point-cut ends to create an effortlessly cool look. Toasted almond or warm chestnut tones add dimension that makes the texture pop even more. This cut keeps hair looking full and alive without needing constant styling.

    Blunt black bob — modern confidence, clean silhouette

    💡 Styling Tip: Rough-dry with your fingers, then add a pea-sized amount of pomade or wax through the ends to define the pieces.

    ⏱ Best for: Medium to thick hair, women wanting low-maintenance but high-style

    15. The Hydro Bob

    The most glamorous bob on the list — the hydro bob sits at or just above the collarbone with a high-gloss, shine-enhanced finish. Less about the cut and more about the styling: creamy, polished, intentionally radiant. A sleek, bold statement that commands any room.

    Sleek black blunt bob — polished, precise, powerful

    💡 Styling Tip: Use a shine serum on dry hair and a boar-bristle brush to smooth the surface. A gloss treatment at the salon every few months maintains the mirror-like finish.

    ⏱ Best for: Straight hair, women who love a polished, put-together look

    16. The Mushroom Blonde Bob

    It’s not just a cut — it’s a color moment. The mushroom blonde bob pairs a clean, blunt or softly layered bob with a cool-toned, muted blonde shade that flatters mature skin tones beautifully. The harmonious color creates a chic, wearable look that feels current without requiring frequent touch-ups.

    Platinum lob — sleek, bold, effortlessly modern

    💡 Styling Tip: Ask for a toner refresh every 6–8 weeks to keep the mushroom blonde cool and fresh. A purple shampoo twice a week maintains the tone.

    ⏱ Best for: Women going lighter, those wanting low-maintenance color, medium to fine hair

    17. The Pixie Bob

    The best of both worlds: shorter at the back and sides like a pixie, but with slightly longer front pieces that skim the jawline like a bob. This style opens the face beautifully, adds volume at the crown, and requires almost no styling time. A cut that looks intentional even when you’ve just rolled out of bed.

    Pixie bob — short structured back, lovely side profile

    💡 Styling Tip: A small amount of styling cream worked through the front pieces in the morning is all you need. Air-dry or a quick diffuse.

    ⏱ Best for: All hair textures, women ready for something bolder and very low maintenance

    18. The Asymmetrical Micro Bob

    Bold, modern, and totally customizable — the asymmetrical micro bob sits at cheekbone to jaw length with one side cut slightly longer than the other. The unexpected asymmetry adds edge and movement to a short cut without losing elegance. One of the most expressive and individual cuts on this list.

    Silver pixie with purple tones — daring, dimensional and fun

    💡 Styling Tip: Keep the longer side tucked behind the ear for a sleek day look, or let it fall forward for a dramatic evening feel.

    ⏱ Best for: Confident style-forward women, straight to wavy hair, oval and long face shapes

    19. The Sleek Tucked Bob

    Minimalist, modern, and incredibly polished — the sleek tucked bob sits neatly with a cool silver or platinum tone that makes the cut look purposeful and architectural. No fuss, no layers, no drama. Just clean lines and quiet confidence. A perfect choice for women who want hair that means business.

    White silver lob — timeless elegance, effortless style

    💡 Styling Tip: Use a flat iron on low heat and a tiny amount of smoothing serum to achieve that perfectly polished finish.

    ⏱ Best for: Straight hair, minimalist style preferences, professional settings

    20. The Gray-Blended Graduated Bob

    Embracing your silver is one of the most powerful beauty moves a woman over 40 can make — and a graduated bob is the perfect canvas for it. The stacking adds shape and volume, while gray blending adds depth and dimension that makes the cut look expensive and intentional. This isn’t ‘going gray’ — it’s a statement.

    Textured silver pixie — bold, modern, low-maintenance

    💡 Styling Tip: Ask for a ‘gray blending’ technique rather than a full gray grow-out — this softens the line between your natural color and silver for a seamless, gorgeous result.

    ⏱ Best for: Women embracing their natural gray, medium to thick hair, all face shapes

    Which Bob Is Right for You?

    The best bob is the one that fits your life. If you’re low-maintenance, go for the Pixie Bob or Soft Layered Bob. If you love a polished look, try the Hydro Bob or Box Bob. If you’re embracing your texture, the Curly Bob or Wavy Lob will be your new best friend.

    The key takeaway: bobs in 2026 are not about one look. They’re about your look. Find the variation that matches your texture, your lifestyle, and your confidence — then show your stylist this list.

    Save This for Your Next Salon Visit!

    Screenshot your favorite styles and bring them to your appointment. The more specific your references, the better your result.

  • 28 Textured Pixie Trends Redefining Maturity in 2026

    28 Textured Pixie Trends Redefining Maturity in 2026

    Short hair is having a “Master Maker” moment. This collection of 25 pixie styles moves beyond the traditional, introducing internal layers, ghost fringes, and the viral “Textured Shullet.” We’re breaking the rules of “age-appropriate” hair and replacing them with high-fashion silhouettes that frame the face and highlight your best features with edgy, artistic precision.

    Meet the 2026 Style Icons

    1. The Sculpted Raven Shullet

    Our first model wears a deep brunette, textured “Shullet” that beautifully bridges the gap between a classic pixie and a modern shag.

    • The Look: Choppy, intentional layers create movement throughout the crown, while a soft, wispy fringe frames the forehead.
    • Why it Works: This style adds “internal lift,” providing volume that looks natural and effortless. It’s the perfect companion for a bold leopard print ensemble, proving that edgy silhouettes have no age limit.

    2. The Red-Carpet Power Pixie

    Showcasing sophisticated precision, our second model rocks a classic, tight-tapered pixie with a polished finish.

    • The Look: Close-cropped sides with just enough length on top to create a sleek, side-swept effect.
    • Why it Works: This cut highlights the bone structure—specifically the cheekbones and jawline—acting as an “architectural sculptor” for the face. It’s the ultimate choice for high-profile events where elegance is the priority.

    3. The “Silver Wing” Platinum Crop

    Our third model demonstrates the power of light and height with a stunning platinum-blonde textured cut.

    • The Look: Upward-swept layers at the crown provide incredible vertical volume, while the sides are kept neat and tapered.
    • Why it Works: By drawing the eye upward, this “Soft-Cloud” variation provides an instant brightening effect to the entire face. It’s a masterclass in using light colors to create a halo of sophisticated, modern energy.

    4. The “Internal Lift” Textural Pixie

    Our fourth model shows exactly how to manage fine or thinning hair with architectural layering.

    • The Look: This cut utilizes “Ghost Layers”—internal layering that provides incredible height at the crown without making the ends look thin.
    • Why it Works: By manually fluffing the top layers, as seen in the model’s styling process, you create a “Soft-Cloud” effect that radiates youthful energy. It is the ultimate “Master Maker” style for daily volume.

    5. The “Hollywood Architectural” Side-Sweep

    Demonstrated with red-carpet precision, this look is all about high-contrast silhouettes and bold confidence.

    • The Look: A deep, polished side-part with a long, sweeping fringe that grazes the eyes, paired with tightly tapered sides.
    • Why it Works: This is the “Architectural Sculptor” in action. It frames the face with a diagonal line, which naturally draws the eye upward and sharpens the cheekbones. It’s a sophisticated choice for evening elegance.

    6. The “Scandi-Precision” Taper

    For those who prefer a clean, streamlined aesthetic, this profile view showcases the beauty of a perfect taper.

    • The Look: The hair is cut close to the nape of the neck with longer, textured layers cascading forward from the crown.
    • Why it Works: It highlights the neckline and ears, making it the perfect frame for statement jewelry. This “wash-and-wear” style is for the woman who values a disciplined, expensive-looking silhouette that requires zero morning fuss.

    7. The “Internal Lift” Honey Pixie

    Our seventh model demonstrates the power of multidimensional color paired with strategic layering.

    • The Look: This style uses “Ghost Layers”—internal thinning and layering that provides volume at the crown while keeping the perimeter soft and wispy.
    • Why it Works: The honey-blonde highlights catch the light on every textured peak, making it an ideal choice for women looking to add the illusion of thickness to fine hair.

    8. The “Silver Halo” Precision Cut

    Showcasing the ultimate in sophisticated minimalism, this platinum look is all about a clean, bright frame.

    • The Look: A deep, side-swept fringe that blends seamlessly into tapered sides, creating a sleek, aerodynamic silhouette.
    • Why it Works: By keeping the length concentrated in a soft, forward-swept bang, this cut acts as an “Architectural Sculptor” for the eyes, drawing focus upward and providing a bright, open expression.

    9. The “Textured Shullet” in Espresso

    Our ninth model brings a rebellious, indie-sleaze energy to a mature silhouette with this dark, piecey cut.

    • The Look: Features a micro-fringe and elongated texture at the nape, perfectly capturing the viral “Shullet” trend.
    • Why it Works: The short, jagged bangs provide a bold frame for the face, while the added length at the back offers a soft, modern edge that breaks the rules of traditional “age-appropriate” styles.

    10. The “Radiant Rose” Color Transformation

    Our tenth model demonstrates how a bold color shift can completely revitalize a classic pixie silhouette.

    • The Look: A soft, rose-pink hue paired with a side-swept, layered fringe that adds immediate warmth and brightness to the complexion.
    • The Impact: This style moves away from the “standard” and embraces playful, high-fashion tones that break traditional age barriers.

    11. The “Architectural Auburn” Sculptor

    This model rocks a rich, copper-toned pixie that emphasizes sophisticated volume and clean lines.

    Story Pin image
    • The Look: Polished, upward-swept layers at the crown provide a structured, “expensive” feel while perfectly framing the cheekbones.
    • The Impact: This is the quintessential “Master Maker” style—disciplined, deliberate, and undeniably chic

    12. The “Platinum Precision” with Statement Frames

    Our twelfth model showcases how a textured pixie serves as the ultimate canvas for bold accessories.

    • The Look: A cool-toned platinum crop with “Ghost Layers” that provide soft, internal lift without excess bulk.
    • The Impact: By keeping the hair sleek and textured, it draws the eye to face-framing elements like cat-eye glasses, proving that short hair is an architectural asset for a curated look.

    13. The “Natural Coil” Micro-Pixie

    Our thirteenth model showcases the beauty of natural texture in a tight, architectural crop.

    • The Look: A very short, uniform length that follows the natural curve of the head, allowing the salt-and-pepper texture to shine.
    • The Impact: This is the pinnacle of “low-maintenance luxury”. It highlights facial features with zero distraction, making it the perfect choice for women who want a bold, unapologetic look.

    14. The “Shattered Silver” Wing

    This model rocks a highly textured, multi-tonal grey pixie that is all about movement and “internal lift.”

    • The Look: Long, piecey layers at the crown are swept forward and upward, creating a “shattered” effect that breaks up the hairline.
    • The Impact: By using darker lowlights against a silver base, this cut adds incredible dimension and density to the hair, acting as a “Soft-Cloud” style that feels light and airy.

    15. The “Sleek Steel” Side-Part

    Our fifteenth model demonstrates a polished, sophisticated take on the pixie with a deep side-sweep.

    • The Look: A clean, disciplined part with hair smoothed across the brow, transitioning into perfectly tapered sides.
    • The Impact: The cool, steel-grey tone provides a modern, high-fashion edge that pairs beautifully with bold geometric prints, embodying the “Architectural Sculptor” aesthetic.

    16. The “Bright Silver” Spiked Taper

    Our sixteenth model proves that silver hair is the ultimate canvas for “vertical volume.”

    This may contain: an older woman with grey hair smiling at the camera, wearing a black and white dress
    • The Look: Tightly cropped sides with a “shattered” top that is styled upward and forward.
    • Why it Works: This acts like a natural facelift. By drawing all the textural energy upward, it sharpens the jawline and opens up the eye area.

    17. The “Scandi-Sleek” Bowl Pixie

    A masterclass in precision and discipline, this platinum-blonde look is for the minimalist.

    Story Pin image
    • The Look: A heavy, straight-across fringe that blends into a rounded, ear-grazing silhouette.
    • Why it Works: This is the “Architectural Sculptor” in its purest form. It creates a bold, horizontal line that highlights the cheekbones and gives the illusion of thicker, denser hair.

    18. The “Wavy Wing” Platinum Bob-Pixie

    For those who want a softer transition from a bob to a pixie, this hybrid style is the winner.

    • The Look: Elongated, wavy layers on one side with a deep tuck behind the ear.
    • Why it Works: The “S-curve” of the wave softens facial features while the short back keeps it feeling light and modern.

    19. The “Mulberry” Textured Crop

    Our nineteenth model brings a bold, wine-colored energy to the collection.

    • The Look: A high-contrast, piecey pixie with jagged micro-bangs and deep mahogany tones.
    • Why it Works: The dark, rich color adds “visual weight,” making it perfect for women who want their hair to feel substantial and edgy.

    20. The “Golden Hour” Spiked Pixie

    Our twentieth model rocks a warm, honey-blonde pixie that prioritizes “vertical movement.”

    • The Look: This style features long, wispy pieces at the crown that are styled upward and outward to create a sun-drenched, airy silhouette.
    • Why it Works: The warm tones soften the complexion, while the height at the top provides that sought-after “natural lift” for the jawline.

    21. The “Minimalist Silver” Micro-Taper

    For the woman who wants total sophistication with zero effort, this multi-angle view shows the beauty of a perfect taper.

    • The Look: This is a classic “Scandi-Crop”—cut extremely close to the nape of the neck with soft, uniform texture across the crown.
    • Why it Works: It is the ultimate “Architectural Sculptor.” By removing bulk from the neck and ears, it highlights the natural elegance of the profile.

    22. The “Emerald Rebel” Textural Crop

    This model proves that bold, high-fashion color isn’t just for the younger generation.

    • The Look: A vivid forest-green pixie with deep, textured layers that allow for “fluffed” volume at the roots.
    • Why it Works: This style breaks all the “age-appropriate” rules. The bold color draws focus to the eyes, while the textured top makes it a perfect “Soft-Cloud” variation for thinning hair.

    23. The “Slate Wing” Profile

    Our twenty-third model demonstrates a flawless silver-grey profile that emphasizes height and flow.

    • The Look: The hair is swept back from the face in a “Winged” motion, paired with a clean, tapered finish behind the ears.
    • Why it Works: This look acts as a frame for statement jewelry (like those stunning silver discs). It’s disciplined yet full of life, embodying the “Master Maker” spirit.

    24. The “Silver Coil” Architectural Pixie

    Our twenty-fourth model showcases the ultimate fusion of natural curls and high-fashion structure.

    • The Look: This is a “Soft-Cloud” masterpiece. The natural silver coils are tapered closely at the sides and nape, leaving maximum volume and “bounce” at the crown.
    • Why it Works: It uses the hair’s natural “gauge” to create height. By keeping the perimeter tight, the curls act as a sculptural element that lifts the features and celebrates texture without the bulk.

    25. The “Golden Ghost” Layered Fringe

    We finish with a polished, multidimensional blonde pixie that relies on precision internal work.

    • The Look: This style features “Ghost Layers”—internal thinning that allows the hair to lay flat and sleek while maintaining a hidden, airy volume that moves with you.
    • Why it Works: The piecey, eye-grazing fringe provides a youthful frame, while the warm golden tones offer a high-end salon finish. It’s the “Plain Beanie” of haircuts: seemingly simple, but technically superior.

    26. The “Silver Coil” Sculpted Taper

    A striking, high-contrast look that celebrates natural texture through a refined, architectural silhouette.

    • The Look: This style features a tight, graduated taper on the sides and back, transitioning into a lush, coiled crown. The silver-and-charcoal palette creates a “salt and pepper” depth that defines every individual ringlet.
    • Why it Works: By keeping the perimeter clean and short, the focus shifts upward to the volume and movement of the curls. It’s the “Tailored Blazer” of haircuts: sharp, professional, and effortlessly sophisticated.

    27. The “Cloud-Shadow” Textural Pixie

    A soft yet structured cut that plays with the interplay between deep natural tones and bright, airy highlights.

    • The Look: This pixie utilizes a “shadow root” technique, where the darker base at the temples and nape provides a grounded foundation for the frosted, spiraled layers on top.
    • Why it Works: The tight crop around the ears emphasizes the cheekbones, while the bouncy texture on top adds height without the weight. It’s the “Silk Scarf” of styles: adding a touch of elegance and lightness to a classic frame.

    28. The “Sonic Spike” Platinum Shag

    A bold, avant-garde take on the short crop that uses aggressive internal texturizing to create a high-energy finish.

    • The Look: This style is defined by “Point Cutting”—snipping into the ends at an angle to create jagged, multidimensional spikes. The cool platinum tone enhances the visual “sharpness” of the hair.
    • Why it Works: It breaks away from traditional soft shapes to offer something edgy and tactile. The crown is designed for maximum “lift,” making it the “Leather Jacket” of the group: rebellious, textured, and full of personality.

    Deconstructing the Modern Pixie

    Contrary to popular belief, the pixie is not merely a “short haircut”—it is a masterclass in architectural weight distribution.

    • The Texture: Observe the “point-cutting” technique along the top. This strategic removal of bulk infuses the hair with movement and prevents the dreaded “helmet-head” effect, allowing the style to breathe.
    • The Taper: The sides and back are closely cropped or faded to hug the natural contour of the head. This sharp definition elongates the neck and creates a clean, sophisticated silhouette that frames the face.

    Achieving the Silver Luminescence

    Natural grey hair possesses a unique texture; it is often coarser and more prone to dullness due to environmental stressors.

    • Neutralizing Brass: Grey hair can develop a yellowish cast from sun exposure or mineral buildup in water. To maintain an “icy” silver, recommend a purple shampoo used once weekly to banish warmth and keep the tone radiant.
    • The Hydration Imperative: Because grey hair lacks melanin, it can feel drier to the touch. To achieve that “HD” glossy finish seen in the remastered photos, a lightweight smoothing oil or leave-in conditioner is non-negotiable for sealing in moisture and shine.

    Versatility in Styling

    The true genius of this cut lies in its transformative range.

    • The “Piecey” Texture: For an undone, modern look, work a matte pomade or wax through dry hair to define individual strands and create separation.
    • The Sleek Finish: For a high-impact, red-carpet aesthetic, apply a light-hold gel and comb the hair flat against the head for a slick, architectural finish.
    • The Amplified Volume: To inject a dose of youthful edge, a sprinkle of root-lifting powder at the crown adds instant height and attitude.

    The Conclusion

    The pixie cut transcends convenience; it is an architecture of confidence. It removes the safety net of lengthy hair to put the focus squarely where it belongs: on the eyes, the bone structure, and the expression. Whether embracing the natural grey transition or seeking a dramatic refresh, the pixie stands as proof that less is not just more—it is everything.

  • Hotest Animal Print Nails in 2026

    Hotest Animal Print Nails in 2026

    If 2025 was the year of the “Clean Girl” aesthetic, 2026 is officially the year of Mob Wife Glamour. Animal print nails are no longer a “bold choice”—they’re the ultimate accessory. From the timeless allure of a high-shine tortoiseshell to the textured edge of 3D crocodile print, animal patterns are being reinvented with a modern, sophisticated twist.

    Whether you want a full-set statement or just a subtle “safari” accent, we’ve rounded up the absolute hottest animal print nail designs to dominate your feed this year. Ready to unleash your wild side? Let’s dive in.

    1. The Full Safari Skittles

    Why choose one species when you can have the whole jungle? This look is a masterclass in maximalism. It features a different animal print on every nail—tortoiseshell, zebra, cow print, and even a mint-green snakeskin. The almond shape keeps the variety looking high-end rather than cluttered. It’s the perfect conversation-starter mani.

    2. Midnight Leopard Matte

    Leopard print gets a “Mob Wife” makeover for 2026. This design uses a velvety matte black base with glossy, tonal leopard spots. The play between matte and shine creates a 3D effect that feels sophisticated and edgy. It’s animal print for the person who usually only wears black.

    3. Pastel 3D Reptile Scale

    Snakeskin is evolving. This look moves away from flat patterns and into 3D texture. Using a mix of soft mint and muted clay tones, the “scales” are embossed to create a tactile, realistic finish. It’s futuristic, biological, and incredibly trendy for the upcoming season.

    4. The “Bambi” Ombré

    For a softer take on the trend, look no further than this deer-inspired print. It features a beautiful caramel-to-nude ombré base with delicate white “fawn” spots concentrated at the tips. It’s earthy, whimsical, and a great way to wear animal print if you prefer a more “cottagecore” or feminine aesthetic.

    5. The Leopard Micro-French

    Can’t decide between a French tip and animal print? This is the 2026 solution. Featuring an almond shape and a flawlessly clean nude base, the “tips” are hand-painted with a classic leopard rosette. It’s the ultimate “Quiet Luxury” version of animal print—subtle from a distance, but incredibly detailed up close.

    6. Crimson Tiger Stiletto

    This is pure “Main Character” energy. These long, razor-sharp stiletto nails feature a deep blood-red base with jet-black tiger striping layered over a subtle leopard shadow. It’s a fiery, maximalist look that screams confidence. If you’re looking for the “Hottest” look for a night out, this is the definitive winner.

    7. The Golden Safari 8-Ball

    This is where animal print meets pop art. This unique design combines zebra-style horizontal striping in earthy tones with gold leaf accents and a 3D “8-ball” center. It’s a literal work of art on your fingertips. It proves that in 2026, animal prints are being used as a texture to complement even bolder graphic elements.

    9. The Minimalist Safari “Dip”

    For the girl who wants to dip her toes (or fingertips) into the trend without going full-on feline, this look is perfection. It features tiny, organic patches of various prints—cow, zebra, and leopard—placed strategically on the corners of a short, natural nail. It’s playful, clean, and proves that sometimes, less is much more.

    10. Electric Blue Zebra Stiletto

    This is high-fashion energy at its peak. This set pairs a vibrant, matte electric blue with striking zebra print accents on long stiletto nails. The contrast between the saturated solid color and the monochromatic animal pattern creates a futuristic vibe. If you want a look that commands attention from across the room, this is your 2026 winner.

    11. Lemon & Leopard Racing Stripes

    Who knew yellow and leopard were such a power couple? This design uses a soft, buttery lemon yellow as a solid base, paired with a vertical “racing stripe” of leopard print down the center of the accent nails. The vertical line helps elongate the look of the almond shape, making it a sophisticated choice for a summer-to-fall transition.

    12. Earthy Leopard & Abstract Swirls

    This look is for the “Boho Luxe” lover. It combines rich terracotta and matte clay tones with hand-painted leopard spots and delicate gold-thread swirls. The mixture of textures and organic lines makes it feel warm and grounded. It’s the ultimate “cozy girl” animal print for 2026.

    13. The Velvet Leopard Almond

    This is how you do animal print with a “matte” twist. The base is a stunning soft-touch rose petal pink, while the tips are finished with a crisp leopard pattern. The contrast between the velvety base and the detailed print makes this look incredibly high-end. It’s the perfect “intro to animal print” for someone who usually sticks to neutrals.

    14. The Split Safari Accent

    Why choose one when you can have both? This design features classic white French tips on most fingers, but the ring and middle fingers take a walk on the wild side. One nail features a full leopard print, while the other splits the difference with a diagonal leopard-and-white tip. It’s balanced, artistic, and very trendy for 2026.

    15. The Zebra “Wave” Tip

    Moving away from standard horizontal lines, this look uses zebra print to create a wavy, organic French tip. The black-on-white contrast is sharp and architectural. Because the lines are hand-painted and slightly irregular, it feels more like an art piece than a simple pattern. It’s the ultimate edgy-meets-elegant manicure.

    16. The Micro-Safari Mix

    This is the “Skittles” version of animal tips. Each nail features a different micro-print—zebra, cow, and leopard—all contained within a very thin French tip line. Keeping the patterns small and the base clear ensures the look stays sophisticated rather than overwhelming. It’s the perfect choice for short-to-medium nails.

    17. The Bubblegum Zebra Mix

    Animal print can be playful, and this set proves it. Combining soft, matte bubblegum pink and a contrasting cool matte gray, the accent nails feature hand-painted zebra stripes. The mix of textures and unexpected color blocking makes this look youthful and artistic. It’s the ultimate “cool girl” way to wear zebra this year.

    18. Hot Pink Leopard Pop

    This is the maximalist’s answer to a neutral mani. On a short-to-medium almond shape, most nails are a smooth bubblegum pink French tip, but the accent fingers feature a stunning neon fuchsia with crisp black leopard rosettes. The contrast between the soft base and the intense animal print is high-impact and incredibly trendy.

    19. Electric Blue & Fuchsia Leopard

    Can’t decide on a color? Wear them all! This set features a beautiful electric blue French-inspired design that transitions into a matte fuchsia leopard print. The bold colors scream summer, while the matte finish keeps the leopard from looking dated. It’s a modern, color-blocked interpretation of animal print that is guaranteed to turn heads.

    20. High-Gloss Tortoiseshell Block

    Tortoiseshell is never out of style, but in 2026, we’re seeing it applied in a more structured way. This set uses a square-coffin shape to showcase a flawless, high-gloss tortoiseshell pattern that looks less like spots and more like a rich, marble-like texture. It’s the “it” manicure for autumn, perfectly mimicking the warmth of a good iced latte.


    21. The “High-Def” Reptile Mix

    This is the ultimate textural experience for 2026. This set features hyper-realistic 3D alligator scales in a muted mint green, paired with crisp black-and-white zebra stripes and a traditional cheetah print. The variety in “scale” (pun intended) makes it look incredibly expensive and custom. It’s for the trendsetter who wants their nails to be the loudest part of their outfit.

    22. Cherry Blossom Cheetah

    Animal print doesn’t always have to be “fierce”—it can be sweet too. This design features tiny, hand-painted red cherries that double as part of a micro-cheetah pattern on the tips. Set against a clean, sheer pink base, it’s a playful, feminine way to rock the trend. It’s “Coquette-core” meets “Safari.”

    23. Dark Safari French Hybrid

    For a sophisticated, moody take, this set uses a deep chocolate and espresso palette. Most nails feature a “split” animal print French tip—half zebra, half leopard—while others showcase a full-coverage, high-gloss tortoiseshell. The muted earth tones make it incredibly wearable for the office while still keeping that 2026 edge.

    24. The Mob Wife Coffin

    If you want to go full “Mob Wife” aesthetic, this is the blueprint. These long coffin nails feature a dramatic pink-and-leopard “swirl” design. The negative space created by the pink “S” curves makes the leopard rosettes pop, creating a look that is both architectural and wild. It’s bold, unapologetic, and 100% on-trend.

    The 2026 Animal Print Styling Guide: How to Wear the Wild

    Animal print has evolved. It’s no longer just a trend; it’s a “power neutral.” It possesses the biological complexity of a texture but the wearability of a solid color. Whether you are going for quiet luxury or high-voltage edge, here is the definitive guide to styling your manicure for maximum impact in 2026.

    1. The Designer’s Formula: The “Rule of Two”

    Can you wear leopard and zebra together without looking like a safari exploded on your hands? Absolutely. The secret lies in the “Rule of Two,” the golden ratio for mixing prints:

    • Shared Color Palette: Cohesion is key. Ensure both prints live in the same tonal family (e.g., pairing a rich chocolate brown leopard with a soft cream cow print).
    • Varying Scale: Opposites attract. Pair a bold, “macro” print (like large, blotted cow spots) with a delicate, “micro” print (like fine cheetah dots). This contrast creates visual harmony instead of visual chaos.

    2. Choose Your Animal: Matching Print to Persona

    Your nail art is an extension of your wardrobe. Each print carries a distinct fashion “vibe.” Choose your spirit animal based on your destination:

    • The Professional (Tortoiseshell): The epitome of sophistication. Its amber swirls pair perfectly with tailored blazers, gold signet rings, and the “Quiet Luxury” aesthetic.
    • The Edgy Artist (Zebra/Tiger): Architectural and sharp. This high-contrast look demands leather jackets, silver hardware, and deconstructed silhouettes.
    • The Playful Trendsetter (Cow/Bambi): Unexpectedly soft and charming. This print lightens the mood and is best friends with denim, chunky knits, and the “Cottagecore” vibe.

    3. The Metal Alchemy: Gold vs. Silver

    The jewelry you choose isn’t just an accessory to your outfit; it changes the temperature of your print:

    • Wear Gold: with Leopard, Cheetah, and Tortoiseshell. Yellow gold pulls out the warm, amber undertones, making the look sun-kissed and expensive.
    • Wear Silver/Platinum: with Zebra, Snake, and Cow print. Cool metals complement the stark black-and-white contrast, giving the look a modern, crisp, and futuristic edge.

    4. The Blueprint: Why Shape Matters

    The silhouette of your nail dictates the attitude of your print. Cut your shape according to your pattern’s personality:

    • Almond / Stiletto: Reserve these for Snake and Tiger. The elongated shape emphasizes the “predatory,” sleek, and high-fashion nature of the design.
    • Square / Squoval: Use these for Leopard and Tortoiseshell. The blunt edge keeps the look grounded, classic, and effortlessly chic.

    The Edit: Which Print for Which Occasion?

    Print TypeBest OccasionThe Mood
    TortoiseshellOffice / ProfessionalExpensive & Timeless
    LeopardDate Night / EveningBold & Classic
    Snake (3D)Concert / Night OutFuturistic & Edgy
    Cow PrintCasual / WeekendFun & Approachable

    Pro Tip: When in doubt, lead with leopard. It’s the denim of the animal kingdom—it goes with everything.

    To bring this “wild” journey to a close, your conclusion needs to shift from technical advice to pure fashion empowerment. It should remind the reader that animal print isn’t just a pattern—it’s an attitude.

    Here is a high-energy conclusion to wrap up your Hottest Animal Print Nails of 2026 article.


    Conclusion: Unleash Your Signature Style

    If these 24 looks have taught us anything, it’s that animal print has officially shed its “tacky” reputation and reclaimed its throne as the ultimate power neutral. In 2026, wearing leopard, zebra, or tortoiseshell isn’t about blending into the background—it’s about choosing a texture that matches your energy.

    Whether you’re drawn to the tactile luxury of 3D reptile scales (as seen in our Texture Guide) or the refined minimalism of a leopard-tipped Frenchie, there is a safari-inspired look for every vibe. By following our Rule of Two for mixing prints and pairing your metals wisely, you can transform your fingertips into a high-fashion accessory that works with everything from a power suit to a weekend tracksuit.

    The jungle is vast, and the rules are officially gone. So, screenshot your favorite “species,” book that appointment, and let your manicure do the roaring for you.

  • 26 Cutest & short frenchtip Nails

    26 Cutest & short frenchtip Nails

    If you thought the French manicure was reserved for long, almond-shaped extensions, think again. The “Clean Girl” aesthetic has officially taken over, and with it comes the rise of the short, chic, and perfectly polished French tip.

    Short nails are no longer just the “practical” choice—they are a high-fashion statement. Whether you’re heading to the office, a wedding, or just want a fresh look that doesn’t get in the way of your keyboard, short French tips offer a level of sophistication that long claws just can’t match.

    From ultra-thin micro-tips to playful pastel swirls, we’ve curated 26 of the trendiest short French tip designs to inspire your next salon visit. Get ready to screenshot, because these looks are about to become your new personality.

    1. The Sweetheart Accent

    Starting off strong with a romantic twist! This look pairs a deep, glossy black-cherry polish with a single accent nail. The delicate heart detail at the cuticle of the ring finger adds a playful touch to an otherwise “femme fatale” vibe. It’s the perfect choice for someone who wants a bit of personality without sacrificing that sleek, dark aesthetic.

    2. The Abstract Deep Red Swirl

    Why stick to a straight line? This design reinvents the French tip by using negative space and swooping, asymmetrical burgundy curves. It creates a modern, architectural feel that elongates the nail bed—a great trick for shorter nails. It’s sophisticated, artistic, and very “high fashion.”

    3. The Alternating Modern Classic

    This style is for the indecisive (in the best way possible). By alternating between full-coverage deep wine polish and classic French tips with a matching dark edge, you get the best of both worlds. The contrast between the sheer nude base and the opaque dark nails makes the French tips pop with a crisp, clean finish.

    4. The Chocolate Cherry Micro-Tip

    Chocolate tones are the new neutrals. These nails feature a square-oval (squoval) shape with an ultra-thin “micro” French tip in a rich, dark espresso-cherry hue. This is the ultimate professional look—it’s understated enough for a corporate office but trendy enough for a weekend cocktail party. just like the previous design this one also alternates with only the frenchtips on the ring and middle finger.

    5. The Deep Plum Skinny French

    If you prefer a softer take on the dark trend, this deep plum or berry shade is a winner. The “skinny” French tip follows the natural curve of the nail perfectly, making it look incredibly neat and intentional. This look is particularly flattering on warm skin tones and looks especially luxe when paired with gold jewelry.

    6. The Midnight “Double” French

    This look is all about high-end contrast. The deep navy or black tips are applied with a slightly thicker “smile line,” giving the illusion of more length on a short nail. Look closely at the pinky finger—it features a gorgeous diagonal “V-cut” or double-wrap tip that adds a modern, geometric edge. It’s the perfect transition from the moody bordeaux to something a bit more architectural.

    7. The Butter-Yellow Micro-Rim

    If “Quiet Luxury” had a summer vacation, this would be it. These nails feature a barely-there, ultra-thin line of soft butter yellow. It’s a masterclass in subtlety; the line is so precise it almost looks like a halo around the edge of the nail. This is the ideal choice for anyone who wants to experiment with color without it feeling loud or overwhelming.

    8. The Daisy Duo

    Spring is calling! This design takes the yellow French tip and elevates it with a tiny, delicate daisy accent on the ring finger. The use of a matte or soft-satin yellow against a high-shine nude base gives it a professional yet whimsical finish. It’s a “happy” manicure that’s impossible not to smile at.

    9. The Lemonade Slant

    Notice the difference in the tip shape here—instead of a traditional curve, these tips have a slight “slanted” or side-swept geometry in a bright lemon hue. This subtle change in angle is a great way to make short, square-cut nails look more elongated and slender. It’s fresh, citrusy, and perfect for a sunny getaway.

    10. The White Swirl Fusion

    We’re finishing this batch with a classic white French tip that’s been given a 2026 upgrade. While the middle and pinky fingers stick to the traditional crisp white tip, the other nails feature abstract, wavy white swirls over a sheer “your nails but better” base. Mixing patterns and solid tips like this creates a dynamic, custom-look feel that is very on-trend.

    11. The Silver Stud Micro-French

    Talk about a “cool girl” staple. This look takes a very thin, crisp white micro-tip and elevates it with a single, tiny silver stud at the center of the thumb. It’s a brilliant way to add a bit of “jewelry” to your nails without it feeling bulky. This design works exceptionally well on short, rounded nails, providing a clean, metallic edge that feels both edgy and expensive.

    12. The Marbled Square Tip

    For those who love a bit of “extra” in their minimalism, this design is a total winner. It combines sharp, opaque white French tips on the outer fingers with a gorgeous white marble/swirl effect on the ring and middle fingers. The sheer pink base keeps it looking soft, while the white-on-white texture adds a level of sophistication that’s perfect for a bridal look or a high-end event.

    13. The Classic “Cloud” French

    Sometimes, you just can’t beat the original. This is the quintessential short French tip—softly rounded, a milky nude base, and a perfectly symmetrical white tip that isn’t too thick or too thin. It’s often called the “Cloud” or “Marshmallow” French because of its soft, diffused finish. It’s the ultimate “palate cleanser” manicure that goes with every single outfit in your closet.

    14. The Heart-to-Heart Accent

    If you’re looking for something sweet but sophisticated, this is it. While most of the nails feature a classic, thick white French tip on an almond-short shape, the ring finger breaks the mold with a flurry of delicate white hearts. The “negative space” hearts over the natural nude base keep the look airy and light. It’s a top-tier choice for Valentine’s Day or just when you’re feeling a little extra romantic.

    15. The “Rich Girl” Square French

    This is the ultimate luxury aesthetic. It features a very short, crisp square shape with a perfectly straight white tip. Notice how the base color is a sheer, milky pink that perfectly mimics a natural, healthy nail bed. It’s polished, professional, and looks incredibly high-end. If you want your hands to look like they’ve never done a day of chores in their life, this is the design to show your tech

    16. The Baby Blue Sky Tip

    Who says French tips have to be white? This gorgeous variation uses a soft baby blue (or “periwinkle”) for the tips, creating a fresh, cool-toned look. The tips are slightly thicker and follow a soft squoval curve, making them feel modern and youthful. It’s a beautiful way to incorporate “Something Blue” into your look or simply to transition your mani into the spring and summer months.

    17. The Noir Oval French

    Classic, but make it edgy. These short, oval-shaped nails feature a jet-black tip that provides a striking contrast against a high-shine nude base. It’s the “Little Black Dress” of the nail world—timeless, versatile, and just a little bit mysterious. The way the black follows the deep curve of the nail bed makes this look particularly slimming for the fingers.

    18. The Sorbet Skittles French

    Can’t decide on a color? Wear them all! This playful “Skittles” French mani uses a different pastel shade for every finger—lemon yellow, mint green, bubblegum pink, and soft lavender. By keeping the tips thin and the base a consistent natural pink, the look remains cohesive and intentional rather than cluttered. It’s a total mood-booster.

    19. The Bright Pastel Palette

    Similar to the sorbet look but with a bit more “pop,” this set uses slightly more saturated pastel tones. The square-oval shape provides a larger canvas for the colors to show off. It’s a fantastic way to transition your style from spring into summer, looking especially vibrant against a white linen outfit or denim.

    20. The Lavender Luxe Square

    For a more unified colorful look, this soft lilac/lavender French tip is the way to go. The cool purple tones are incredibly trendy and offer a “calm” alternative to the traditional white. These are filed into a clean square shape, which gives the lavender a modern, structured feel. It’s feminine without being too “girly.”

    22. The Floral Lilac Fusion

    This design takes the purple palette a step further by mixing textures. It features a combination of full-coverage lavender nails and French tips adorned with tiny, delicate white flowers. The floral accents are placed right at the transition line, acting as a bridge between the nude base and the purple tip. It’s the ultimate “Spring Garden” manicure.

    23. The Minty Mix-Up

    Mint green is notoriously tricky, but this “half-and-half” set nails it. By alternating solid mint nails with mint-tipped French nails, the color doesn’t feel too heavy. The cool, crisp green is perfect for brightening up your look, and the short square shape keeps the mint looking modern rather than retro.

    24. The Glazed Cherry Micro-Tip

    This look is all about that “lit from within” glow. It features a super-fine, metallic or high-shine cherry red tip on a very short, rounded nail. Because the line is so thin, it almost looks like a delicate piece of copper or red-gold jewelry at the end of your fingertips. It’s a stunning, understated way to wear red without the maintenance of a full-color mani.

    25. The Bronze Goddess Chrome

    Metallic tips are the ultimate “cheat code” for making short nails look expensive. This look features a stunning rose-gold or bronzed copper chrome tip on a square-oval shape. Because the metallic finish reflects light, it draws the eye to the ends of the nails, making them appear longer and more polished. It’s the perfect companion for gold statement jewelry.

    26. The Iced Espresso Micro-French

    To round out our list of 26, we have this ultra-sophisticated chocolate brown tip. Brown is the “it” color of the season, acting as a softer, warmer alternative to black. This micro-French style is incredibly minimalist but packs a punch when paired with a glossy top coat. It’s the “espresso martini” of manicures—chic, dark, and always in style.

    Guide to Styling & Maintaining Short French Tips

    French tips on short nails have a reputation for being tricky. Too thick and they look chunky. Too thin and they disappear. But when you get them right? They’re the ultimate flex—polished, practical, and impossibly chic.

    The secret isn’t complicated technique or expensive products. It’s understanding a few key principles about proportion, placement, and maintenance. Use this guide to ensure your manicure looks expensive from the moment you leave the salon to the moment you reluctantly remove it two weeks later.


    1. Choose Your Tip Thickness Wisely

    The single biggest factor in whether short French tips look elegant or stubby is the proportion of the white tip to your nail bed. Here’s how to get it right.

    The Micro-Tip (1mm or less)

    Think of this as the “whisper” of French tips—just a hint of white along the edge. It’s ideal for very short nails or anyone with an active lifestyle who can’t afford a thick tip chipping off. The illusion? It makes your nail bed look longer than it actually is. Ask for “baby French” or “micro French” at the salon.

    The Deep Curve Smile Line

    Have wide nail beds? This is your secret weapon. Instead of a flat or gently curved tip, request a “deep smile line” where the white color travels further down the sides of the nail. This creates the illusion of longer, slimmer fingers by visually narrowing the widest part of your nail. It’s a small adjustment with dramatic results.

    The Bold Block Tip

    Reserved for square or squoval shapes (think image #15 in our gallery), this look features a thicker, straight-across white tip. It reads as modern, intentional, and slightly retro—like a 1960s twist on a classic. The key is keeping the line razor-straight and the opacity high.


    2. Match the Base to Your Skin Tone (Seriously, Do Not Skip This)

    A French manicure is only as good as its foundation. The “nude” part should look like a perfected version of your skin—not a one-size-fits-all beige.

    Cool Undertones (you burn easily, veins look blue):
    Reach for sheer “ballet slipper” pinks, milky whites, or shades with a subtle blue undertone. These brighten fair skin without looking chalky.

    Warm/Olive Undertones (you tan easily, veins look green):
    Look for peachy-nudes, sandy beiges, or sheer honey tones. These warm shades complement golden skin and prevent that “mannequin hand” effect.

    Deep Undertones:
    You have options. Rich caramels create a stunning contrast with bright white tips. Sheer cocoa shades look sophisticated and expensive. Or go for a completely clear “glass” base and let your natural nail tone provide the contrast—it’s unexpectedly modern and grows out invisibly.

    Pro Tip: Bring a reference photo to your appointment, but trust your nail tech if they suggest a different nude. They’re holding it up to your actual hand and can see what truly works.


    3. How to DIY the Perfect Line at Home

    Attempting French tips at home? Respect. It’s not easy, but these hacks will get you closer to salon results.

    @hannah.bausch

    The easiest way to do french tips on on your nails!! If you haven’t tried a nail stamper yet I highly recommend🫶🏼 #diynails #diynailsathome #nailtutorial #frenchtipnails #nailarttutorial

    ♬ original sound – Hannah Bausch

    The Silicone Stamper Hack (Game Changer)

    You know those silicone stamps for nail art? Use them for French tips. Apply a thin layer of your white polish to the flat surface of the stamper. Let it dry slightly (about 30 seconds). Then, gently press your nail tip into the polish at a 45-degree angle. Lift straight up. You’ll get a perfectly curved, crisp line every time. This works for gel and regular polish.

    The Striper Brush Method

    Stop trying to paint the smile line with the brush that came in the bottle. It’s too thick. Invest in a long, thin “striper” brush (available at any beauty supply store for a few dollars). Dip it in polish, wipe off excess, and draw the line with the brush perpendicular to your nail. You’ll have infinitely more control.

    The Concealer Brush Cleanup Trick

    Even pros need cleanup. Dip a flat concealer brush (the kind with a precise edge) into 100% acetone. Wipe off the excess so it’s barely damp. Then, “carve out” the smile line by running the brush along the edge of your white tip. This removes mistakes instantly and gives you that sharp, salon-quality finish.


    4. Pro Maintenance: Making Them Last Two Full Weeks

    Short nails are high-traffic zones. We type, text, cook, and clean with our fingertips constantly, which means the tips are the first to chip. Here’s how to fight back.

    The “Cap” Technique (Non-Negotiable)

    Every time you apply color and every time you apply top coat, run the brush horizontally along the very edge (the thickness) of your nail. This “caps” the free edge with polish, sealing it and preventing water and friction from lifting the product. It adds maybe 10 seconds to your routine and doubles your wear time.

    The Mid-Week Refresh

    French tips show wear faster than solid colors. By day four, you might notice micro-scratches or a slight dullness. Solution: Apply one fresh, thin layer of high-shine top coat. It fills in the scratches, restores the “wet” look, and buys you another several days before removal. Think of it as a facial for your nails.

    Glove Up (Seriously)

    It feels old-fashioned, but wearing gloves while washing dishes or using cleaning supplies is the single most effective way to extend the life of any manicure. Heat, water, and chemicals soften polish and cause lifting. Five minutes with gloves on saves you five days of wear. Worth it.


    What to Ask Your Nail Tech (The Cheat Sheet)

    Save this for your next appointment:

    “I’d like a short French tip. Can we do a micro-thin tip with a deep smile line? And can you help me pick a nude that matches my undertones—maybe something with [pink/peach/cocoa] in it?”

    That’s it. That sentence communicates everything they need to know.

    Final Thoughts: Small Nails, Big Impact

    If there’s one thing these 26 looks prove, it’s that you don’t need two-inch extensions to make a high-fashion statement. The beauty of the short French tip lies in its versatility—it’s the only manicure that looks just as good with a morning coffee as it does with an evening gown.

    Whether you’ve fallen in love with the “Micro-French” minimalism of #7 or the moody “Iced Espresso” of #26, remember that the best manicure is the one that makes you feel most like you. By matching your base to your skin tone and using the “capping” technique we discussed, you can keep that fresh-from-the-salon glow for the full two weeks.

    So, go ahead—screenshot your favorite, book that appointment, and embrace the chic, low-maintenance world of short French tips. Your cuticles (and your keyboard) will thank you.